Category: Massage Injury Prevention

  • Massage Injury Prevention: How to Save Thumbs + Index Fingers

    Massage Injury Prevention: How to Save Thumbs + Index Fingers

    At first, this is not going to sound like a massage injury prevention guide for your thumb and index fingers, but it really is.

    Ready?

    Your client, Taro, is waiting on the table. When he was changing you had grabbed a quick snack, but then remembered that you nails were like daggers.

    You frantically fumble for your nail clippers but know if you don’t get in that room like now, Taro is going to be major grumpy. You decide that you only have time to cut 3 nails per hand. Which 2 nails on each hand are you going to leave uncut?

    Let me see if I can guess…

    …hmm…

    …could it be these two?!

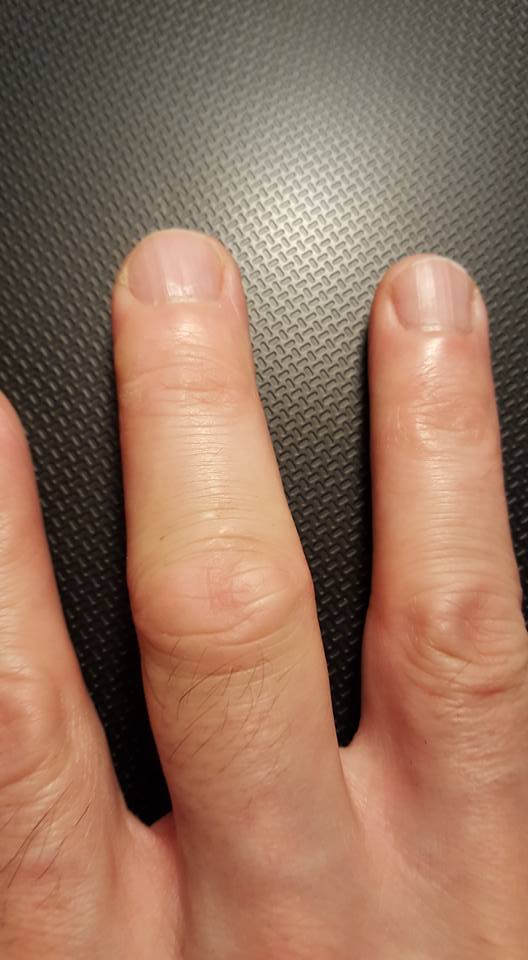
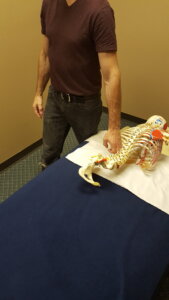
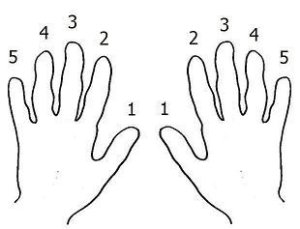
    Let’s take this a step further. Here are two hands. The fingers are numbered 1 – 5, starting with the thumbs.

    If you taped your 4th and 5th fingers to your palm, could you do a massage?

    Yeah, no problem, right?

    Now imagine that 1, 2 and 3 are taped down to your palm. That massage ain’t happening, is it?

    For me, fingers 1 and 2 do the most massage work. Finger number 3, the middle finger, comes in third. Finger 4 gets used some. And finger 5 is basically along for the ride unless I’m squeezing which I rarely do (Trap Release Without Squeezing).

    Years of Overuse Can Cause A Massage Injury

    Now imagine what happens after 20 or so years of primarily using fingers 1 and 2. It’s a massage injury waiting to happen, right?

    Here’s a common sense but under-utilized strategy that will set you on a course to saving your thumb and index finger.

    The strategy is: Take the workload off the overworked parts. Also known as use overworked parts less.

    How to Prevent a Finger Massage Injury

    Experimenting with Fingers 4 and 5

    For the longest time, when it came to massage, fingers 4 and 5 were decorations on my hand.

    But when fingers 1 and 2 started to feel persistently tight, I started experimenting with offloading some of the work to fingers 4 and 5.

    At first, it was like trying to eat with my non-dominant hand. But after a few months, fingers 4 and 5 started to adapt, and fingers 1 and 2 got happy again.

    Substituting fingers 4 and 5 for fingers 1 and 2 has its limitations, but the substitutions work particularly well in these situations:

    Three Ways to Use Fingers 4 and 5
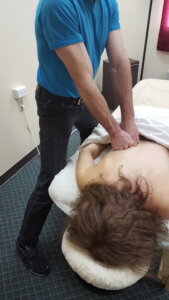
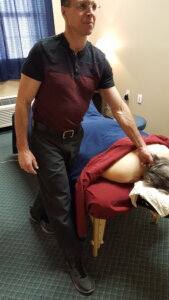
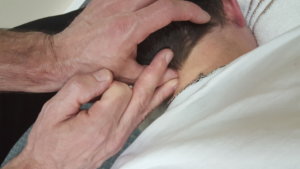
    Supine Occiput Work

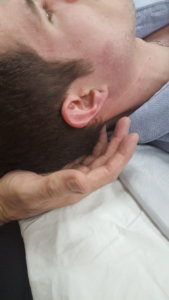
    This is the best starting point for engaging fingers 4 and 5 more and using fingers 1 and 2 less.

    Why?

    Because you don’t have to press hard with fingers 4 and 5 to do this technique. The weight of the client’s head resting on your fingers creates the pressure. And slightly pressing up with fingers 4 and 5 is a great way to start to strengthen them.

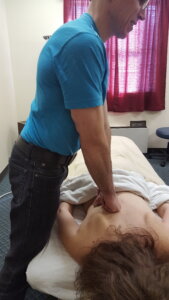
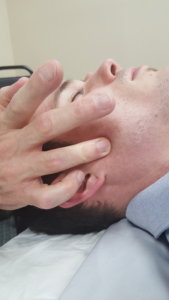
    Temporalis, Masseter, and Pterygoids Work

    From a requiring strength standpoint, working jaw muscles is a more advanced move than the supine occiput work. I would start by getting some reps in with fingers 4 and 5 on the body of the temporalis.

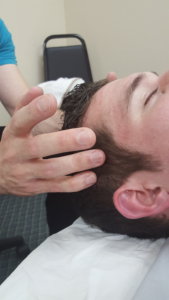
    Then I’d work in the masseter and pterygoids.
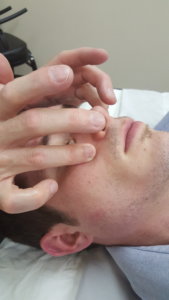
    Sinus Work

    When you’re ready to fine tune your pressure with your 4th fingers, try them out on sinus cavities. It’s definitely challenging at first, but like anything else, it gets easier after a few attempts.

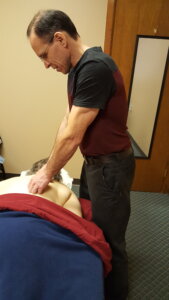
    Cervical Work (Light to Medium Pressure)

    When you resign yourself to learning how to spread the workload out to prevent a massage injury, it’s only natural to experiment. I find that it’s during heavy massage weeks, when body parts get tired, that I experiment the most. This move came about when I had a lot of necks to do in one week.

    I’m combining finger 4 and my thumb on the opposite hand. This combination is good for light to medium pressure.

    Going to the Next Level

    If you want to take spreading the workload out to the next level, try substituting fingers 4 and 5 for other tasks that finger 1 and 2 do.

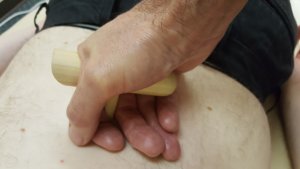
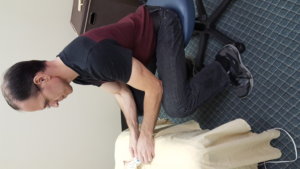
    For instance, when I’m doing a massage, this is how I usually get cream from a massage cup.

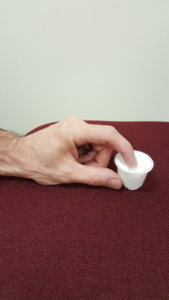
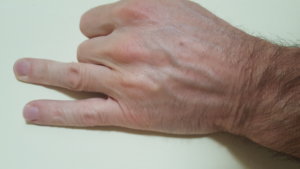
    Finger #2 working hard.

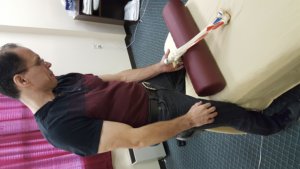
    Here’s what I try to do now.

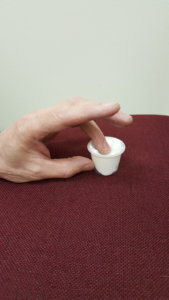
    This is a minuscule task in the grand scheme of overuse. But in this case, it’s not about changing an action to prevent a massage injury. Instead it’s about making you feel more adept using finger 4. When I do things like this, I want to use fingers 4 and 5 more often in daily life. Here’s what I mean.

    Spilling Over Into Life

    The other day my wife was watching me type, or as she put it “pound the keyboard”.

    What can I say, I GET EXCITED WHEN I WRITE!

    But she also made another interesting observation. She pointed out that I was only really using 3 fingers on each hand to type.

    Guess which ones?

    Yep, fingers 1, 2  and 3.

    Well, of course, I can’t let this go. So, I’m fixing this by forcing myself to use fingers 4 and 5 about 15%ish of the time when  I type. I hate it because it really makes me slow down. But I know I’ll like the end result.

    At this point, I need to talk about obnoxious thumb pain. If you’re in a state where your thumbs are aching all the time, you’re going to want to seriously consider these suggestions.

    Other Ways to Save Your Thumbs and Index Fingers

    This is my favorite:

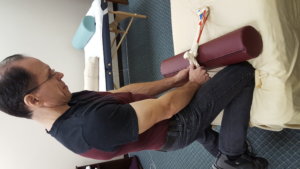
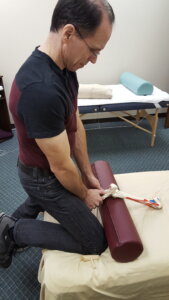
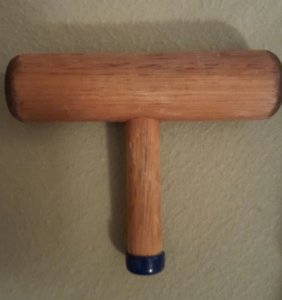
    1. Use a T-bar or an L-bar.

    The T-bar…

    …and L-bar

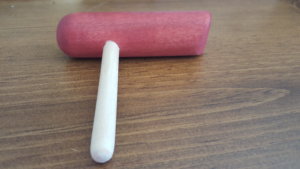
    …are my top choices for massage tools. For one, they have a simple design which means you can hold them in a variety of ways. Over-designed tools lock you into one or two holds.

    T-bars and L-bars are the ultimate thumb savers because they literally substitute for thumbs. And they don’t stress thumbs because you can hold them in many different ways.

    Here’s a quick T-bar and L-bar intro: Save Your Hands: Use a T-bar and L-bar.

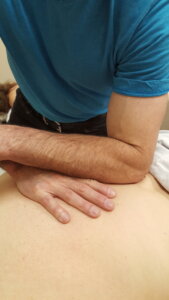
    1. Use knuckles and fingers in combinations.

    Combining body parts is foundational to saving your thumbs. When you combine body parts, you brace and stabilize joints and spread out the workload.

    If you want to get started combining body parts, begin here: How to Do Very Precise Pressure

    The last thing you need to know is that you have to experiment.

    Embrace the Experiment to Prevent a Massage Injury

    Experimenting live (on a client) is a little scary because we’re not sure how it feels to the client.

    You can lessen the chances of the client saying “Ouch! What the hell are you doing?!” by first working on people who can give you immediate feedback, like friends.

    I never use this approach for this reason: I’m a wimp. If something hurts during a massage, I want it to stop hurting. So, automatically, I start experimenting with different techniques until the pain goes away.

    Introducing a New Technique

    So, when I introduce a new technique, I look for warning signs with the client, like a leg twitch, as an indicator to determine if what I’m doing is okay.

    And I don’t spend a lot of time using that new technique at first. Rather I introduce it briefly, look for client reactions, and then reintroduce it in small doses. It slowly becomes a tool in my toolkit when I know clients like the technique and I’m comfortable with it.

    Joyriding with Fingers 4 and 5

    Ready to take fingers 4 and 5 for a spin?

    I’d start with supine occipital work. Then I’d try out jaw work, and when I felt comfortable with that I’d fine-tune my finger 4 touch with sinus work.

    If you’re thumbs and index fingers need a serious break, try using a T-bar, L-bar or body part combinations.

    Now you have the information that will help you prevent a massage injury to your thumb or index finger. And if you’re currently in pain, experiment. You just need to find the way out.

    Get Help With Your Specific Pain Issue

    If you need more help with saving your hands (and the rest of your body) when you massage, consider reading my DIY book, The Pain-Free Massage Therapist.

    About seven years ago my body was falling apart after 20+ years of massage. I gave myself a year to figure out how to massage pain-free, and if I couldn’t, I’d have to find a new career.

    In that year I discovered the things I was doing wrong for my body in the massage room. But the process to becoming a pain-free massage therapist was not as simple as replacing one technique with another. It involved changing my thinking so that I caught trouble before it happened along with knowing how to adjust when I was in pain.

    This book is your head start. You don’t have to come up with the strategies and techniques to save your body. You just need to try out the ones I recommend. Keep the ones that work for your body; pass on the ones that don’t.

    The book comes with a website link where you can access free how-to-massage-pain-free videos. You can purchase the book on Amazon.

    Purchase Book

    If you have any questions or want to talk about your specific pain issues, email me mark@makethemostomassage.com 🙂


  • Your Injury Can Be An Opportunity

    Your Injury Can Be An Opportunity

    A few winters ago I had dry-skin challenges of winter and I developed a significant skin crack on the knuckle of my right middle finger. This knuckle is a tool that I use when I need to deliver precise, deep pressure.

    At first, I thought about cancelling some deep pressure clients, but I didn’t. Instead I worked around the injury—and I’m glad I did. For one, I got better at using my left (non-dominant), middle-finger knuckle to deliver deep pressure. I also “created” and got efficient at using new power tools (two or more tools—fingers, thumbs, knuckles, fists, elbows-forearms—that are used together). In essence, my injury helped me become a more durable and balanced therapist. Here’s my process for working around a hand injury:

    Think “Work Around” Not “Work Through”

    We’ve all done it–repeat the same mistake over and over. My injury was a perfect example. At first I taped my knuckle and tried to work through the discomfort, like I’ve done in the past, but my knuckle just got angrier. Finally, after my knuckle became sore to the touch, I decided to work around the injury instead of through it. In other words, I would not use, or minimally use, my right, middle-finger knuckle. Instead I would figure out other ways to deliver precise, deep pressure. When I gave that knuckle a rest, it finally had time to heal and within a week, it was good to go again. This time I think (hope) the lesson has stuck.

    Think: Opposite Side

    Since I wasn’t going to use my right, middle-finger knuckle during a massage and I wasn’t cancelling any clients, the pressure was on. I needed to immediately figure out new ways to deliver precise, deep pressure during the upcoming scheduled massages. The good news was that I was familiar with using my left, middle-finger knuckle to deliver deep pressure, but I just wasn’t good at it. So with my right knuckle out of commission, I put my left knuckle to work. It took some work but to my surprise, within 10 massages I felt competent with my left knuckle. Which begs the question: If my right knuckle wasn’t injured, would I have ever gotten better with my left? My guess is probably not.

    Think: T-Bar

    I also tried substituting my thumbs and fingers for my right knuckle, but this wasn’t sustainable because I used my thumbs and fingers a lot throughout a massage already. So I started experimenting with my T-bar. The fact is that I also used my T-bar a lot throughout a massage, but the T-bar didn’t overtax my hand muscles and finger joints because I could hold it in a variety of ways. Substituting the T-bar for a knuckle was new to me, but I found it to be an excellent substitute when doing precise, deep pressure in the arches of the feet, on the levator scapulae attachment and in the upper cervical areas.

    Think: New Power Tools

    Though I had temporarily stopped massaging with my right, middle-finger knuckle, I habitually kept placing my hands down as if I were going to use my injured knuckle. When that happened I found myself experimenting with using other knuckles on my right hand. Because I never experimented with these knuckles individually, it felt comfortable to support them with another tool. Soon I had more power tools (two or more tools—fingers, thumbs, knuckles, fists, elbows-forearms—that are used together) at my disposal. My new power tools were right, pinky-knuckle braced with left thumb and right, index-finger knuckle braced with left thumb. These combinations were great for detail work in the back and upper shoulders.

    In this video I demonstrate some combinations:

    The Rewards

    There’s no doubt that it can be scary when you get injured. But if you can work around an injury there’s potential for multiple payoffs. For one, you’ll become more versatile with under-used tools. You’ll also begin to “create” and use new power tools in ways you never imagined before. Lastly, you’ll feel more confident in your ability to succeed in massage because despite being injured you will have gotten the job done without compromising the quality of your work.

    Can you massage pain-free?

    Take the pain quiz and get an instant video that will help you with your pain problem.

    PAIN QUIZ
  • How to Stop Your Traps From Aching

    How to Stop Your Traps From Aching

    If you struggle with pain around the neck and upper traps when doing massage, here’s one simple massage strategy that could help you out: sit down when you can.

    Pain in the Trap Area

    When the orthopedist diagnosed me with an unstable shoulder and cervical radiculopathy a while back, I knew I needed to change some things around or I would have to find a new career. At the time, pain symptoms kicked up in trap/levator scapulae area when I was doing detailed work and having to stand in one position for a long time.

    Then one day I sat down to work the neck of a client who was prone. I rested my forearms on my knees and the pain in the trap/levator scapulae area practically went away. But as I pressed, the pain returned.

    To me, this pain could be associated with muscular contraction of my neck and upper shoulders and/or a change in my shoulder/neck positioning. I wondered how I could take “contracting my shoulder and neck muscles” out of the equation when doing seated massage.

    Over the course of the next year, I discovered the other piece of the puzzle: leaning.

    Seated Leaning

    I had become efficient with leaning to generate pressure when standing, but it didn’t cross my mind to lean when I was sitting and working. When I eventually did, the trap/levator scapulae area stopped acting up.

    The hinge for leaning when seated is the waist. When you’re leaning from the waist, the weight of your torso will sustain the pressure. If you’re not leaning, your shoulder and arm muscles will be working hard to sustain the pressure.

    seated-leaning-pic

    Seated massage is ideal for doing prone cervical work. In this video, I break down the process into 3 steps: sit, support arms, and lean: Seated Massage Body Mechanics Video.

    Sit and Work Using a Massage Tool

    I would strongly recommend experimenting with a massage tool in the seated position. Specifically, I would choose to work with an L-bar because it has a longer shaft than the T-bar. The longer shaft will allow you to get into the cervical erectors easier.

    When you use a massage tool like the L-bar while seated, you’ll be able to really focus your pressure because the end of the L-bar has a small surface area. This means that you’ll barely have to lean to generate appropriate pressure. I hardly feel like I’m working when I’m seated and leaning with my L-bar.

    In this video–L-Bar Seated Massage Body Mechanics Video–I show how to sit, support, and lean when working the neck with an L-bar.

    Create Your Own

    There are many other ways that you could incorporate seated massage into your massage routine. Here I’m working the plantar side of the foot with my arms supported on my legs. From this position, I can easily get my pressure up to medium.

    seated-lean-supported-with-legs-pic

    If I need deeper pressure, I would stand and support my arm and hand with my leg.

    standing-supported-pic

    If you want to give your hands a break, try the same standing supported-arm technique with a T-bar.

    tbar-one-hand-foot

    It’s Not Hard

    There is only one way to change how your body feels when doing massage and that is to experiment. If you’re having trap area problems, try doing some of your work seated.

    In my book, the three most important steps for seated massage are:

    1. Sit
    2. Support
    3. Lean

    Once you get those down, think about adding “looking straight ahead”and you’ll put even less strain on your traps/neck.

    Watch a Video Before You Start Your Next Client

    For quick reference, here are the videos. They are short so that you can watch them during the time you allot for your client to get on the table.

    Seated Massage Body Mechanics Video

    L-Bar Seated Body Mechanics Video

    Massage doesn’t have to hurt you. Keep experimenting. And if you need some help, let me know.

    Can You Massage Pain-Free?

    Yes.

    Start by taking this pain quiz and you’ll get an instant video solution to your pain problem.

    PAIN QUIZ


  • Massage Body Mechanics Courses

    Massage body mechanics has a physics part (what is the most efficient way to massage in general) and a personal part (what is the most pain-free way for you to massage).

    It’s been my experience that the personal part is often left out of most massage body mechanic courses.

    But it’s the combination of the two—general efficiency and personal efficacy—that should determine your body mechanics when doing a massage.

    Let’s breakdown these two aspects of body mechanics further.

    The Physics Part of Body Mechanics

    Would you agree that if you’re doing light pressure massage you’re less worried about straining muscles and injuring joints?

    In my experience, it’s the medium and deep pressure that causes pain. So, what’s the most efficient way to deliver medium to deep pressure?

    I would argue it is to use your body weight to generate pressure.

    If you can transfer your body weight onto the client you don’t need to press with your upper-body, and it’s much easier for you to keep your shoulders, elbows and wrists aligned. When you can keep your joints aligned, the assumption is that you’re less likely to injury a joint.

    In this picture you can see that my table is low.

    It’s low so that there is enough distance between my client and myself so that I can transfer my bodyweight onto the client when I lean.

    If my table were high, I wouldn’t be able to do that.

    Ah, Mark, but a low table will hurt my back.

    That would be true if you didn’t do this one thing—use the table for support.

    Take a look at this pic.

    Do you see how my one leg is leaning against the table?

    The massage table is actually helping to support my weight which takes the strain out of my back. I could even straighten up if I wanted to.

    To get an idea of how leaning against the table can take the strain out of your trunk muscles just lean against the wall. Muscularly speaking, it’s a lot easier to stay upright, right?

    Leaning and using your body weight to deliver pressure efficiently takes a little practice, but is not crazy hard to do.

    The challenge to good body mechanics is part two—the personal part of body mechanics.

    The Personal Part of Body Mechanics

    We all come in different shapes and sizes and injuries and challenges. Theoretically, leveraging your body weight may look good on paper, but it may not be the pain-free thing to do for your body in every massage situation.

    My wife, Lisa, is a massage therapist, too. She uses her upper-body a lot when massaging and that can aggravate her neck and shoulders.

    She does not work on a low table because she doesn’t want to lean into the massage table for support. It’s physically and mentally uncomfortable to her.

    So, if she did work on a low table without leaning into the massage table for support she’d aggravate her low back which is already set up for pain issues.

    Time to trash the strategy of leaning to generate pressure for Lisa?

    Not at all.

    Lisa does a lot of her massage work sitting. She can lean when sitting down.

    Okay, that’s me leaning while sitting, but you get the point. I’m leaning to generate pressure rather than contracting my upper-body to generate pressure.

    Let’s go through another example. I’m going to use me. Many years ago I was a forearm massage therapist. But overtime cervical radiculopathy and an unstable left shoulder caught up with me and anytime I did forearm work, my left neck and arm ached and my elbows and hands would tingle.

    It didn’t matter if I was leaning with my shoulder stacked over my elbow—I still was in pain.

    I decided to take my shoulder and neck out of the equation by leaning on my fists instead of my forearms.

    Well, that meant that I had to lower my table even more so that I would have enough distance between my client and my fists to transfer my body weight onto my client.

    Once I did that I could stack my shoulders over my elbows and my elbows over my wrists.

    Guess what?

    No more neck and shoulder pain.

    So, leaning, keeping my work below and in front of me and keeping my joints stacked pretty much took care of my shoulder and neck pain when massaging.

    These kinds of experiences made me realize that when I taught  “good massage body mechanics” to a massage therapist, I was actually teaching strategies not axioms.

    I was saying to the massage therapist: Go ahead, take this strategy out for a test drive. How does it ride?

    Sometimes the massage therapist would just need to let the new strategy settle in, sometimes we would need to tweak the strategy to make it work for a specific requirement and other times we needed to pass on the strategy altogether.

    The good news is that there’s not just one strategy to help a massage therapist massage efficiently and without being in pain. And at the end of the day I became confident that I could help any massage therapist find the strategies that would work for her/himself.

    Speaking of other body mechanics strategies, here’s another one: combining body parts.

    What do I mean when I say combine body parts?

    Combining Body Parts

    I’m talking about taking two body parts—fingers, thumbs, knuckles, fists, forearms—and putting them next to each other or on top of each other to brace and support each other.

    When I do this I create a very stable “tool” that doesn’t rely on one finger or thumb or joint.

    In this video you can see how I combine body parts for working in the lamina groove.

    Once you start experimenting with combining body parts, you are going to start to figure out what kinds of combinations work best for you and you’ll probably come up with a few of your own.

    Here’s another strategy for saving your hands: become ambidextrous.

    Become Ambidextrous

    Becoming ambidextrous is not as hard as you think. It simply requires practice.

    The trick is don’t try it all at once. In other words, sneak your non-dominant finger, knuckle or hand into a massage in short bursts. As you get more comfortable with your non-dominant hand you can work in longer periods of time.

    Here’s one of my favorite body mechanics strategies: break static posture.

    Break Static Posture

    What is static posture?

    It’s a fixed body position.

    Think hairstylists, dentists, mechanics, data entry workers, and us, massage therapists.

    The problem occurs when you’re in a fixed position for extended periods of time while you’re physically exerting yourself.

    Why is that bad?

    Because protracted  static posture increases loads or forces on muscles and tendons in specific areas. When this happens fatigue occurs in these areas because blood flow is impeded. When blood flow is impeded there’s less replenishing of nutrients and elimination of metabolic waste. In other words, tissue recovery is not good.

    It’s a perfect set up for back pain.

    Now think about your way of doing massage. Seeing some static posture moments?

    Time to make some adjustments.

    Here’s a common static posture in massage.

    Hunching with head down.

    So how I can I interrupt this static posture massage cycle without rewriting how I do massage?

    One way is to find times during the massage when you can change your back position. Here’s one way:

    Massage with one hand so that you can straighten up.

    Or take a knee on the table when standing and working on feet.

    In this video you can see how I interrupt static posture when working the subocciptals.

    Massage Body Mechanics Course

    Massage body mechanics is more than just physics. What’s the point of applying the best theoretical body mechanics principles if those principles don’t keep you out of pain or worse, they put you in pain?

    In my book, body mechanics and massaging without being in pain are inextricable—and both must be considered when figuring out the best body mechanics for you.

    If you want to figure out the best body mechanics for you, I have a body mechanics online, home study CE course called How to Deliver Deep Pressure Without Hurting Yourself (3 CEUs).

    It’s NCBTMB-approved and you can check it out here.

    Want my latest information on staying out of pain when doing massage and building a massage practice? Sign up for my free, email group and I’ll send you my latest information.