Category: Massage Injury Prevention

  • Injury Prevention for Massage Therapy – This Worked For Me

    Here are seven “injury prevention for massage therapy” strategies that keep me out of pain and allow me to increase my massage max.

    1. Stop doing techniques that hurt you.
    2. Find replacements for techniques that hurt you.
    3. Use as many body parts as possible.
    4. Use your body weight to apply pressure.
    5. Interrupt static postures.
    6. Use a massage tool.
    7. Become ambidextrous.

    You may have laughed at the first strategy—stop doing the techniques that hurt you—but here’s the reality, it’s easier said than done.

    1. Stop doing techniques that hurt you.

    You learn a great scapula release technique at a CE class and your clients love it. Problem is, it hurts your hands. What do you do? Well, if you’re like me you keep doing it until it becomes a problem. I know I’m not the only one that does this.

    Once I was training Susan, a massage therapist who was working for us.

    She complained about that her right shoulder was really bothering her as the number of massages in a day increased.

    So, we went into the massage lab to investigate. As she was working on me (tough experiment for me, haha) she said, Now…it hurts now.

    Okay, what are you doing right now?, I asked.

    When I got off the table she showed me what she was doing. Her right hand was under my back and she was doing a supine subscapularis release technique.

    That’s it, she said, that’s exactly when my shoulder hurts.

    I then asked her, Have you tried a different release technique?

    She looked at me puzzled, and then said, I never thought about trying something different.

    I showed her a side posture subscapularis release technique and it didn’t cause pain in her shoulder.

    There was a flash of embarrassment on Susan’s face when she realized that she never thought about NOT doing the move that was hurting her shoulder.

    I told her that we’ve all been there. In fact, you still might be there.

    You might be thinking: This killer move is what my client wants, it’s my signature move, it’s the best move out there and/or I’ve done this move forever (in varying degrees of pain) so it’s my body that’s the problem, not the move.

    Okay, let’s get rid of this “if I’m in pain doing massage, it’s okay” out of our heads right now because there’s a cumulative effect with this mindset. And it can set you up for more pain and potentially an injury.

    No technique is worth an injury (or pain). If certain techniques bother your body, stop those techniques and…

    2. Find replacements for techniques that hurt your body.

    Here comes that voice again: “Nothing can replace my patented supine rhomboid move.”

    I’m here to tell that voice, Yes, that move can be replaced.

    And it can be replaced by a move that doesn’t hurt your body.

    You just need to start experimenting.

    For example, are you into squeezing traps?

    If so, how do your hands and forearms feel after a 6 hour day of squeezing.

    Mine didn’t feel so good. That’s why I started to experiment with different ways to release traps. In this video I use a massage tool to press instead of squeeze with my hands.

    Now that you’ve agreed to stop doing the techniques that hurt your body and are starting to think about replacement techniques that don’t hurt your body, it’s time to…

    3. Use as many body parts as possible.

    When I say body parts I’m talking about fingers, thumbs, knuckles, fists, palms, forearms and elbows.

    Why use as many body parts as possible?

    So that you don’t burn out one body part.

    Think about it—if you can alternate between fingers, thumbs, knuckles and elbows (in large muscles areas) for detail work, you can spread out the workload over multiple joints and body parts.

    Spreading out the workload amongst body parts may look like this for detail work: 20% thumb, 20% fingers, 20% knuckles, 20% elbow, and 20% massage tool (we’ll talk about massage tools in a minute).

    Hmm…100% using thumbs to do detail work versus 20% using thumbs…I’m going to say my thumbs will be a lot happier carrying only 20% of the workload for detail work.

    We covered some injury prevention strategies for detail work and general massage, but what about for deep pressure massage?

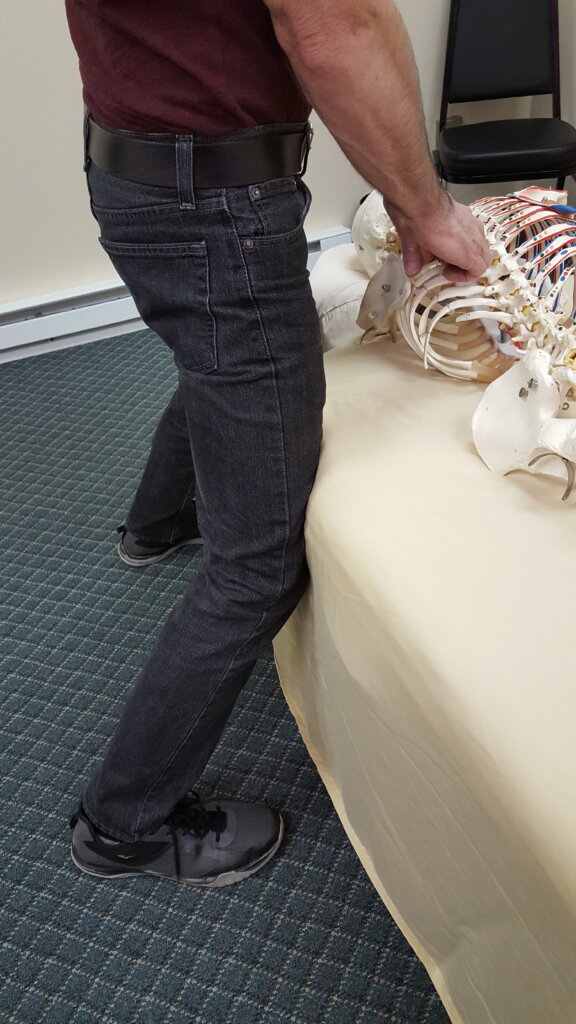
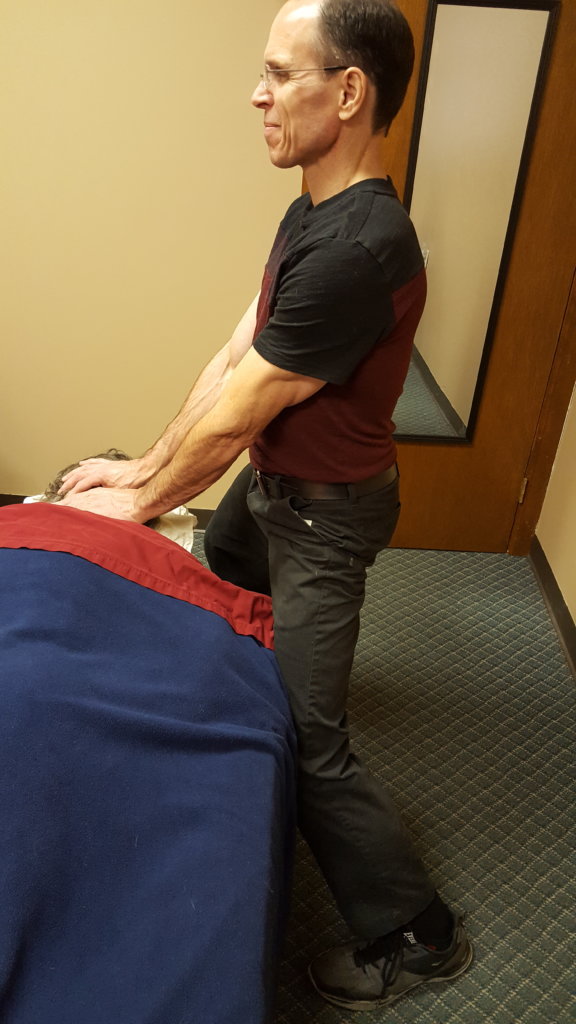
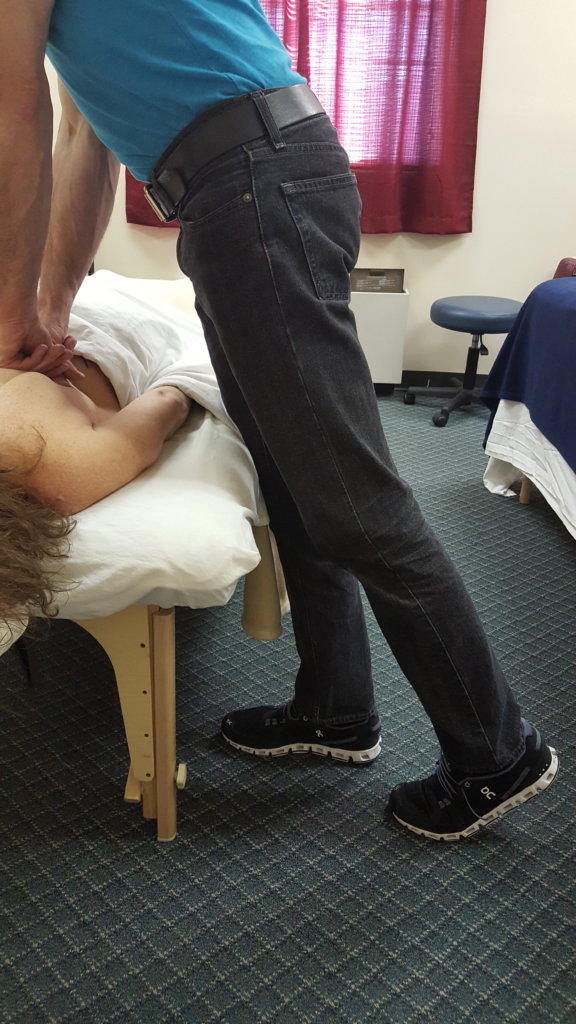
    4. Use your body weight to generate pressure.

    When you use your body weight to generate pressure you take the strain out of your upper body. In fact, applying pressure pretty much becomes effortless. But in order use your body to the point that you can transfer your body weight onto the client, you’ll need to lower your table.

    Twenty-five years ago I was taught that to set my table height, my distal knuckles should touch the top of the table when my arms were at my sides. Look on the Internet and you’ll find a range of table height advice, like: The height of your table should be your height divided by two.

    Though well intended, there are some serious flaws with standardizing a table height setting that result in a loss of leaning leverage for medium and deep pressure. With no leverage, backs, hands, arms and necks get trashed because you need to overuse your upper-body when doing deep pressure.

    But a lower than “normal” table is the set up to allow you to transfer all of your body weight (lean) onto the client.

    If you don’t believe me try leaning onto your client at your normal table height. Then lower your table to the lowest setting, better yet, take off the extender legs so that the table is even lower than the lowest setting. Now lean.

    Do you see how you can now transfer all of your body weight onto your client if you wanted to?

    It will take you some experimentation to figure out which lower table height setting works best for you when doing deep pressure. My suggestion is this: Whichever setting you’re thinking about lowering your table to, go one if not two settings lower than that.

    To learn more about working on a low table so that you can lean effectively, go here.

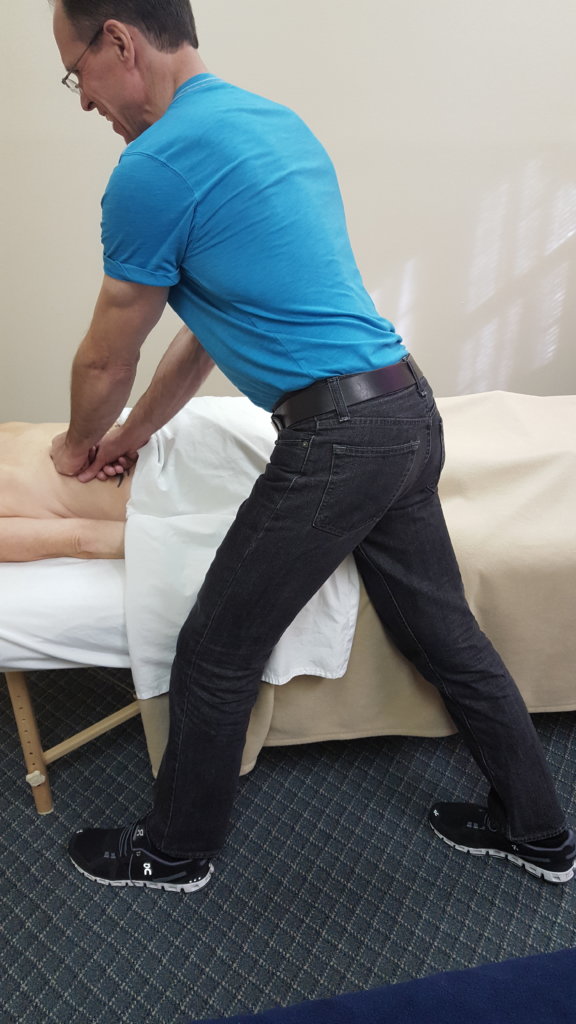
    Leveraging your body weight to deliver pressure is going to take the strain out of your upper-body, but we have something else to consider that can lead to fatigue and cause us pain and potentially contribute to injury—static posture. Here’s what we’re going to do:

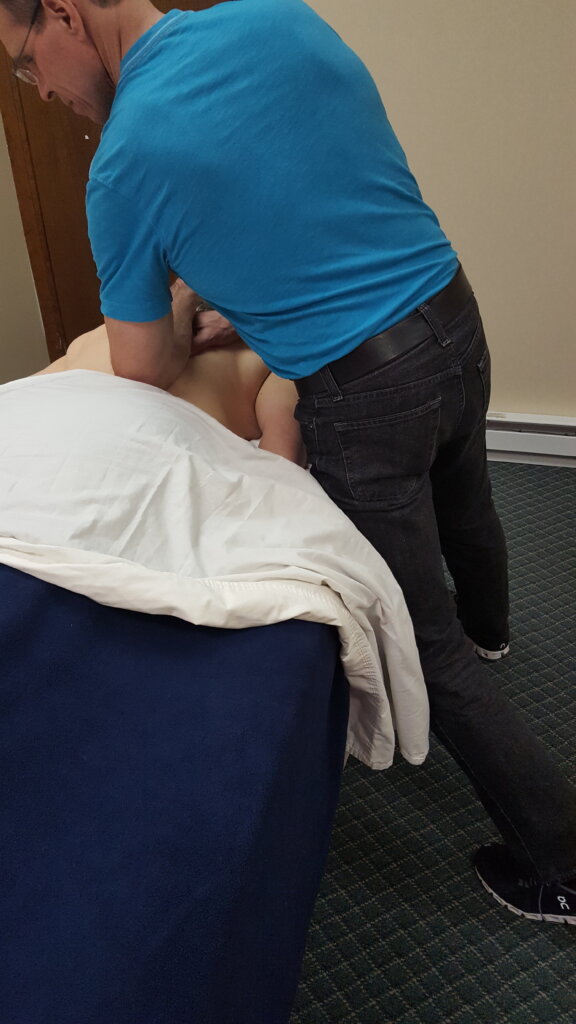
    5. Interrupt static posture.

    First, what is static posture?

    Static pressure is being in a position for a long time without moving. It often looks like this during a massage:

    Static posture is bad because protracted  static posture increases loads or forces on muscles and tendons in specific areas. When this happens fatigue occurs in these areas because blood flow is impeded. When blood flow is impeded there’s less replenishing of nutrients and elimination of metabolic waste. In other words, tissue recovery is not good.

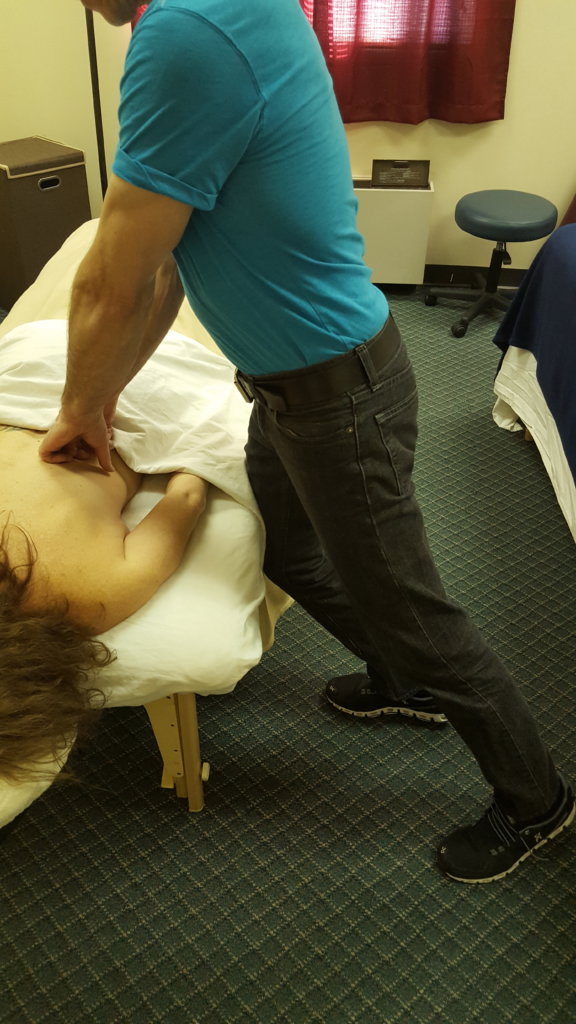
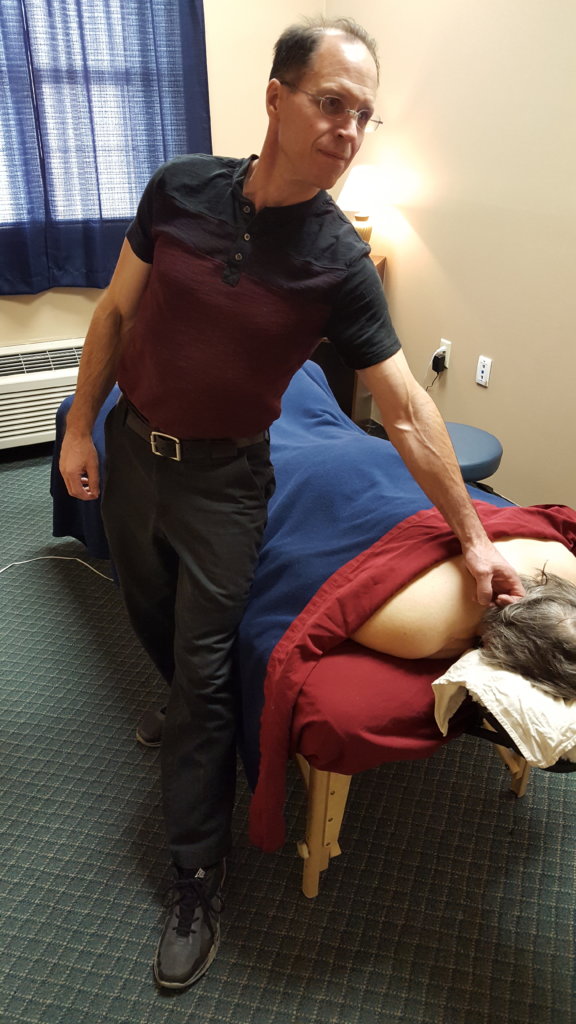
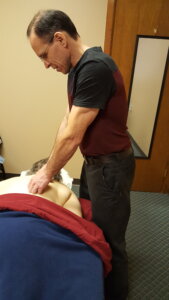
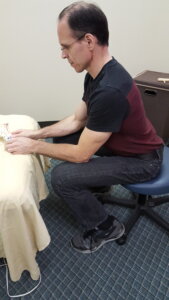
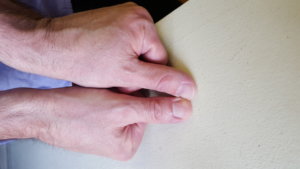
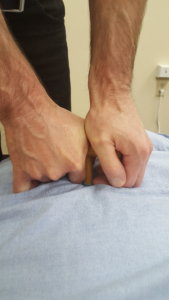
    Here’s an example of how you can disrupt static posture during a massage.

    Look at the picture above. I’m hunching with my head down, a common static posture position.

    So how I can I interrupt this static posture massage cycle without rewriting how I do massage?

    One way is to find times during the massage when you can change your back position. Here are some examples:

    1. Take a knee on the table when standing and working on feet.


    2. Sit and lean whenever possible.

    3. Massage with one hand so that you can straighten up.

    This article will give you a more in-depth understanding of how to break static posture during a massage: Don’t Do Static Posture Massage.

    Breaking static posture will become the norm once you start experiencing the huge benefits of not being in the same position all the time.

    Speaking of big rewards, I now want to show you how massage tools can save your hands.

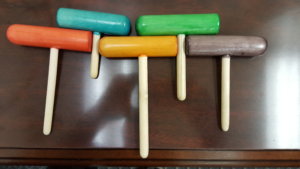
    6. Use massage tools.

    I’m not talking about any massage tool. I’m specifically talking about massage tools that have a handle and a stem.

    Why?

    Because a handle makes the tool easy to hold, and a stem does a fantastic job of simulating a thumb.

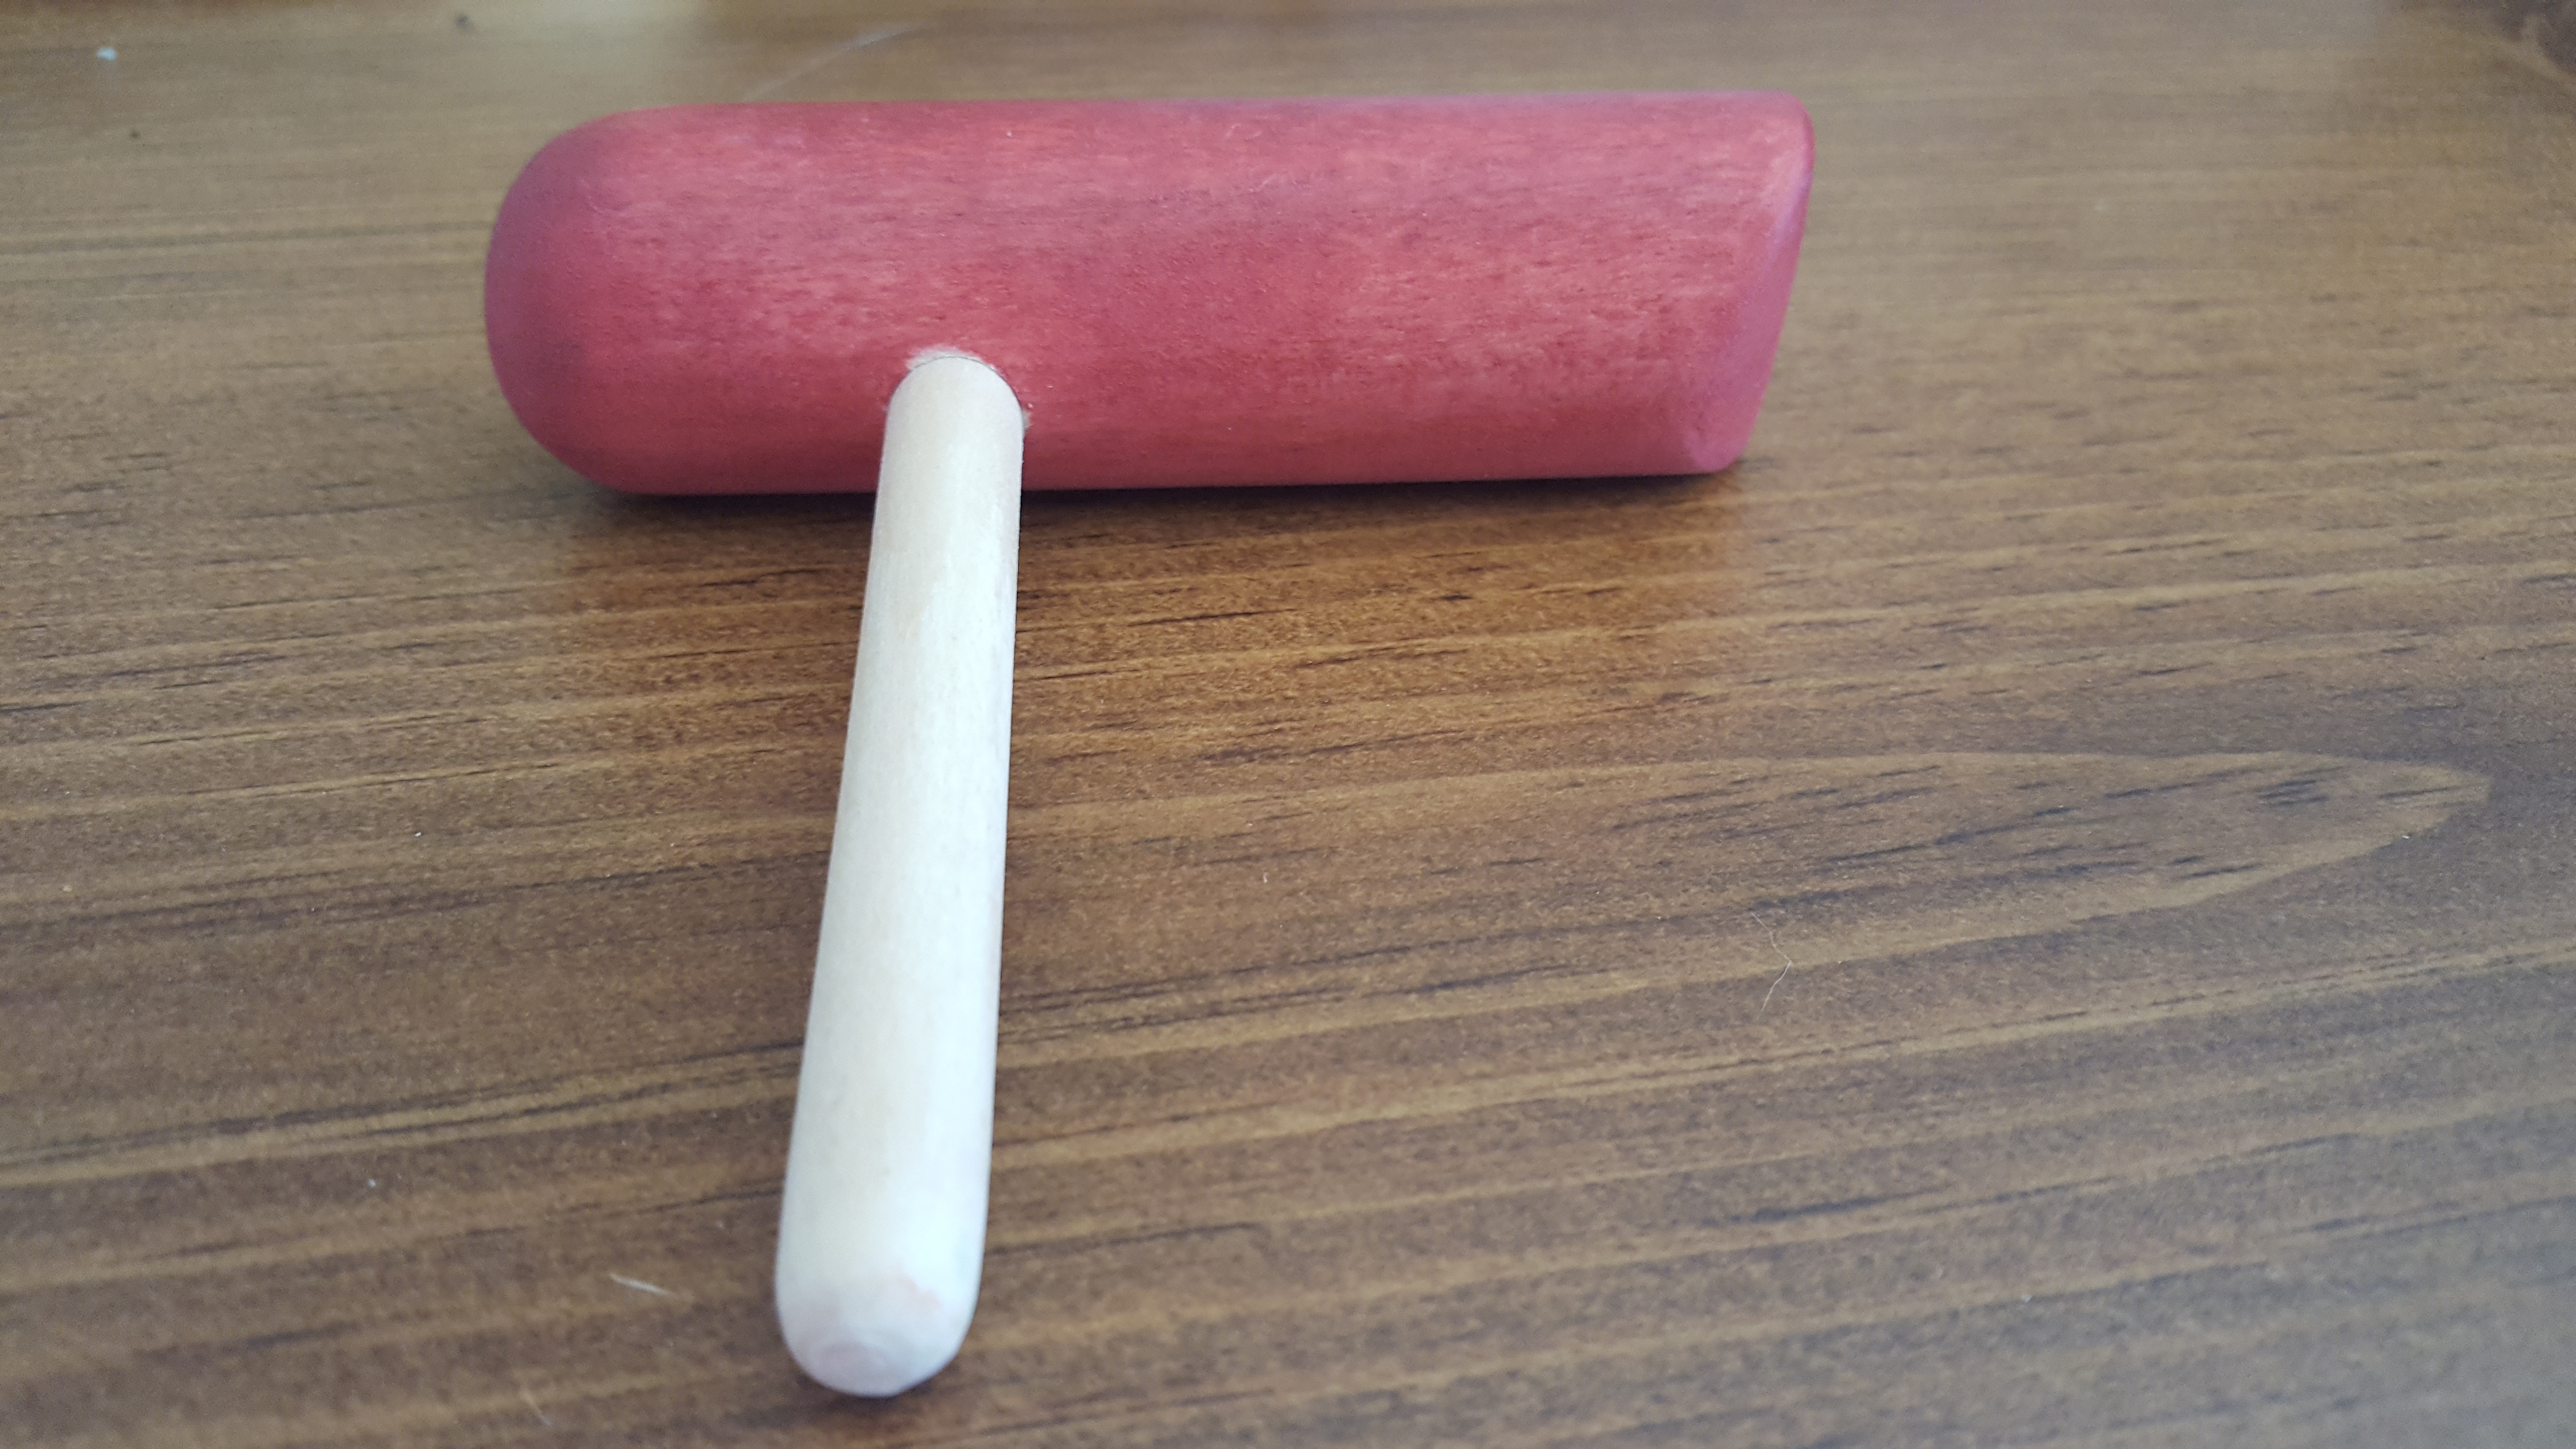
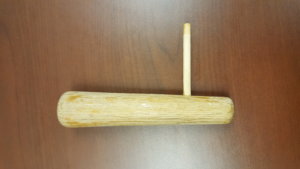
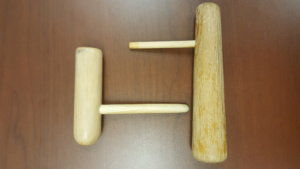
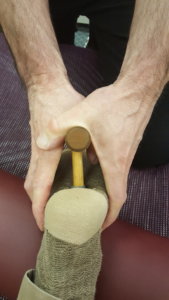
    Here what tools with handles look like:
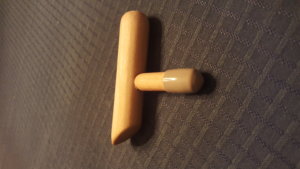
    Here’s a T-bar:

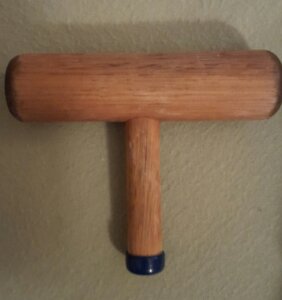
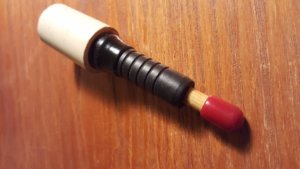
    And here’s a long stem T-bar:

    (Thank you Matt Johnson for designing and making my wooden tools!)

    Massage tools with handles come in a lot of different flavors, but I really want to emphasize the importance of the handle.

    The Importance of a Handle

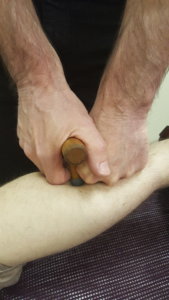
    The handle allows you to easily hold the massage tool BUT I’m not talking about holding a handle in the traditional sense–wrapping your hand around the handle and gripping.

    I’m talking about using the handle to support your body weight. Think of parallel bars or push-up stands where you’re simply supporting your body weight on an apparatus.

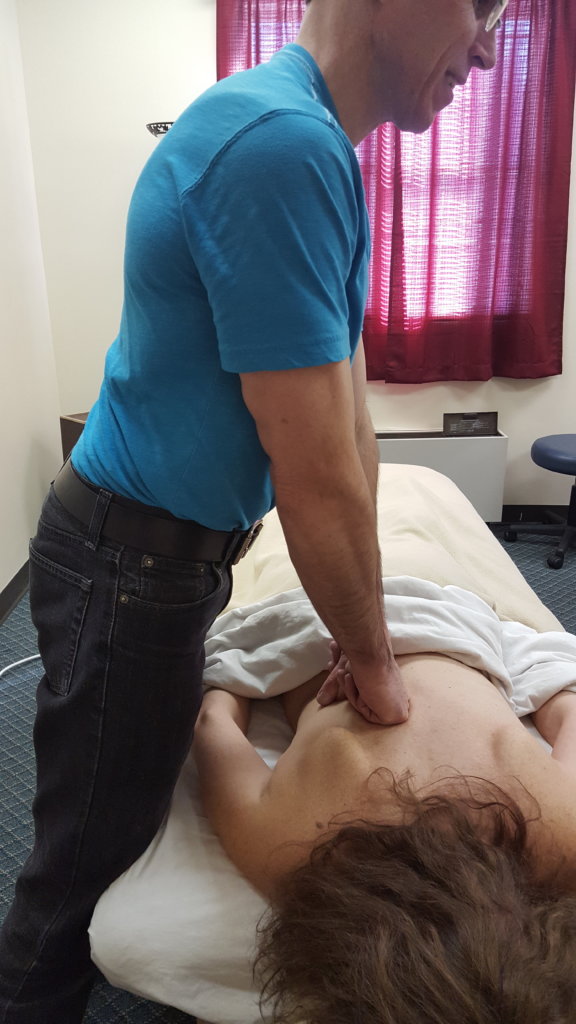
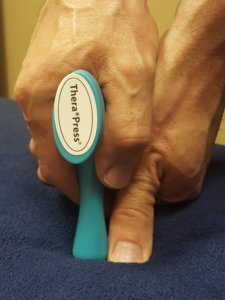
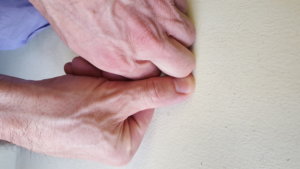
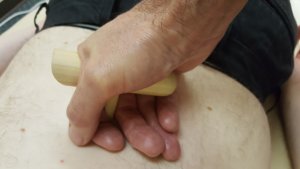
    Holding a Massage Tool

    With a massage tool you are directing some of your body weight onto the handle of the tool.

    If the massage tool is pinned between your hand and the tissue you’re working on, you can loosen your grip.

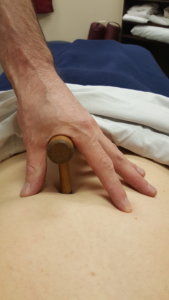
    And if you add a guide finger/thumb next to the end of the stem of the massage tool, you can actually relax your “holding” hand.

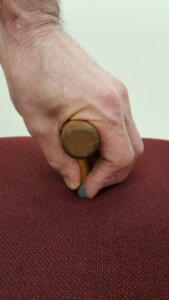
    Here’s what that looks like:

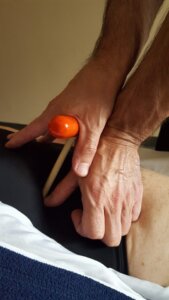
    See how relaxed my hands are?

    My guide fingers is helping to stabilize the tool. I’m also sensing how much pressure I am applying with my guide finger.

    This all looks great, right? But when you actually go and try to hold a T-bar or L-bar without gripping you’re going to say–Mark, you’re a freakin’ liar–because it’s not going to work.

    Why isn’t it going to work?

    Because your table won’t be low enough. And that means you’re not going to be able to lean onto the massage tool handle with enough pressure to keep the tool upright without gripping.

    Leaning into a massage tool, like leaning into the client with your hands, is not rocket science. It just takes practice.

    The last injury prevention recommendation I have is to…

    7. Become ambidextrous.

    Raise your hand if you’re severely one-sided!

    I was. It felt unnatural and inefficient to use my non-dominant side.

    Why?

    Because it WAS unnatural and inefficient to use my non-dominant side.

    But with a little practice I got a little better and soon the idea of becoming competent with my non-dominant side didn’t seem that farfetched.

    This isn’t exactly what I did, but I think it will get you to where you want to be. For the next 50 massages, every time you use a dominant-side body part for detailed work (e.g. right thumb), use a non-dominant-side body part (left thumb), too.

    Make it easy when you first start by only placing a non-dominant-side body part down for 1 or 2 seconds. Gradually add more time.

    As you add time, explore with the non-dominant-side body part.

    Why not? We have the perfect work situation to explore.

    Seriously.

    For one, we can eye the client for reactions.

    Get a squirmy reaction, then stop and try again in a different place or on a different client.

    We also know what it feels like to get a massage. We know when pressing on a spot too long starts to feel uncomfortable.

    And that on-the-table sense is always running as we’re doing the massage. To build that sense up, get more massages. I’m always amazed how much I learn when I’m actually the one getting the massage.

    Injury Prevention for Massage Therapy in a Nutshell

    If you’re feeling like injury prevention is a little daunting, step away from my specific recommendations for a minute and think in broader terms.

    To prevent repetitive stress injuries you don’t want to keep racking up the massage hours with a particular body part, like your thumbs.

    So what do you do?

    You can become ambidextrous, use many body parts (and combination body parts) and massage tools.

    To prevent injuries that are caused from overstraining, use your body weight to generate pressure, stop doing the techniques that hurt you and find replacement techniques.

    To avoid injuries due to muscle fatigue from being in one position too long, find other positions to do your work.

    It took me a while to get this about massage injuries: Avoiding injuries (and pain) when doing massage is an active process. It’s not an off and on thing. In fact, it always needs to be on. When it is, it becomes part of your massage style and what makes you unique and keeps you injury free.

    Have a pain/injury issue?

    Take my pain quiz and get an instant video solution.

    PAIN QUIZ

    For more about staying injury and pain free, sign up for my email group. It’s free:-)


  • Massage Therapy Hand Pain – NOPE

    Massage Therapy Hand Pain – NOPE

    How do you eliminate hand pain when doing massage?

    1. Incorporate your non-dominant hand. 
    2. Add in bracing/combination techniques.
    3. Use hand-held tools.

    I bet you thought I was going to say use your elbows/forearms as substitutes for your hands.

    Elbows can be good substitutes for hands, but if you start to rely on your elbow too much you could develop overuse problems, like cubital tunnel syndrome. 

    In addition, an elbow is great for a back, but how about if you’re doing detail work, like in the neck? For most of us massage therapists, using an elbow to do detail work in cervical erectors is not going to work.

    Enter your non-dominant-hand, bracing and combination techniques and massage tools.

    1. Massage Therapist Hand Pain – Be Ambidextrous 

    About 10 years ago, my right thumb started to bother me.

    When I think back it makes perfect sense that it would. I used it a lot—especially when doing deep, detail work. For a long time, I simply accepted thumb pain as the price to pay for doing massage.

    But as the pain increased I realized that if I didn’t change something soon I was going to be in trouble.

    One day during a massage my right thumb was really aching and I had to give it a break. So I stuck my left thumb in the cervical erectors.

    It was awkward BUT my left thumb didn’t ache. (Hey, I could get used to this!)

    Then I experimented with my left thumb so often that it started to hurt, too.

    Eventually, I found that if I followed a thumb workload formula of 60/40 (60% dominant thumb/40% NON-dominant thumb) my thumbs felt great.

    2. Massages Therapist Hand Pain – Combine and Brace

    Splitting the workload to 60/40 between my thumbs was a big improvement for reducing pain in my right thumb. However, it didn’t solve my problem of achy and stiff fingers.

    There was one move in particular that really made my hand ache. The move involved squeezing and rolling the upper trap edge between my thumb and fingers.

    One day I was doing that move and my hand ached. Without thinking I reached over with my other hand to help with the squeezing.

    Hmm…it sure was a lot easier squeezing with two hands.

    And that is when I really started to experiment with combining and bracing.

    What happens if I put a thumb over top a thumb and pressed down with both thumbs?

    Well, I’ll be damned if that didn’t make the work for my dominant thumb easier.

    There are no right or wrong bracing techniques. It depends on the individual and is influenced by anatomy (e.g., big knuckles versus small knuckles) and preexisting conditions.

    My favorite hand-saving, bracing combinations are

    Braced thumbs:Braced Thumbs pic
    Third knuckle and thumb:Braced Thumb and Third Knuckle pic
    Braced knuckle and fist:Braced Knuckle with Fist pic

    Check out this video for more in-depth bracing and combination techniques: 

    Here’s my favorite eliminating hand pain solution—massage tools.

    3. Massage Therapist Hand Pain – Massage Tools

    Becoming ambidextrous and bracing my fingers, thumbs, knuckles and fists together made my hands feel better. But adding in hand-held tools allowed me to increase my massage volume big-time without injuring my hands.

    Here are 2 basic types of wooden hand-held tools that I use:T-bar and L-Bar pic
    These tools were designed by my massage colleague and friend, Matt Johnson.

    Let’s take a closer  look.

    This is a T-bar.

    And this is an L-bar.

    A little intimidating looking, right?

    But if you start with baby-steps you’ll get used to them, and then you’ll never want to do another massage without them!

    Here’s what you need to do to get competent with massage tools.

    Adjustment #1: Relax Your Hand

    This is how we were taught to grip a T-bar in NMT class.

    Take note of my fingers gripping the stem and tip to control the T-bar.

    This hold allowed you to have fine-tuned control of the T-bar when working a tight/tender spot, but it also encouraged you to grip the T-bar tightly, even when applying light pressure.

    Hmm, I wondered, what would happen if I just loosened my grip some?

    Actually, nothing happened. The T-bar didn’t slip out of my hand, and I was still able to control the tip with a lighter grip.

    This begged the question: How loose can I hold the T-bar without it actually falling out of my hand? I started experimenting and found that my hands were very happy when I simply steadied the T-bar with the minimal amount of pressure required to keep the T-bar from dropping  or slipping from my hand.

    This is a loose-hand hold: 

    My fingers are relaxed and I’m using just enough of a grip so that T-bar doesn’t slip out of my hand.

    At the end of a month or so, I got pretty good with light and medium pressure, but when I ratcheted up to deep, I had to tighten the grip to keep the tool steady.

    I wish I could say that I figured out the pain-free method of holding a T-bar for deep pressure within a month or so, but I can’t.

    In fact, I went in a different direction altogether. I started experimenting with other massage tools for deep and precise pressure. And it wasn’t until 15 years later that I figured out how to use the T-bar for deep pressure without hurting my hands.

    At that time, shoulder and neck conditions forced me to radically change my massage body mechanics. One of the big changes that I made was to set my table lower than I normally had it. And when I did, the T-bar missing puzzle piece fell into place.

    Adjustment #2: Pin the T-bar

    With a lower table, my work was below me. This meant that I could take full advantage of leaning my body weight into the client to generate pressure.

    When I leaned in with a T-bar to do deep pressure, I could pin the T-bar between my hand and the client’s body. There was no need to grip hard to hold the T-bar in place. In fact, I really didn’t have to grip at all. This is an open-hand hold.

    Open hand hold.

    To execute this hold the table has to be low enough so that you can lean in to generate pressure and pin the T-bar. Here’s what it looks like when the camera steps back.

    The pin technique made it easy to hold the T-bar, but there were times when a one-handed pin wasn’t possible and/or my pinning hand needed a break. This leads us to the third adjustment.

    Adjustment #3: Use A Guide Hand Next to the T-bar

    Using a guide hand next to a T-bar is my preferred way to hold a T-bar.

    For one, I’m contacting the client with more surface area than I would with the T-bar alone. This gives the massage more of a relaxation feel.

    Two, it’s really easy to stabilize the T-bar with a guide hand, maintain sensitivity and regulate pressure.

    Three, I can shift the emphasis of pressure from tool to guide hand (hand not holding the T-bar) without having to pull my hands off the client.

    In this picture my guide hand is a relaxed fist. 

    The relaxed-fist, guide hand that’s next to the T-bar serves as a stabilizer. For broader pressure, I would direct more of my body weight into my fist. For precise pressure, I’d lean more into the T-bar. This hold is great for calves and forearms.

    This next example is a double-handed hold.

    Two hands on the handle hold.

    Note that both hands are contacting the handle. Having two hands on the handle allows me to lean in with my body weight. I use this hold when I need to deliver more pressure to influence deep muscles.

    The double-handed hold is good for when you’re working thick areas, like back, hamstrings and quads.

    Also, can you see that my hands are relaxed? That’s really important because you’ll instinctively want to tighten your grip to steady the T-bar as you lean in to deliver deeper pressure.

    But that’ll be completely unnecessary. Look at all the points of contact my fingers and knuckles make with my client’s back. That T-bar is not going anywhere!

    This last hold is a wrap-around technique that works well feet.

    The great thing about the wrap-around hold is that it’s easy to control your pressure. You simply lean in. 

    The guide-hand and two-handed holds worked great for me, but I had a tendency to get really comfortable with one or two holds and I then I’d feel the overuse pain again. This tendency led to me to adjustment #4.

    Adjustment 4: Vary Your Holds

    There are countless ways to hold a T-bar. Here’s how I recommend you experiment. First, pin the T-bar between your hand and the client’s body. Then place your other hand next to the T-bar and allow that hand do whatever it wants to in order to support the T-bar.

    Just remember to keep your hands relaxed and you’ll be amazed at how many different holds you’ll come up with.

    Easier than You Think

    There’s a potential irony in massage that we all desperately try to avoid. It goes like this: We put ourselves in pain to get someone else out of pain.

    Thumb pain is not a byproduct of doing massage.

    Kick thumb pain to the curb by using a T-bar when doing deep and precise work. But first you have to learn how to hold the T-bar without gripping it.

    Here are the keys for holding a T-bar:

    1. Hold the T-bar with a relaxed hand.
    2. Pin the T-bar between your hand and the muscle by leaning in. You may have to lower your table. You can lean when you’re sitting, too.
    3. Use a guide hand, thumb, finger next to the T-bar for stability, sensitivity and as a pressure gauge.
    4. Use two-handed holds to spread the workload.
    5. Vary your holds so that you don’t overuse a body part.

    Once you get these basic things down, you’ll never have to worry about developing chronic thumb pain again.

    This video will help you, too:

    Eliminate Hand Pain Recap

    The great thing about massage is that you can get paid for on-the-job training.

    With a paying customer you can experiment with your non-dominant hand.

    Once you do that add in a bracing combination, like thumb on thumb.

    With hand-held massage tools take it a little slower.

    First,  practice on friends, colleagues and family.

    Once you get positive feedback with your tool work test out a massage tool  on a client. 

    Slowly increase the time you use a massage tool with that client on subsequent sessions.

    Online, Save-Your-Body CEU Course

    Need more help saving your hands?

    I have an online course that can help you eliminate hand pain (and shoulder, neck and back pain, too).

    A while back I almost quit massage because of pain and injuries.

    Then I spent a year revamping my massage to see if I could massage pain-free. That’s where incorporating the lower half of my body into the massage came in along with a bunch of other strategies that ultimately saved my massage career.

    I pulled all that first-hand experience together and made a live CEU class which I taught for about 5 years. During those 5 years I listened to the massage therapists taking the course and worked out the learning kinks. 

    Check out the kink-free, massage-pain-free course here

    Online, Massage Tools CEU Class

    Massage tools help saved my hands and upper-body.

    Most massage therapists shy away from using massage tools because, less face it, it’s hard to be sensitive with a piece of plastic or a hunk of wood–that is unless you have work-arounds.

    I use massage tools in every massage from focused pressure work to total relaxation. I can do this because the work-arounds work and are easy to implement.

    So, if you’re ready to take the plunge and delve into massage tools, I have an online, home-study course that will make your learning life easier.

    Here it is: How to Use Massage Tools (Fearlessly and Effectively).

  • The Secret Weapon That Will Save Your Back: Your Massage Table

    The Secret Weapon That Will Save Your Back: Your Massage Table


    I love my massage table.

    I know that sounds a little strange, but I have a good reason to love my massage table.

    My massage table saved my massage career.

    Here’s the short version.

    Saving My Massage Career

    A while back I stressed my shoulders doing massage in an attempt to save my neck and elbow.

    Then to save my shoulders, I stressed my back.

    At that point I was feeling mighty low and about ready to quit massage because no matter what I did something always hurt.

    But then I discovered a cool thing about my massage table.

    I could lean into it. 

    When I did my back got happy AND I was able to use the strategies that saved my shoulders, elbow and neck once again.

    Why did my back get happy?

    Because it didn’t have to work as hard to keep me upright and it could unbend from the typical massage-hunchback position.

    In a minute I’m going to show you how to lean into the table to save your back (and shoulders and neck).

    But before I do that I want to give you a framework for leaning.

    So, I’ll start from the beginning.

    How My Massage Table Saved My Massage Career

    My daddy was born into a family of sharecroppers living in the rolling hills of Harrisonburg Virginia…haha…not that far back.

    At one point in my massage career I was diagnosed with Cubital Tunnel Syndrome, cervical radiculopathy and an shoulder instability.

    Every time I did massage something hurt and the pain wasn’t going away.

    So I threw myself into an experiment to save my massage career. 

    My Experiment

    I had three rules for the experiment.

    1. Figure out what triggered or caused me pain in the massage room.

    2. Stop doing the the things that triggered/caused pain.

    3. Find alternatives to get the job done.

    The first thing I went to work on was my elbow pain (Cubital Tunnel Syndrome),

    To be honest, it was sometimes hard to differentiate between the pain coming from my neck (cervical radiculopathy) and pain coming from my elbow.

    But one thing for sure triggered both–using my forearms to massage.

    So, out went forearms.

    That stunk because they were a big part of my deep pressure work.

    Hmm…what could replace my forearms.

    I tried fists.

    But when I used my fists at my normal table height I had to really engage my upper body and I ended up tweaking my unstable shoulder.

    Now what? Knees? Believe me, I thought about it for a second.

    But lucky for me I was already familiar with leaning (using my body weight to generate pressure).

    In fact, leaning was core to my forearm work…

    …and massage tool work, too.

    So, now I just needed to lower the table far enough so that I could lean with my body weight using my fists.

    And that’s precisely what I did.

    It worked like a charm.

    There was no strain in my upper-body because my body weight was doing the work.

    My shoulders and neck liked that.

    However, not all my body parts were happy.

    My back started to bother me from working on a low table, especially when the client required less pressure (light to medium).

    Less pressure meant that I couldn’t lean all my body weight onto the client so my back and legs had to do more work. 

    Because I was on a mission to massage efficiently and effectively (aka, to be lazy and expend the least amount of energy as possible) without being in pain, it wasn’t long before my leg found the side of the massage table.

    The leg against the table provided extra support.

    That meant less work for my back to do and, ultimately, it allowed me to change positions so that I wasn’t in the  massage-hunchback position all the time.

    Leaning into the massage table has become a central feature to my body mechanics, so much so that if you randomly pulled the massage table away from me when I was standing during a massage, I would fall on my face 90% of the time.

    Here’s what you need to know to experiment with leaning into the massage table.

    1. You can lean into the massage table for support with all sides of your legs (front, back, side, inside).

    It doesn’t take much leaning to provide enough support to be able to get you out of massage hunchback.

    Here I’m leaning into the table using the inside of my left leg.

    In this next picture I’m leaning into the table with the side of my leg.

    Here’s classic leaning into the front of a leg.

    And here’s what you’ve been waiting for: Leaning into the back of a leg(s).

    2. Think plank when leaning into the table for deeper pressure.

    Deeper pressure is going to require more weight onto the client rather than onto the table.

    So you’re contact leg that’s leaning into the table is going to help stabilize your “planking”.

    Don’t worry about getting more vertical when leaning and doing deep pressure.

    Here’s what leaning into the table delivering deep pressure looks like:

    3. Straighten up and change back positions with light to medium pressure and/or when using one hand to massage.

    For light to medium pressure my stances widen because I don’t want to transfer all of my body weight onto the client.

    The combination of not needing to exert a lot of pressure and having the support of the table is the perfect opportunity for me to unbend my back.

    Time for a Change?

    As you can tell by now, I’m a very lazy creature when it comes to working in the massage room.

    I want a workout in the gym to feel like a workout in the gym.

    And I want the work I do in my massage room NOT to feel like a workout in the gym.

    That’s why I’m addicted to leaning.

    To find more about doing massage effortlessly check out Minimal Effort Massage

    And if you’re ready to jump into massaging pain-free, here’s the online, home-study course (3 CEUs) that will get the job done: How to do Deep Pressure Without Hurting Yourself.

    The course is based off my real-life experiment of overcoming career-ending conditions in the massage room.

    Lean on.


  • Deep, Detail Work—Bring It On!

    Deep, Detail Work—Bring It On!

    How do you do a TFL massage that’s detailed without killing your thumbs and fingers?

    1. Pinpoint the exact area in the TFL that you want to work with a massage tool.

    2. Guide the massage tool with your non-holding hand as you press, pull, reciprocate and/or vibrate that exact area until you create the desired effect that you’re looking for.

    My favorite massage tools for the TFL are simple (and inexpensive), but effective.

    They are a T-bar…

    …and an L-bar.


    1/3 of the Trick

    The T-bar is an important tool for neuromuscular massage (NMT), and is waaaay better than thumbs for doing detail work on tough to reach muscles like the multifidi and rotatores deep in the lamina groove.

    But when I started practicing NMT, I soon learned that if I gripped the tool too hard, my hand hurt.

    Over the years, I’ve developed ways to grip the T-bar that are easy on my hands. You can check them out on this post, Tools Can Save Your Hands.

    The T-bar was better than thumbs for precision for sure, but I’m greedy and I wanted something even more precise. 

    2/3 of the Trick

    So I went to my dad and asked him to make some tools for me that would allow me to work muscles super-precisely. Here’s an early model of something that he made that didn’t work out so well.

    PopPop V-Bar Pic

    Not pictured is the massage tool that was about 18 inches long and rested between my shoulder and armpit. This was a removable tip that you could put on the end of it.

    Scary looking, huh?

    Promise I never made anyone bleed.

    However, this one was a winner!

    Pop TBar Pic

    The stem diameter was narrower than the T-Bar which gave me greater precision.

    And the stem was offset (the tool sort of looks like an “L”; that’s why I call it an L-Bar).

    That allowed me to get into tight spaces like the neck.

    The Whole Trick

    As my Dad’s health deteriorated over the years, I backed off asking him to help me with new designs. Then one day I was teaching a class on delivering deep pressure without hurting yourself.

    I was demonstrating the tools and explained that I use a massage tool as if it were an extension of my hand.

    Matt Johnson, who was taking the class, took me up on what I had said—literally. He designed a tool with a longer stem that actually extended beyond my finger tips and thumbs. This modification allowed me to access hard to get to areas, like the TFL, with precision and ease.

    PopPop&Matt LBars

    By the way, Matt makes customized massage tools. If you want him to make one for you, let me know, and I’ll put you in touch with him.

    Now, I had the whole trick: a T-Bar and L-Bar that allowed me to deliver precise pressure with my fingers simply acting as guides (no strain).

    Detail work—deep work included—was now a walk in the park.

    TFL Massage

    So, let’s put these tools into action. In this video I’m using a long stem T-bar to pinpoint tender spots in the TFL.

    Wait, Mark, isn’t that supposed to be an L-bar?

    It doesn’t matter if it’s a T-bar or L-bar as long as the stem is long enough to provide enough clearance between the handle and the TFL so that the tool can be held effortlessly.

    Here we go!

    [embedyt] https://www.youtube.com/watch?v=-G7QQuM8V4s[/embedyt]

    Rotatores and Multifidi Massage

    The deep rotatores and multifidi are no are no problem with a T-bar or L-bar.

    In this video I tackle traps and rhomboids, too.

    [embedyt] https://www.youtube.com/watch?v=3yoHT9EM0Lw[/embedyt]

    Using a massage tool, like the T-bar or L-bar is not hard, but it does take some practice.

    Here’s a recap of what you need to do:

    TFL Massage and Rotatores/Multifidi Massage Recap

    1. Pinpoint the area you want to work with a T-bar, L-bar or massage tool of your choice.
    2. Use a guide hand to sense pressure and support the massage tool as you press, pull, reciprocate, and/or vibrate the area with the massage tool.

    The Massage Tool Era

    I believe it’s a new era in massage. We no longer have to accept that pain, injury and burnout are the natural consequences of working hard at massage.

    Massage tools like the T-bar and L-bar are go-to tools for me.

    But they are not the only tools that save my hands and help me do better work.

    In fact, I take no less than 7 tools into a massage with me, like this one:

    Okay, so I’m a massage tool addict.

    But here’s the advantage that massage tools give me:

    1. They save my fingers and thumbs.
    2. I can access difficult areas that require a precise and focused pressure better than I can with fingers.
    3. I have more tissue contact options than I do with fingers.  

    How to Use Massage Tools Fearlessly and Effectively (2.5 CEU)

    If you want to learn how to use massage tools so that you can do more massages, make more money and save your fingers and upper-body, then check out How to Use Massage Tools (Fearlessly and Effectively).

    It’s an online, home-study course that you can take at your own pace. In other words, you can practice what you learn in the class as you go along because you have life-time access to the course.

    Yes, it is a NCBTMB-approved 2.5 CEU course, so you can get some of your continuing education credits, but more importantly, it’s a practical course with lots of videos and real massage-life applications. Let me know what you think:-)