Category: Massage Tools

  • Two Hands on a Massage Tool

    Two Hands on a Massage Tool

    A massage tool will kill your hand. I agree with statement—said Mark 20 years ago because he didn’t know how to hold a massage tool. And he definitely didn’t know anything about two-handed holds.

    I can’t blame myself entirely for thinking massage tools did more harm than good because no one that I knew back then was drilling down on how to hold a massage tool without hurting yourself.

    Truthfully, I don’t think a lot has changed. Getting the job done still takes precedence over getting the job done without hurting yourself.

    The reality is if you want to practice massage for more than a couple of years you need to know how to take care of your body while doing massage.

    Enter massage tools.

    They will save your hands (and your body) IF you know how to hold them in ways that won’t strain your hands.

    How to Hold a Massage Tool Cheat Sheet

    First, don’t think of your massage tool as a screwdriver that you have to hold tighter and tighter the harder you work.

    Think of your massage tool as an egg that you have to keep from falling over, but if you squeeze it too hard, it will break.

    You probably thinking there’s a big, fat contradiction here. If you’re pressing harder with a massage tool AND relaxing your hold (trying not to break the egg), at some point, in order to stabilize the tool in your hand, you have to tighten your grip.

    That’s what I used to think, too.

    But I found three ways to stabilize a massage tool without having to tighten up on the grip.

    1. Pin the tool between your hand and the muscle.
    2. Add a guide finger from the non-tool-holding hand.
    3. Use two hands.

    Pin the Massage Tool

    If you want to hurt your hands fast use a massage tool for medium to deep pressure without pinning the massage tool.

    What do I mean by pinning the massage tool?

    I mean this.

    The massage tool is pinned between your hand and the muscle you’re working on.

    Leaning (transferring your body onto the massage tool) is what does the pinning.

    Here’s how you pin a massage tool:

    [embedyt] https://www.youtube.com/watch?v=LE9P3BOdxAM[/embedyt]

    Add a Guide Finger

    Once you feel okay with pinning it’s time to add a guide finger(s). Besides giving you more “feel” with the tool, the guide finger/hand helps support the tool.

    Pinning and a guide finger together act as highly effective stabilizing forces so that you can loosen your hold on the massage tool.

    Here’s how to add a guide finger: Why You’re Not Using Your Massage Tool.

    I have one more trick for stabilizing a massage tool: Two-handed holds.

    Two-Handed Holds

    The advantage of two handed holds from a “relaxing your hand” standpoint is that you can spread the workload (holding the massage tool) out over two hands instead of one. Combine that with leaning and you’ve got some really relaxed hands.

    The disadvantage to holding a massage tool with two hands is that there’s a potential to lose your “feel” for what’s underneath your fingers because your guide finger is not down BUT that lose of sensitivity can be overcome in 2 ways.

    1. Do exploratory strokes without massage tools to determine where tight spots and trigger points are so you know where to use more or less pressure with your massage tool.
    2. Use two-handed holds that keep parts of your hand in contact with the tissue you’re working on.

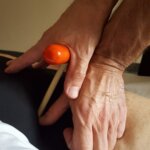
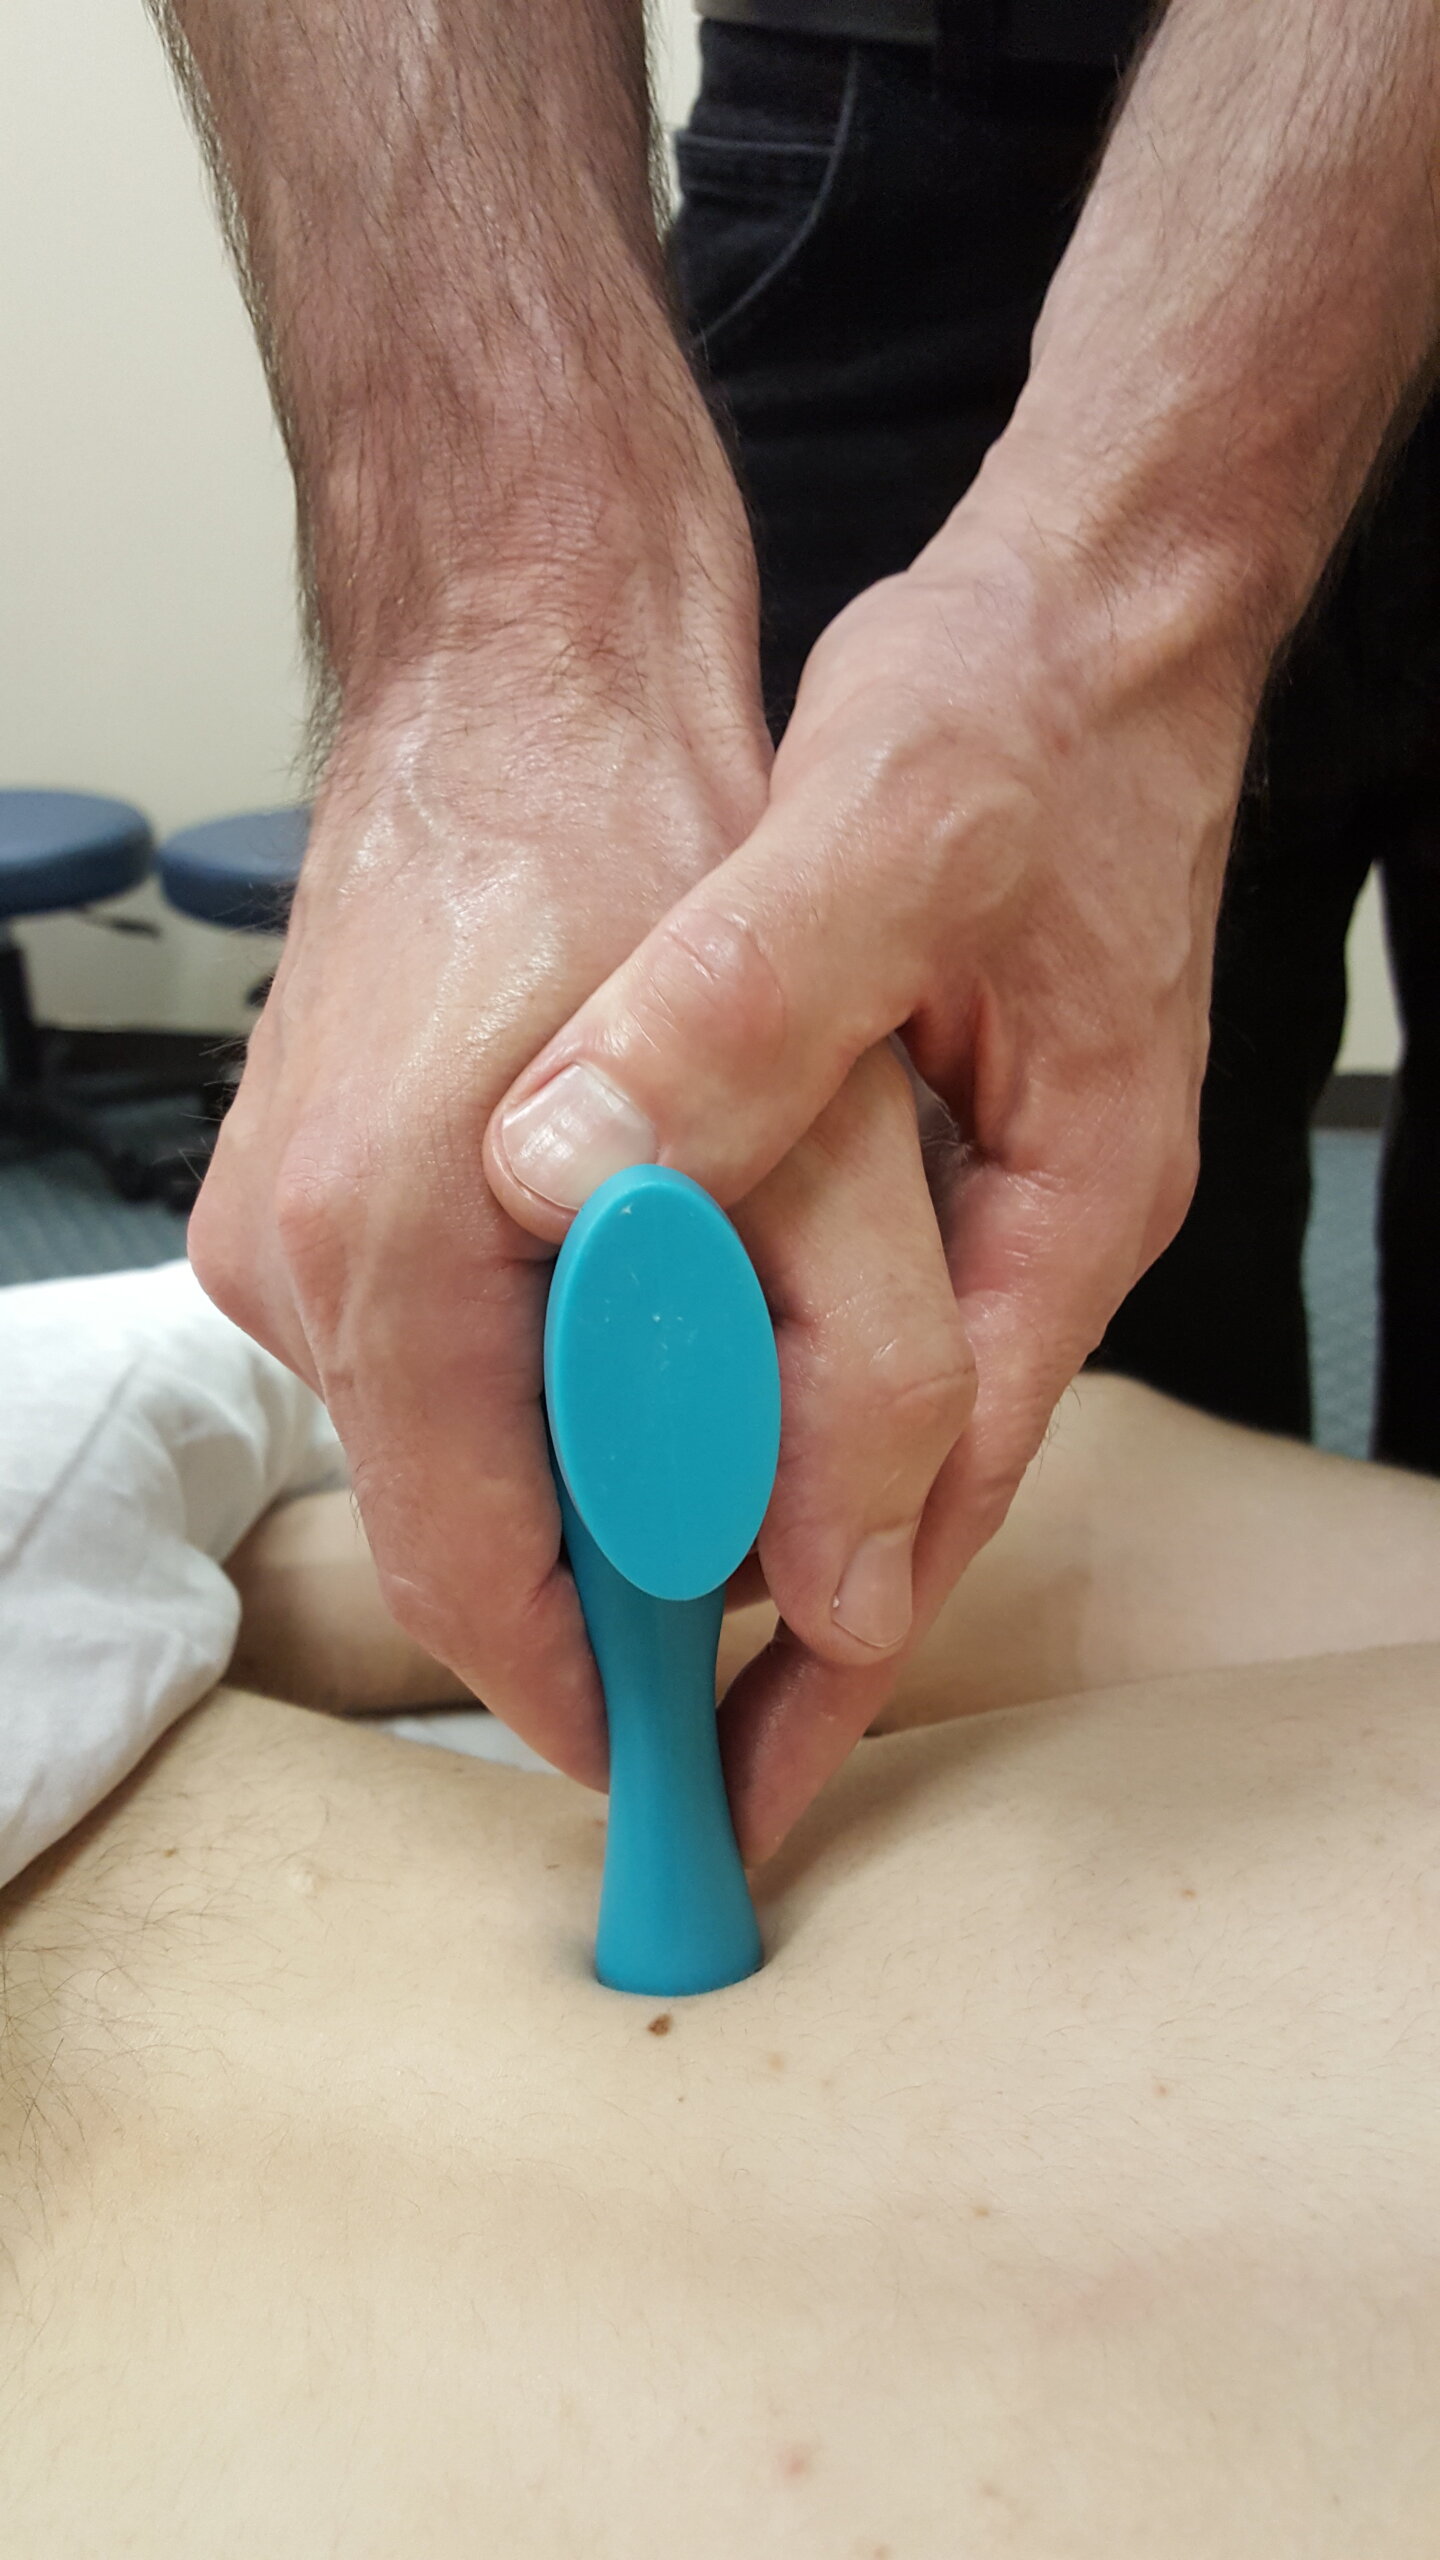
    Here’s an example of what that looks like:

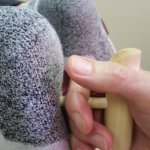
    See how my knuckles and fingers are contacting the clients back?

    Now look even closer. My left index finger and my right index knuckle are next to the massage tool tip. In addition to being tool stabilizers, they’re also sensors which allow me to palpate the tissue where the tool tip will be placed next.

    There are tons of different ways to do two-handed holds.

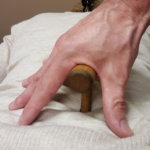
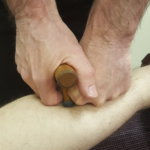
    Here I’m stabilizing a T-bar with my fingers wrapped around the top of the foot.

    There is zero strain on my hands.

    I could hold this position forever.

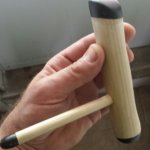
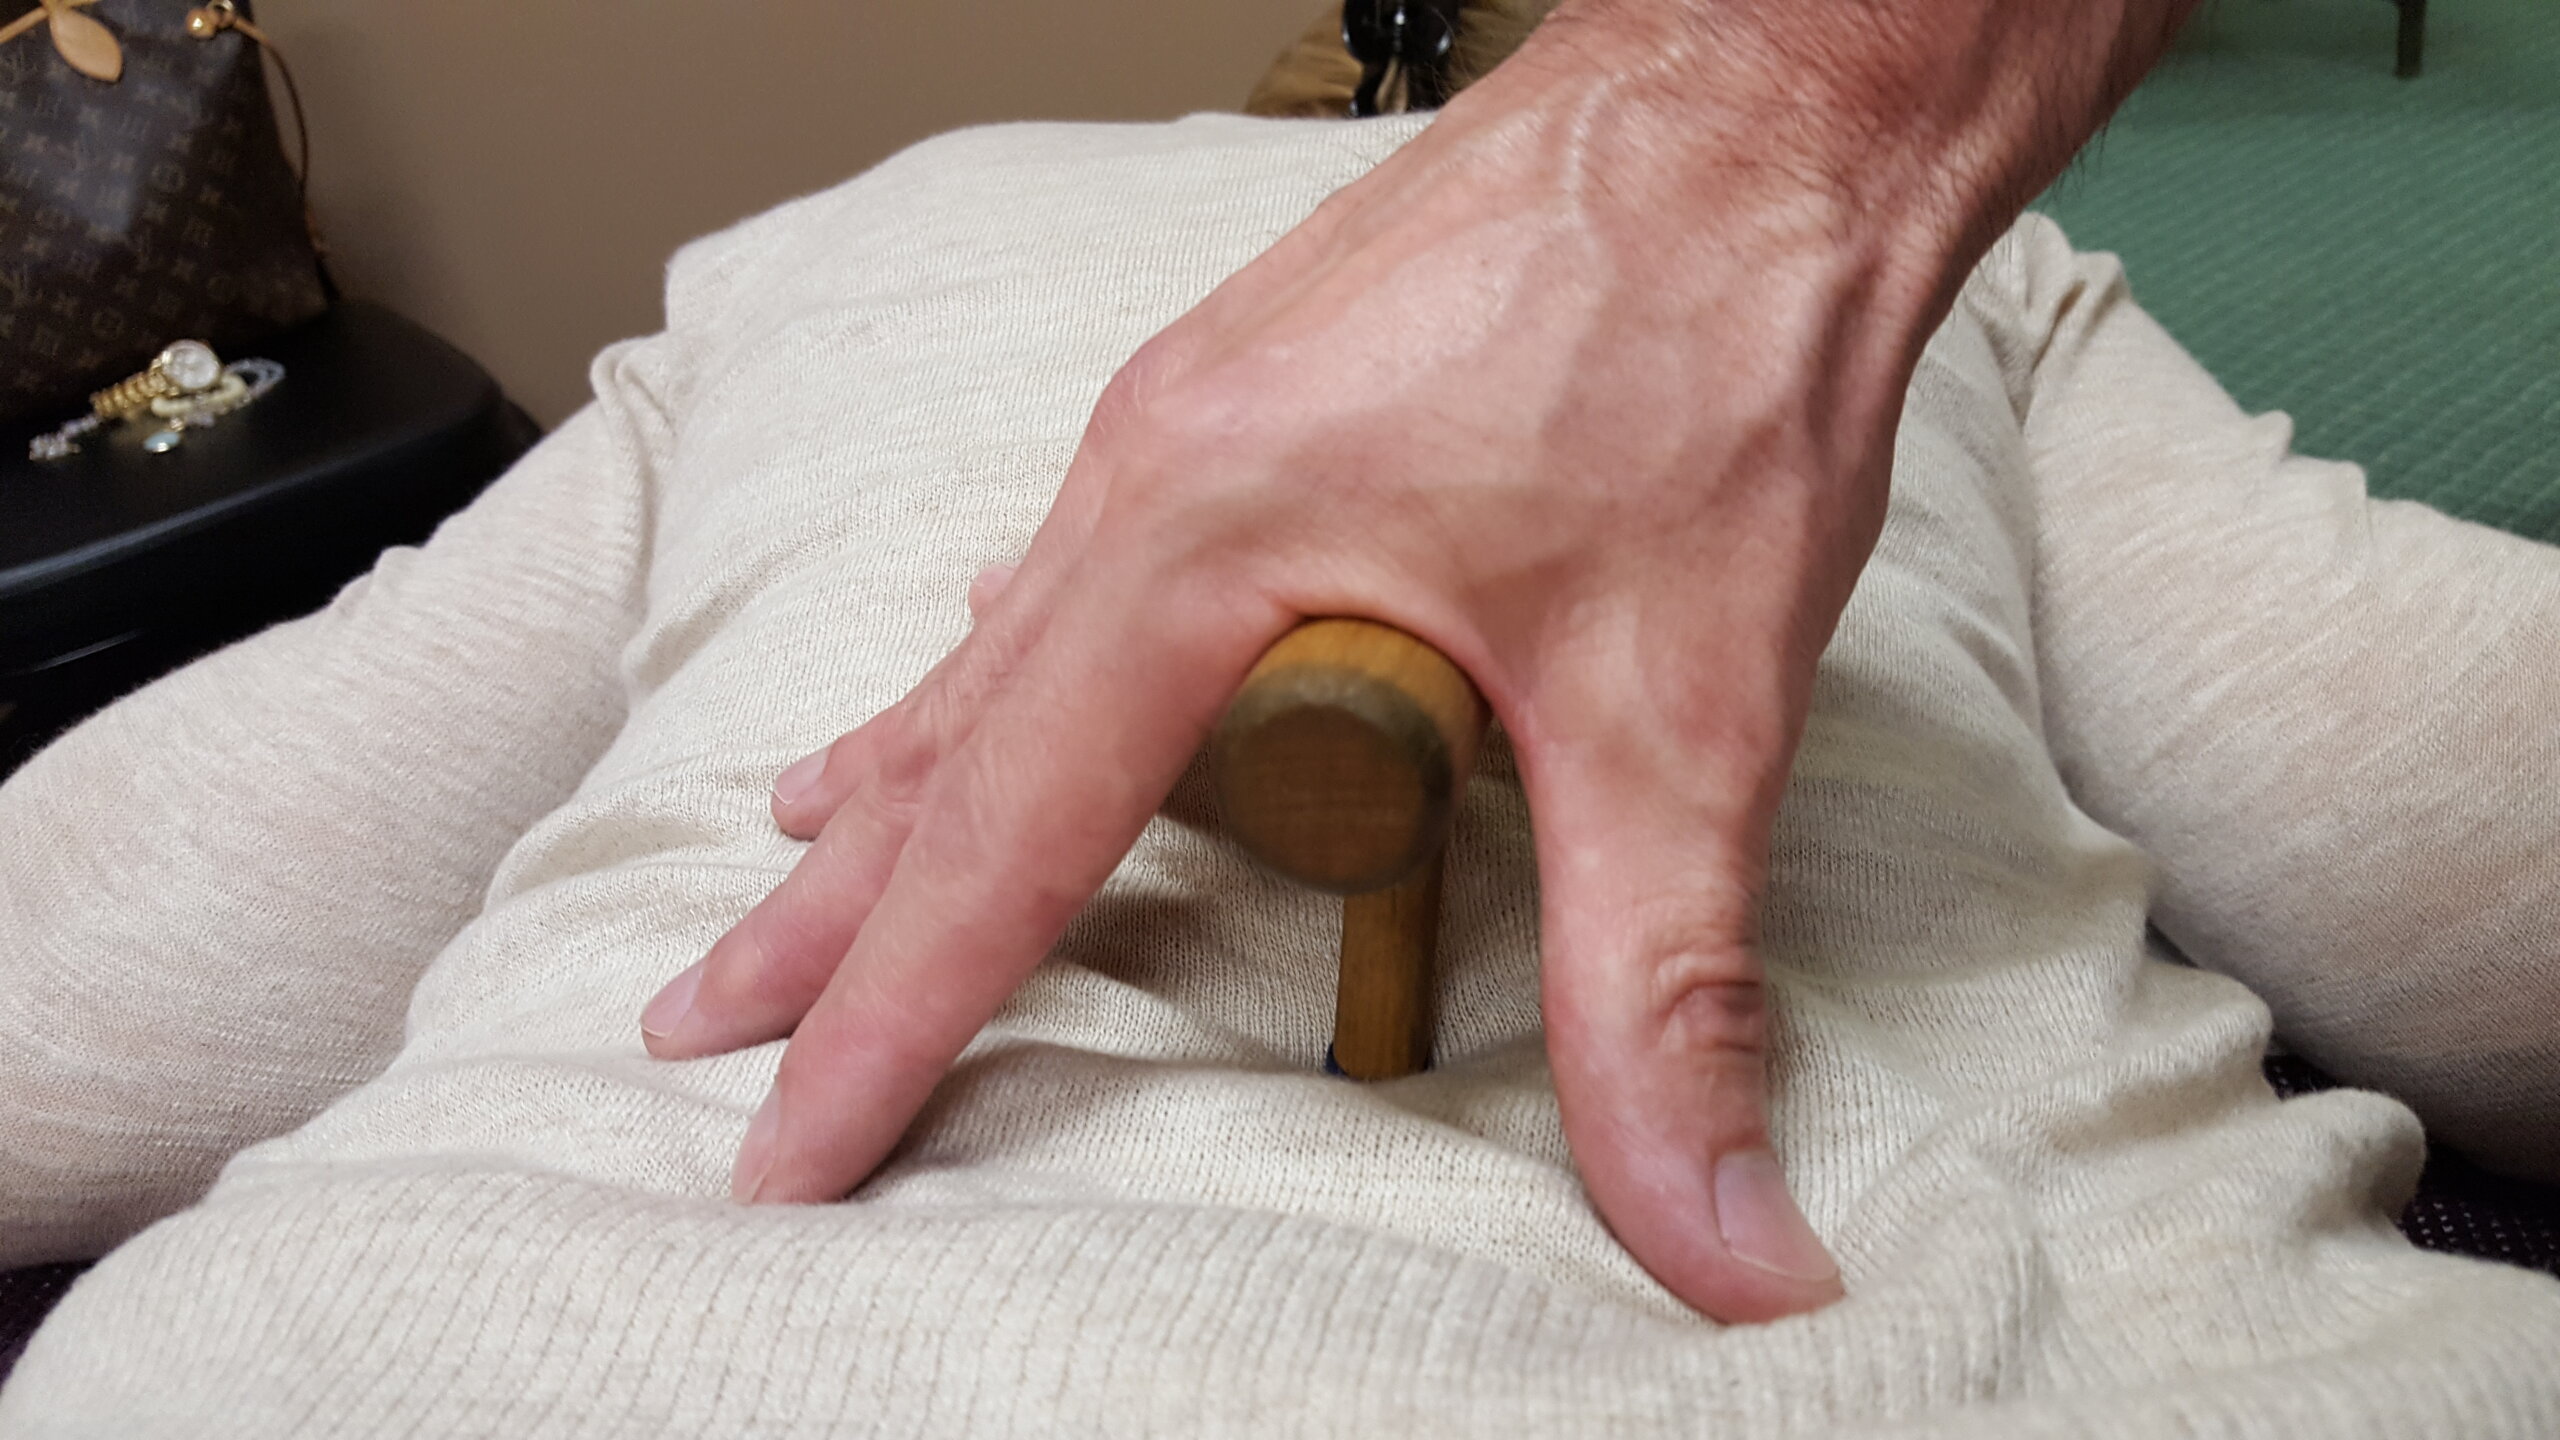
    In this picture I’m using two hands to hold a TheraPress massage tool.

    My finger tips on my left hand are making contact with the client’s back.

    Again, there is no strain to my hands or body.

    Best Two-Handed Holds

    So, what are the best two-handed holds? The ones that makes your hands feel good.

    That means you’re going to have to experiment. Here are my suggestions for experimenting.

    1. Pick a tool that feels comfortable in your hands.
    2. Figure out where that tool works best. (A tool that’s great for the feet because it has a broader tip may be too big for the neck.)
    3. Pin the tool with one hand and then bring the other hand on the tool for support.

    Allow you hands to move and experiment with different positions.

    Eventually, you’ll discover the two-handed holds that are easy on your hands.

    Don’t forget to lean when generating medium to deep pressure.

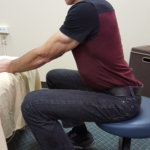
    By the way, leaning is not just for standing.

    You can lean when you sit, too.

    Want to learn more about how to hold a massage tool (and how to get more massage clients)? Join my email group and get my weekly articles. It’s free:-)

    Massage Tools Online Course

    If you’re ready to jump into massage tools, I have an online, home-study course that will teach you how to fearlessly and effectively use massage tools. 


    It’s called, surprisingly, How to Use Massage Tools (Fearlessly and Effectively). It’s a 2.5 CEU course, NCBTMB approved. Check it out here.


  • Save Your Thumbs: The Mighty T-Bar

    Save Your Thumbs: The Mighty T-Bar

    I’d bet $100 that you’ve experienced this at least once in your massage career: thumb pain.

    And my guess is that the next thing you do is to search YouTube videos for thumb massages and stretches.

    But instead of just managing thumb pain, why not stop injuring thumbs altogether?

    And burn out my fingers instead, Mark?

    No.

    Use a T-bar instead of thumbs and fingers.

    But there’s a caveat here. A T-bar can actually hurt your hand if you don’t understand some basic things about holding it.

    The T-bar Structure

    The T-bar can be broken down into three elements: the handle, the shank and the tip.

    The shank is in the middle of the handle. The tip of the shank can be flat or have rounded edges. Here the tip is covered by a plastic end-cap. Other options include a rubber end cap or no end cap at all, just bare wood.

    As you can see, it’s a very simple tool. But a simple tool can be a highly effective tool. And that’s what I discovered when I first got my hands on a T-bar.

    St. John’s Neuromuscular Therapy

    I was introduced to the T-bar in 1998 when studying Paul St. John’s neuromuscular therapy (NMT). A tenet of NMT was to work the origin and insertions of muscles. To do this, you needed to be able to apply very precise and often deep pressure. Thumbs, of course, were a natural fit for this job.

    However, thumbs would take a pounding if you tried to use them for deep work in dense muscle areas like in the spinal lamina groove. Enter the trusty T-bar.

    When I first tried using a T-bar during a neuromuscular class, I was instantly hooked. Though it felt clunky in my hands, I was able to generate precise pressure like never before without thumb pain.

    After I was certified in NMT, I opened a practice. But a few years into the business, something unexpected happened: My hands hurt.

    I Didn’t Want to Quit Massage

    At first I thought I’m simply coming up to one of the reasons why MTs change careers—pain and injury.

    But at the same time, I was having non-massage, pain issues, too. A lot of my non-massage pain was due to bad techniques when working out. I decided to make some changes in the gym and those issues got better.

    So, I then took another look at my hand pain. It seemed to occur after I was using the T-bar. This made me wonder if I could eliminate my hand pain by adjusting something that I was doing  when using the T-bar.

    The short answer was yes. And it all started with my intention.

    How My Thumb Pain Went Bye-Byes

    At the time, my intention when using the T-bar during a massage was to work a tender/tight spot with precision.

    But there was a vital part missing to this intention. The missing part was “without causing me (the massage therapist) pain.”

    That may sound obvious, but think of all the times you did a particular massage technique to release a muscle, knowing that it was causing or was going to cause you pain?

    It’s just what we do.

    So, keeping this idea of “not being in pain when working” in mind, I zoomed in on how I was holding the T-bar. It soon became apparent that I was over-gripping the T-bar, and that was probably the cause of my hand pain.

    Adjustment 1: Relax Your Hand

    This is how we were taught to grip a T-bar in NMT class.

    Take note of my fingers gripping the stem and tip to control the T-bar.

    This hold allowed you to have fine-tuned control of the T-bar when working a tight/tender spot, but it also encouraged you to grip the T-bar tightly, even when applying light pressure.

    Hmm, I wondered, what would happen if I just loosened my grip some?

    Actually, nothing happened. The T-bar didn’t slip out of my hand, and I was still able to control the tip with a lighter grip.

    This begged the question: How loose can I hold the T-bar without it actually falling out of my hand? I started experimenting and found that my hands were very happy when I simply steadied the T-bar with the minimal amount of pressure required to keep the T-bar from dropping  or slipping from my hand.

    This is a loose-hand hold: 

    My fingers are relaxed and I’m using just enough of a grip so that T-bar doesn’t slip out of my hand.

    At the end of a month or so, I got pretty good with light and medium pressure, but when I ratcheted up to deep, I had to tighten the grip to keep the tool steady.

    I wish I could say that I figured out the pain-free method of holding a T-bar for deep pressure within a month or so, but I can’t.

    In fact, I went in a different direction altogether. I started experimenting with other massage tools for deep and precise pressure. And it wasn’t until 15 years later that I figured out how to use the T-bar for deep pressure without hurting my hands.

    At that time, shoulder and neck conditions forced me to radically change my massage body mechanics. One of the big changes that I made was to set my table lower than I normally had it. And when I did, the T-bar missing puzzle piece fell into place.

    Adjustment #2: Pin the T-bar

    With a lower table, my work was below me. This meant that I could take full advantage of leaning my body weight into the client to generate pressure.

    When I leaned in with a T-bar to do deep pressure, I could pin the T-bar between my hand and the client’s body. There was no need to grip hard to hold the T-bar in place. In fact, I really didn’t have to grip at all. This is an open-hand hold.

    To execute this hold the table has to be low enough so that you can lean in to generate pressure and pin the T-bar. Here’s what it looks like when the camera steps back.

    The pin technique made it easy to hold the T-bar, but there were times when a one-handed pin wasn’t possible and/or my pinning hand needed a break. This leads us to the third adjustment.

    Adjustment #3: Use A Guide Hand Next to the T-bar

    Using a guide hand next to a T-bar is my preferred way to hold a T-bar.

    For one, I’m contacting the client with more surface area than I would with the T-bar alone. This gives the massage more of a relaxation feel.

    Two, it’s really easy to stabilize the T-bar with a guide hand, maintain sensitivity and regulate pressure.

    Three, I can shift the emphasis of pressure from tool to guide hand (hand not holding the T-bar) without having to pull my hands off the client.

    In this picture my guide hand is a relaxed fist. 

    The relaxed-fist, guide hand that’s next to the T-bar serves as a stabilizer. For broader pressure, I would direct more of my body weight into my fist. For precise pressure, I’d lean more into the T-bar. This hold is great for calves and forearms.

    This next example is a double-handed hold.

    Note that both hands are contacting the handle. Having two hands on the handle allows me to lean in with my body weight. I use this hold when I need to deliver more pressure to influence deep muscles.

    The double-handed hold is good for when you’re working thick areas, like back, hamstrings and quads.

    Also, can you see that my hands are relaxed? That’s really important because you’ll instinctively want to tighten your grip to steady the T-bar as you lean in to deliver deeper pressure.

    But that’ll be completely unnecessary. Look at all the points of contact my fingers and knuckles make with my client’s back. That T-bar is not going anywhere!

    This last hold is a wrap-around technique that works well feet.

    The great thing about the wrap-around hold is that it’s easy to control your pressure. You simply lean in. 

    The guide-hand and two-handed holds worked great for me, but I had a tendency to get really comfortable with one or two holds and I then I’d feel the overuse pain again. This tendency led to me to adjustment #4.

    Adjustment 4: Vary Your Holds

    There are countless ways to hold a T-bar. Here’s how I recommend you experiment. First, pin the T-bar between your hand and the client’s body. Then place your other hand next to the T-bar and allow that hand do whatever it wants to in order to support the T-bar.

    Just remember to keep your hands relaxed and you’ll be amazed at how many different holds you’ll come up with.

    Easier than You Think

    There’s a potential irony in massage that we all desperately try to avoid. It goes like this: We put ourselves in pain to get someone else out of pain.

    Thumb pain is not a byproduct of doing massage.

    Kick thumb pain to the curb by using a T-bar when doing deep and precise work. But first you have to learn how to hold the T-bar without gripping it.

    Here are the keys for holding a T-bar:

    1. Hold the T-bar with a relaxed hand.
    2. Pin the T-bar between your hand and the muscle by leaning in. You may have to lower your table. You can lean when you’re sitting, too.
    3. Use a guide hand, thumb, finger next to the T-bar for stability, sensitivity and as a pressure gauge.
    4. Use two-handed holds to spread the workload.
    5. Vary your holds so that you don’t overuse a body part.

    Once you get these basic things down, you’ll never have to worry about developing chronic thumb pain again.

    Looking to get a T-bar?

    For a plastic one, check out CareerExtenders.

    For a wooden T-bar, visit NeuromuscularSolutions.

    Want a custom T-bar?

    Call/text my friend Matt Johnson: 610-945-6491.

    He makes all my wooden massage tools. Prices range between $15 and $25 per T-bar.

    Want to Get Good with Massage Tools?

    Do it with one online, home-study class and some practice.

    This is the  online, home-study class that I’ve designed to get you comfortable with using a massage tool in any massage you do: How to Use Massage Tools (Fearlessly and Effectively).

    This class takes massage tools to the next level so that you can brand yourself as an expert with focused pressure: Advanced Massage Tools.


  • How to Reciprocate with a Massage Tool

    How to Reciprocate with a Massage Tool

    Massage tools aren’t just about saving hands. They can also enhance your massage. One of my favorite pain-relief/relaxation techniques is to reciprocate with a massage tool.

    Reciprocate with a Massage Tool

    When I say reciprocate with a massage tool, I mean to go back and forth over a focus area (tight/tender spot or if you subscribe to trigger point theory, a trigger point).

    My clients tell me that reciprocating with a massage tool is relaxing and helps to relieve pain.

    And there’s a bonus: That back-and-forth (side-to-side) motion is a great way to palpate because you can sense differences between tissues as you glide across an area.

    Reciprocating with a massage tool is easy. Here’s what I do:

    1. Pin the massage tool between one hand and the area to be massaged.
    2. Put finger(s), knuckle(s) or thumb from the other hand down next to the massage tool tip to brace the tool.
    3. Move the massage tool back-and-forth over the focus area.

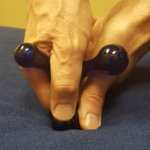
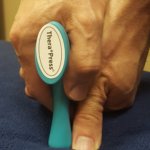
    Here’s one way it could be done with the TheraPress. The brace hand is the one with the thumb down next to the tip of the TheraPress.

    When you go back-and-forth with the TheraPress keep your hands and the massage tool together, and move as one unit.

    So why not just use one hand to reciprocate?

    Pin and Reciprocate with a Massage Tool Q & A

    Well, you could use just one hand.

    But with two hands you have better control over the massage tool.

    Here’s why: When using two hands, the hand that’s holding the massage tool basically has one job to do–pin the massage tool against the tissue–while the bracing hand does a good chunk of the tool stabilization.

    Since the holding hand is doing minimal stabilization it’s easy to move that hand to direct and angle the massage tool.

    Also, the two-handed hold means you can relax your hold on the tool because the brace hand is stabilizing the tool.

    If you’re using one hand, that hand has to both stabilize and press which means you’re grip will automatically tighten.

    Reciprocate with a Massage Tool Test Drive

    Test out different tools and two-handed holds.

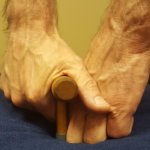
    This is a T-bar. I’m doing the exact same thing that I did in the TheraPress picture above, but instead of bracing with a thumb/fist, I’m using knuckles this time.

    If I want more pressure on the tender/tight spot, I simply lean more of my weight into the T-bar, but not into my bracing hand.

    This is an L-bar.

    To reciprocate with an L-bar I do things  a little different.

    First, notice how small the tip of the L-bar is. It’s much smaller than the TheraPress and T-bar tips.

    Reciprocate with the Bracing Hand

    Since the L-bar is designed for precise pressure, using two hands to reciprocate the L-bar is overkill, and I’m in danger of ramping up the pressure too much. So here’s what I do.

    I still do a two-handed hold, but instead of moving both hands as one unit to reciprocate, I reciprocate with the bracing hand.

    In the picture, I’m reciprocating with the thumb of the bracing hand.

    The hand holding the L-bar is not moving the L-bar back-and-forth. It is simply stabilizing the tool as I lean into it.

    When my bracing hand/thumb moves the tissue back-and-forth, the tip of the L-bar moves, too.

    Pressure is really easy to regulate this way since the hand that’s holding the tool doesn’t have to help move the tool back-and-forth.

    I also reciprocate with the bracing hand when using the T-bar and TheraPress. It just depends on the situation and which technique is easier to do at the time.

    If you looked at all the time I reciprocate with a massage tool during a week, this would be my massage tool usage breakdown:

    T-bar: 60% of the time.

    L-bar: 30%

    TheraPress: 10%

    I use the massage tool reciprocating techniques on tendons, too (especially biceps and hamstrings tendons).

    Ready To Try It?

    1. Pin the massage tool with one hand.
    2. Brace it with the other.
    3. Reciprocate keeping the massage tool and hands as one unit OR reciprocate with the bracing hand.

    Want to get good with massage tools?

    This online, home-study course (2.5 CEU) will get you comfortable with using a massage tool in any massage that you do: How to Use Massage Tools (Fearlessly and Effectively).

    This online, home-study course (2.5 CEU) will help you brand yourself as an expert with focused pressure: Advanced Massage Tools.

    Where to Get Massage Tools

    If you think that you’re ready to experiment with some massage tools, here’s where you can get the TheraPress, T-bar and L-bar.

    TheraPress: Ebay or Amazon would be my choice.

    T-bars (standard): Neuromuscular Solutions

    T-bars and L-bar (customized): Matt Johnson.

    Matt makes all my wooden massage tools. When I teach Massage Tools classes I use his massage tools because I can have tools made for all sizes of hands.

    His prices range from $15 – $30 for a massage tool depending on what you want. Just email him for more information.

    T-bar (plastic): Career Extenders


  • Effleurage T-bar Review

    Effleurage T-bar Review

    When I asked Merrill Lund about which of his massage tools to try, I was a bit surprised when one of the tools that he sent me was the Effleurage T-Bar.

    For one, I already had a lot of effleurage tools on me, like my hands, knuckles, fists and forearms.

    So, why would I need another?

    Secondly, here’s what the Effleurage T-Bar looks like:

    Not the friendliest looking massage tool you’ve ever seen, right?

    But from a functional design standpoint, this tool is balanced and feels good in my hands. (Hands is not a typo. The Effleurage T-Bar is a two-handed tool in my book. More about that later.)

    The Pluses

    Here’s what else I like about the Effleurage T-Bar:

    (1) It’s a great alternative to using palms, fists and forearms when doing effleurage strokes.

    I believe in changing things up whenever possible in order to spread out the workload. This tool gives my fists (my main effleurage body part) a break.

    (2) It’s a solid massage tool when working the lower back, hamstrings, quadriceps and IT band.

    If you hold the tool with two hands and use your body weight to generate pressure, the Effleurage T-bar is really easy to use on back and leg muscles.

    (3) It can be a broad and precise effleurage tool at the same time.

    By pressing with more pressure on one edge of the tool you can focus your effleurage stroke on a particular area of the body with ease, which makes this tool effective and easy to use on feet, too.

    The Challenges

    Here are some challenges with the tool (but didn’t prevent me from buying it).

    (1)  The tool can look intimidating to clients.

    Solution: I don’t keep the Effleurage T-Bar in a place where clients can see it.

    (2) It’s heavy.

    Solution: Use two hands to hold the tool and that will offset the heaviness.

    I show you how I do that in the video below.

    Here are the types of clients I use the Effluerage T-Bar on:

    (1) Body part clients, like runners, cyclists and triathletes.

    I especially like this tool when I’m working lower quads and along the IT band/vastus lateralis overlap.

    (2) Full body massage clients who have leg issues and/or lower back issues.

    This tool works well when effleuraging the lower back of average to large sized clients. When working in the lower back of thin clients, I’d rather glide with my hands or a small massage tool.

    Bottom line for me: The Effleurage T-Bar is one of the tools that I use in my effleurage rotation (hands, knuckles, fists and a variety of other hand-held massage tools) for body-parts work and/or focus work (especially back and legs) during a general massage.

    Below I demo how I use The Effleurage T-Bar on quads. You can purchase the Effleurage T-Bar from Career Extenders here.

    Massage Tools Online Class

    If you want to save your hands by being able to use massage tools in your massage, then this is the class for you: How to Use Massage Tools (Fearlessly and Effectively), 2.5 CEU (NCBTMB-approved), online, home-study course.

    If you know something about massage tools and want to brand yourself as a focused pressure massage therapist, then check out this course: Advanced Massage Tools, 2.5 CES (NCBTMB-approved), online, home-study course.


    Ad