Category: Uncategorized

  • How to do Fall and Catch Massage

    How to do Fall and Catch Massage

    Fall and catch massage sounds very judo-y. But I promise that you won’t have to make your client tap out.

    Fall and catch massage is a way to do massage without squeezing and pressing a client’s muscles with all your might.

    Instead you “fall” into the client, and the client’s body “catches” you.

    Your body weight provides the pressure. And with good body mechanics there’s minimal strain to your neck and shoulders.

    I should mention that we’re talking about controlled falling. No black and blue clients.

    Here’s what I mean by controlled falling.

    You’re going to…

    1. Initiate the fall with your feet.

    By simply shifting your weight from your heels to the balls of your feet you begin the fall.

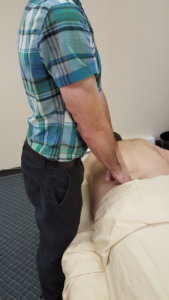
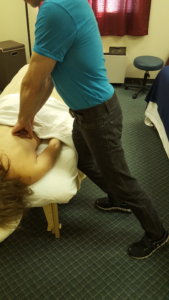
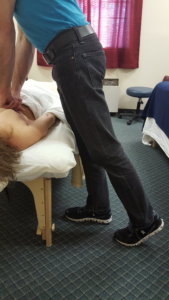
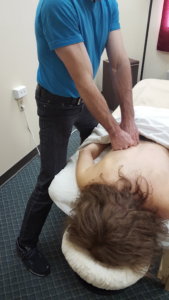
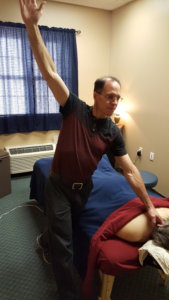
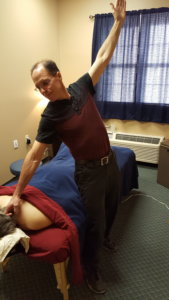
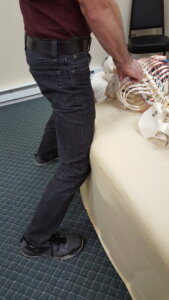
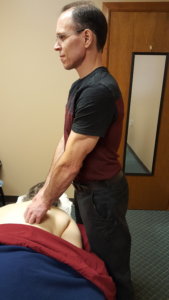
    In this pic I’m positioned to fall with my fists. My weight is towards my heels.

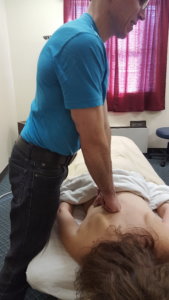
    Here I’ve fallen by shifting my weight to the balls of my feet.

    .

    2. Catch your weight on the table and/or client.

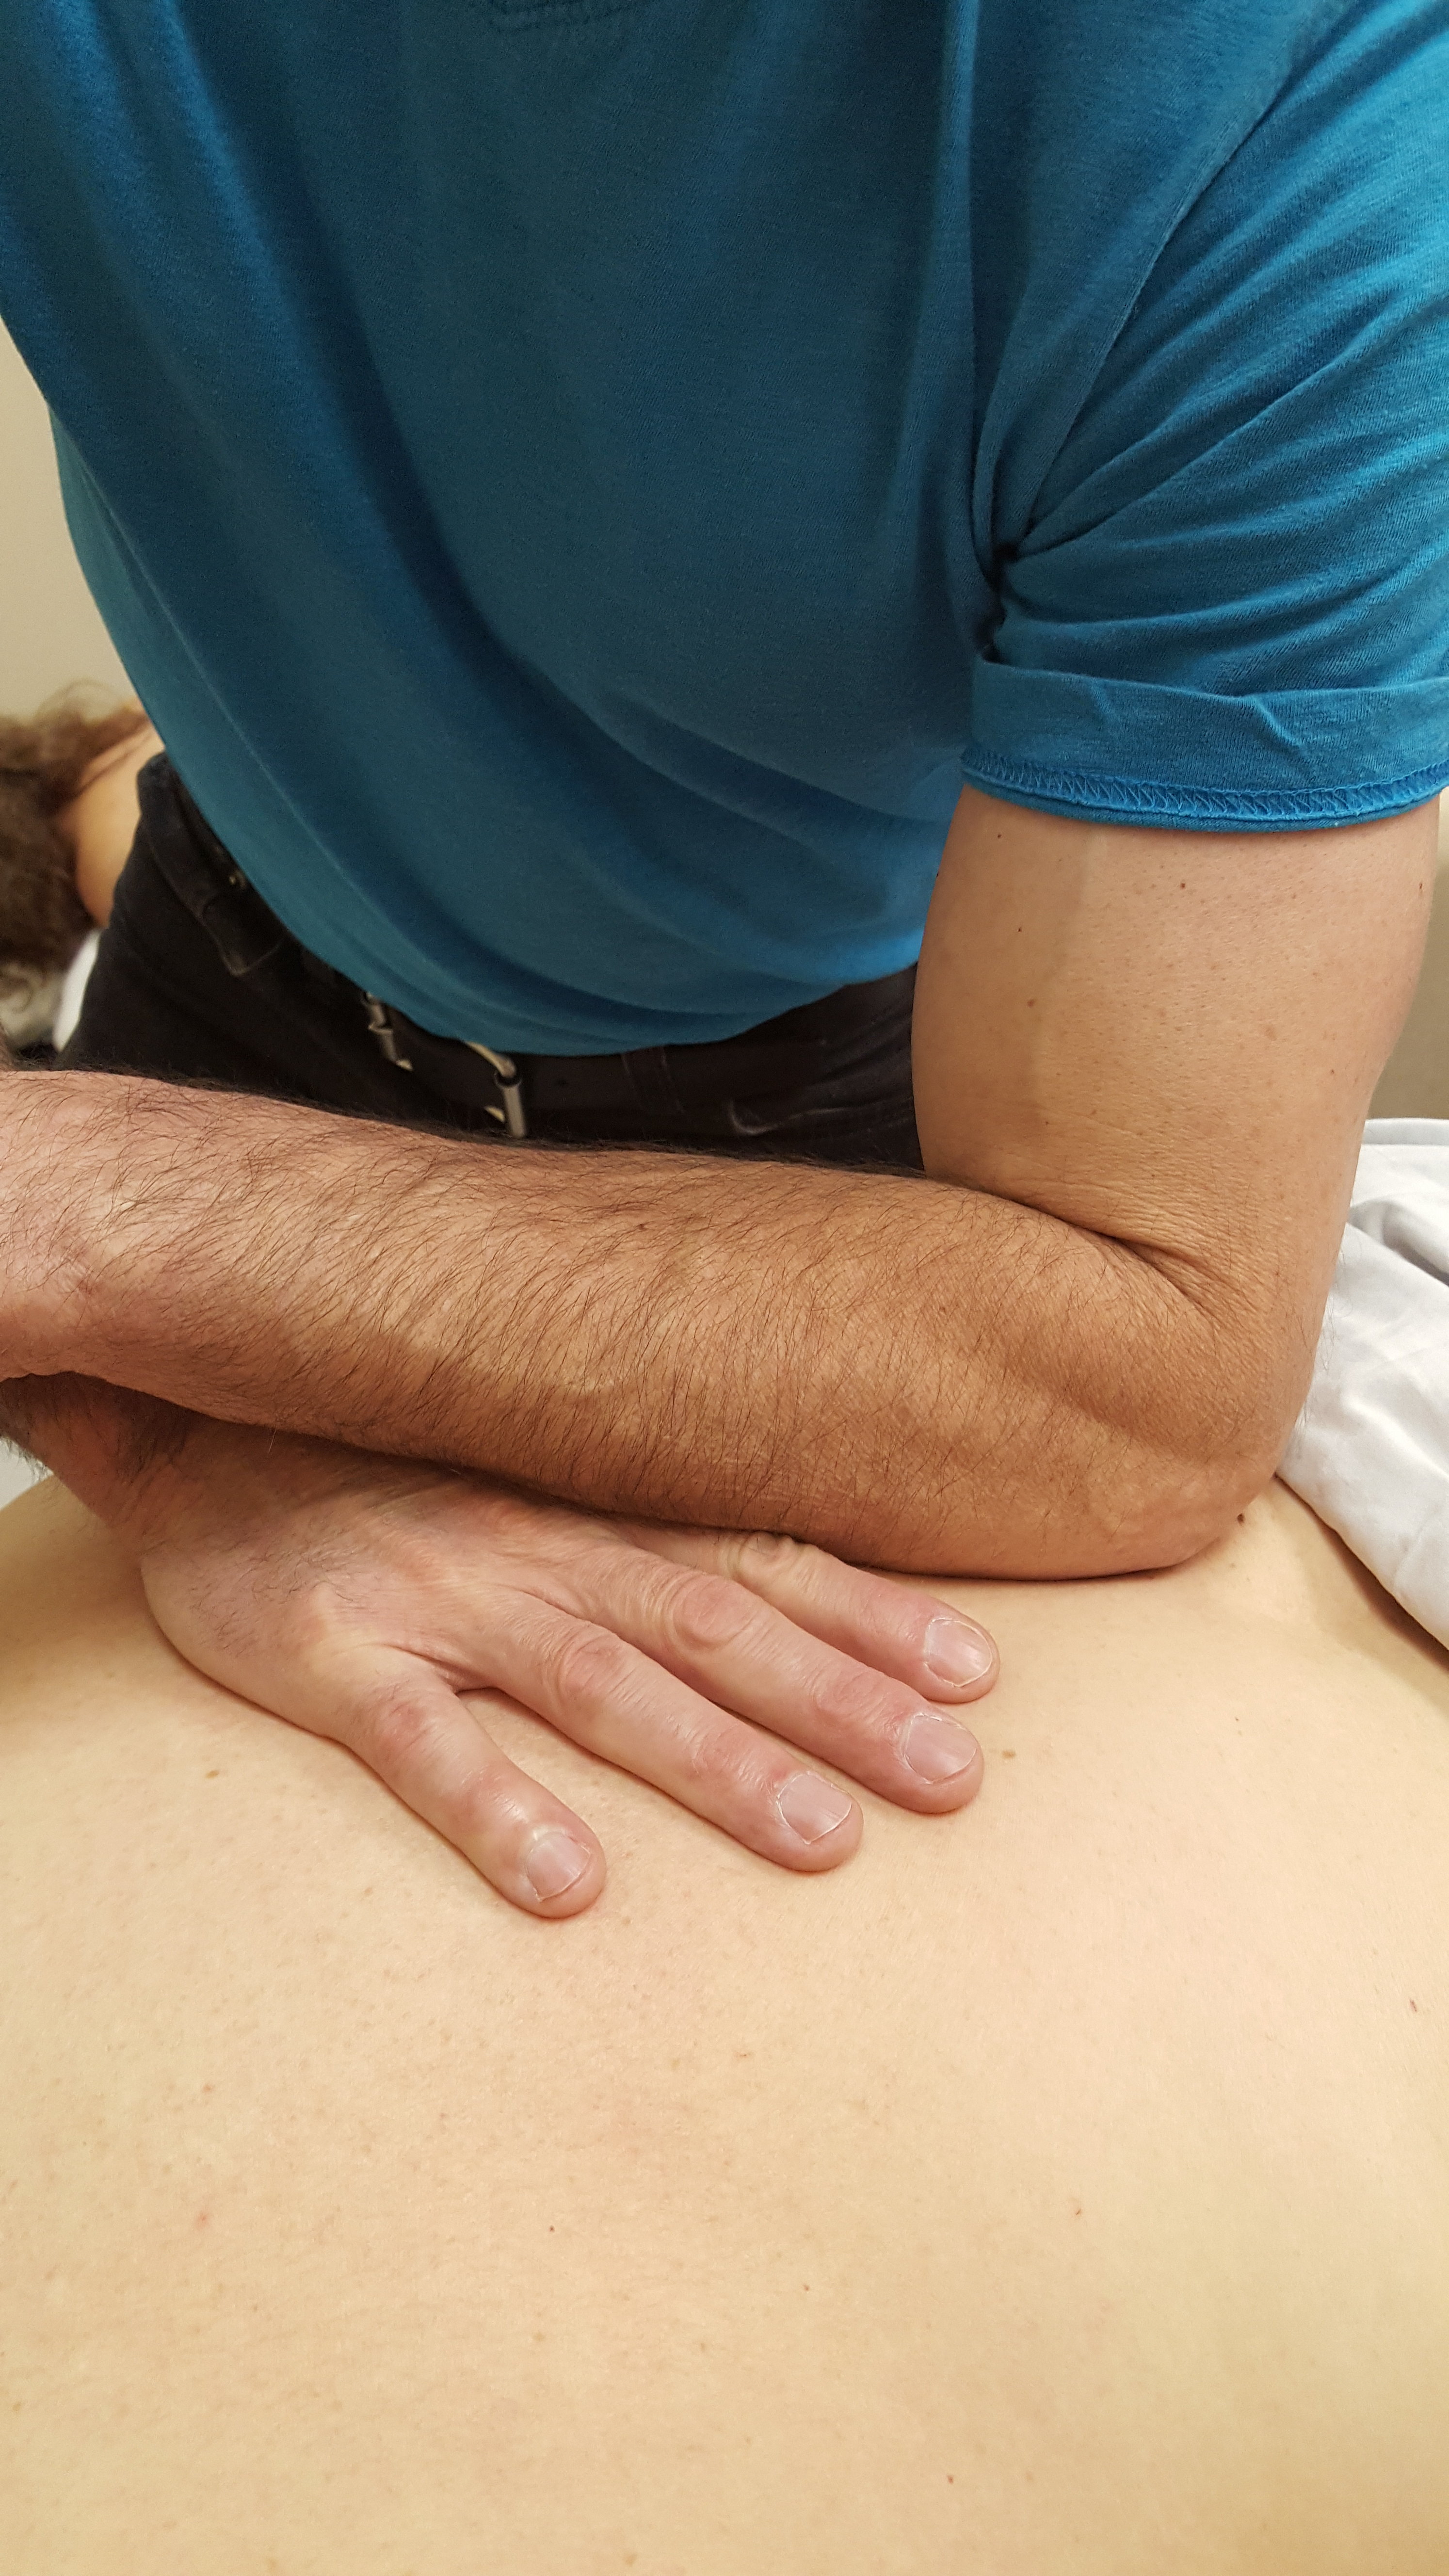
    The catching part is practically imperceptible because the body parts you’re massaging with (palms, fists, forearms, thumbs, or knuckles), should be in contact with the person.

    You’re simply transferring your body weight forward by shifting your weight from your heels to the balls of your feet.

    Light to Medium Pressure

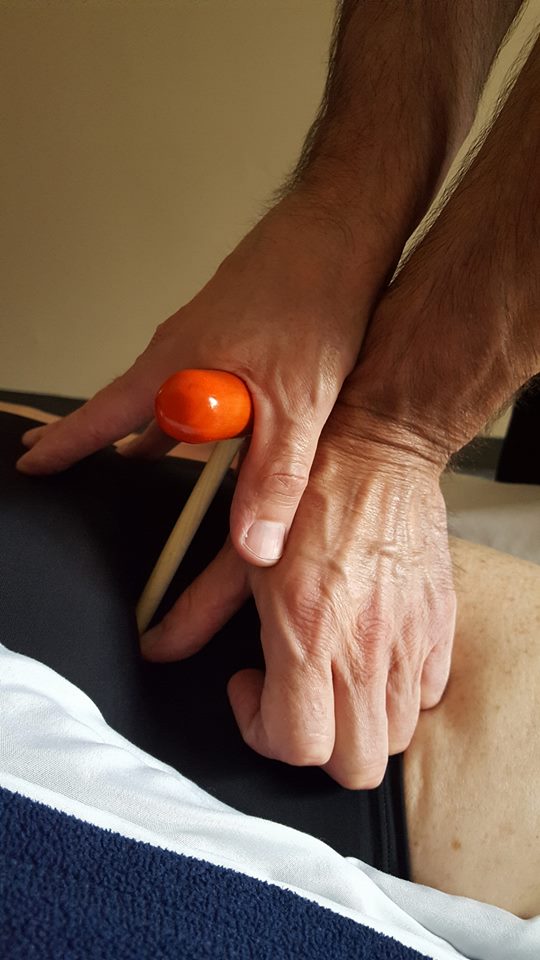
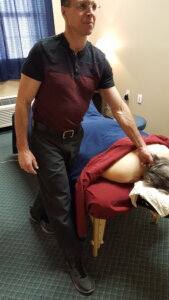
    To do light to medium pressure, direct some of your body weight into the table as well as the client.

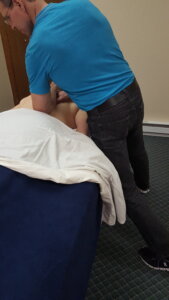
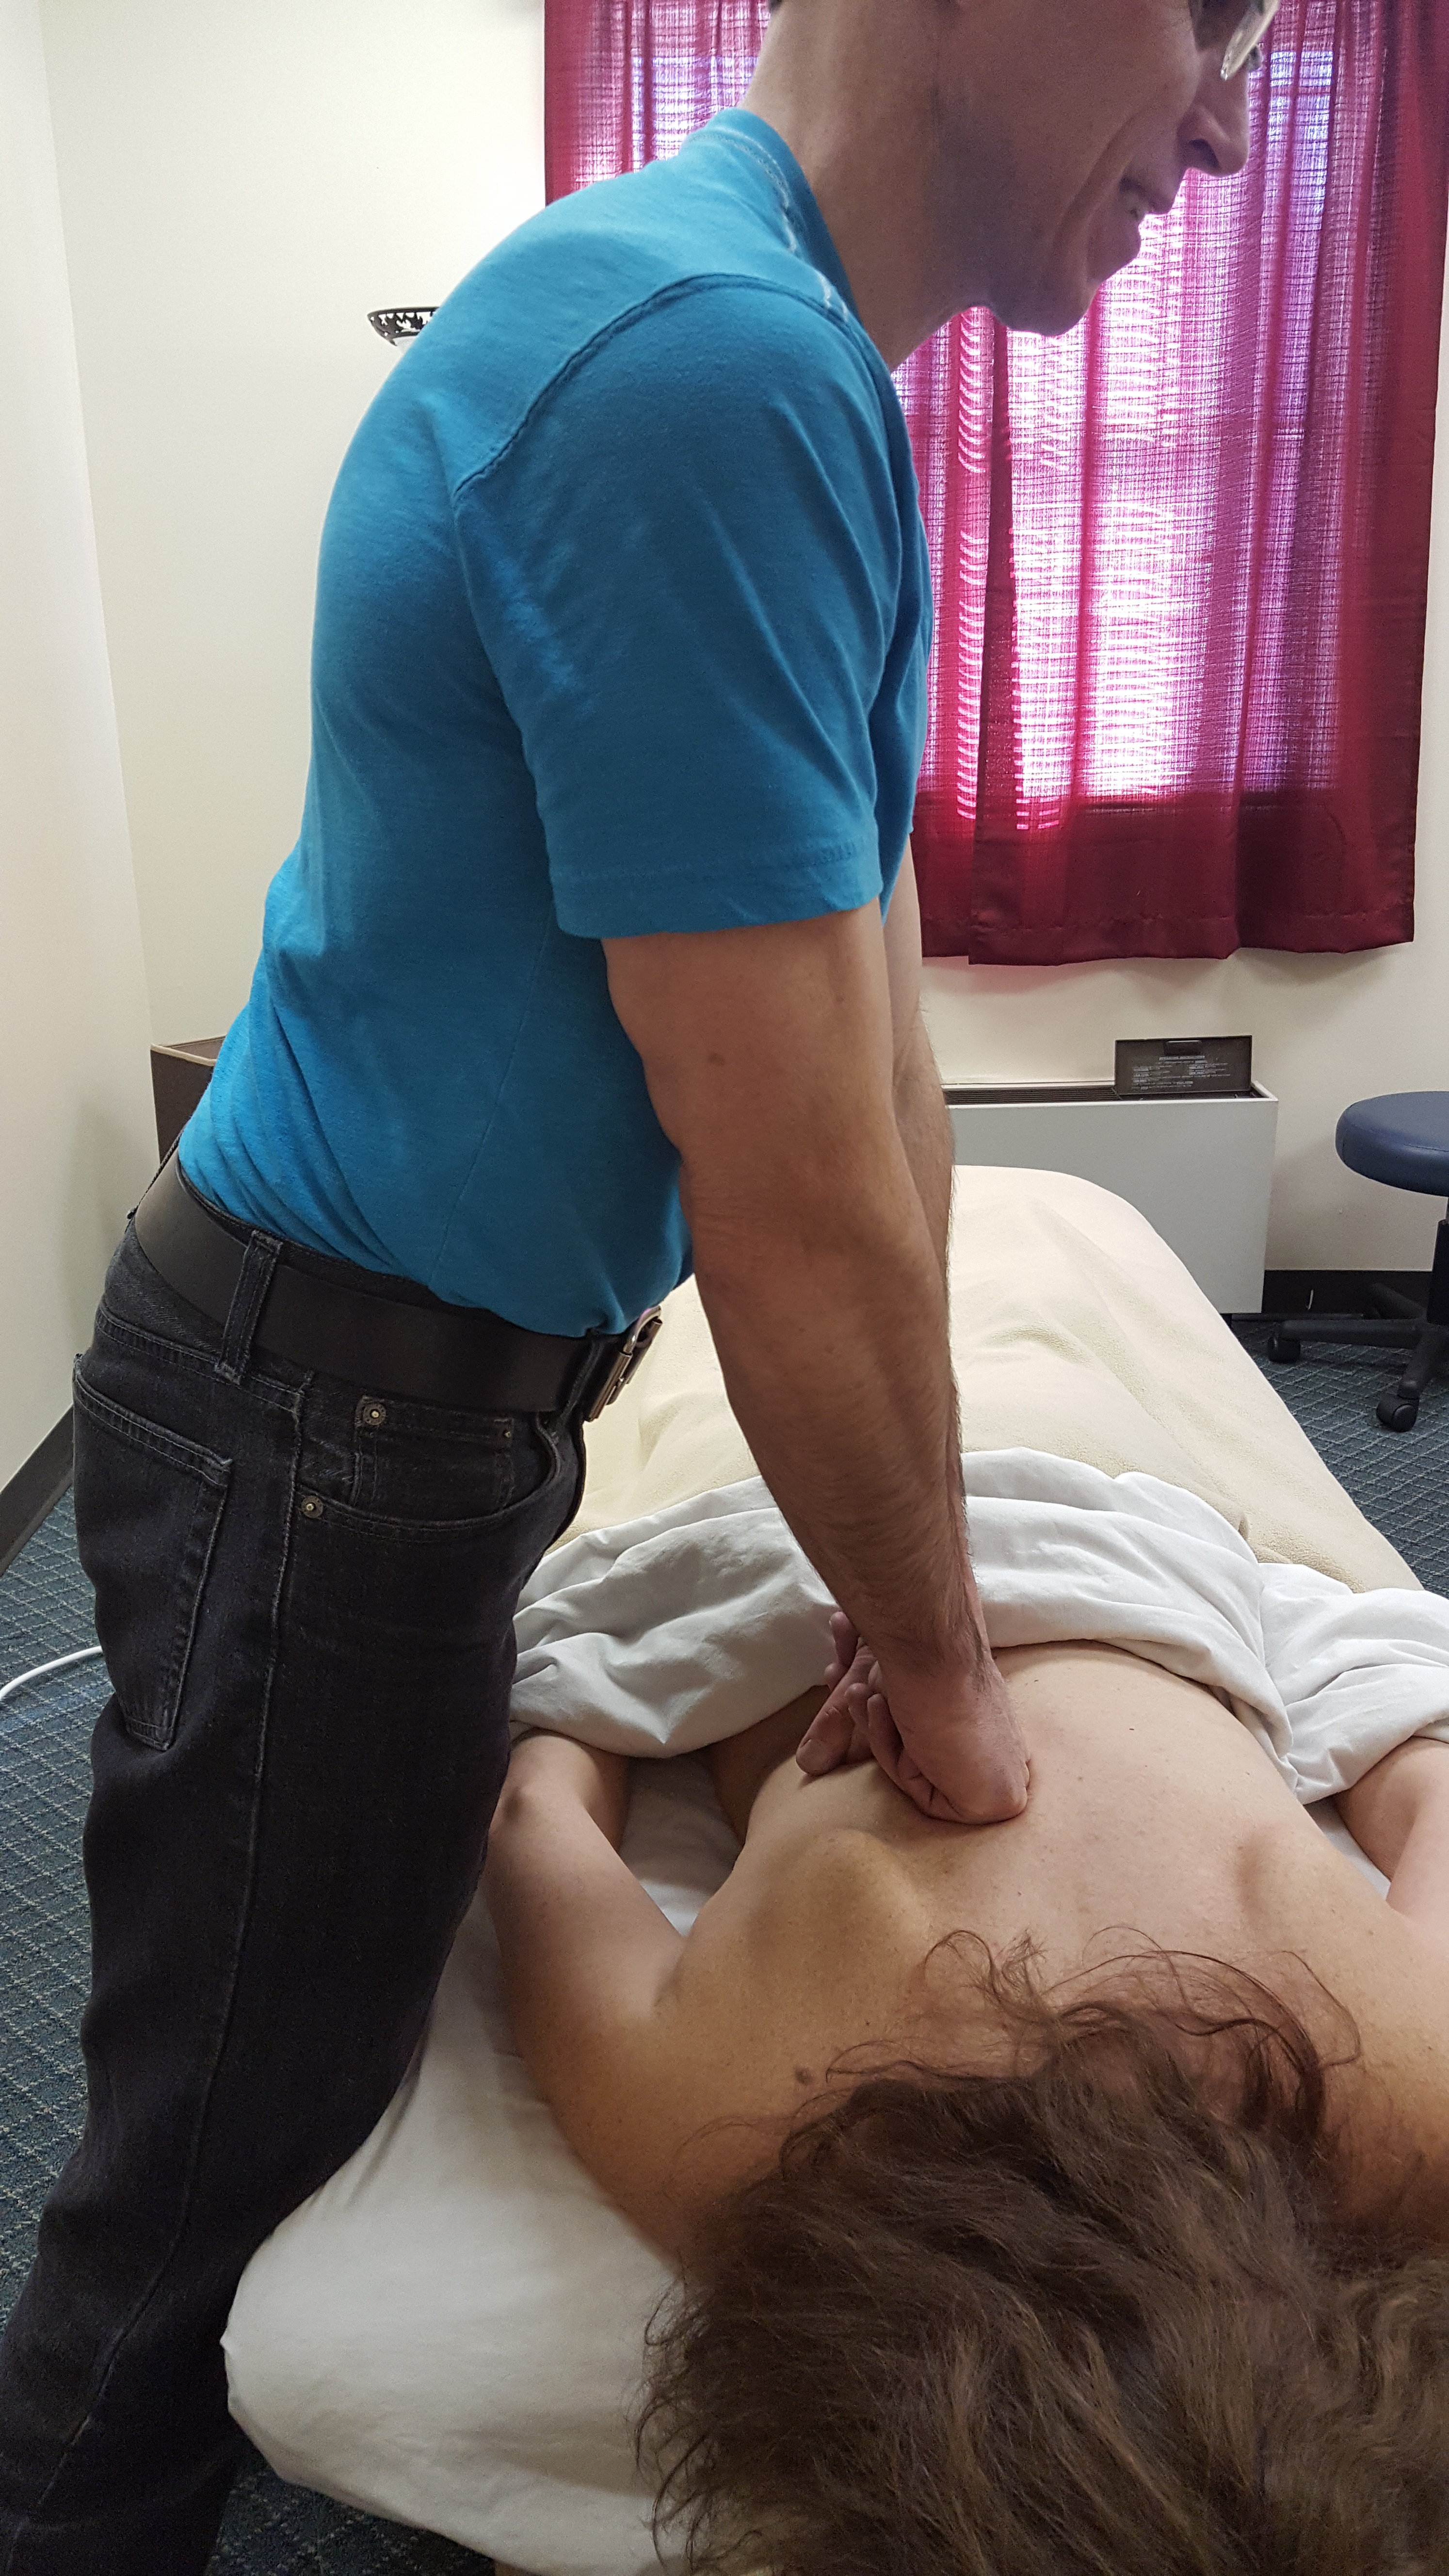
    See my leg leaning against the table in this pic? I’m primarily leaning into the table and exerting light pressure through my forearm. (80% into the table; 20% into the client).

    For deep pressure direct all of your body weight into the client.

    If you “fell” too deep, shift some of your weight back off the balls of your feet.

    Here are some other keys for deep pressure.

    Fall and Catch Massage Stances

    When using fists, thumbs, palms and knuckles, a narrow stance will allow you to transfer all of your body weight onto the client.

    Whereas, a wider stance won’t.

    Also, in general, for deep pressure step farther away from the table.

    For light pressure, step closer.

    Advanced Falling

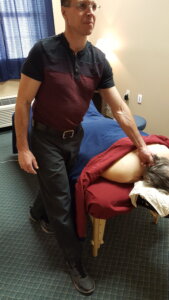
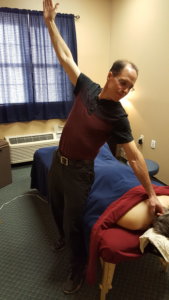
    You can also fall into your client with one hand.

    Here’s a little fall.

    A bigger fall.

    You can see in the picture that my back heel has come up and I’ve shifted my weight to the front of my feet.

    And a client-wants-ridiculous-pressure fall.

    Here I’ve switched stances so that I can get directly over the area I want to lean into with my body weight.

    Falling Sounds Like Leaning

    At this point, if you’ve read my other articles, you get that I’m using “fall” and “lean” interchangeably.

    But there’s a reason I chose “fall” this time.

    To me, “fall” conveys the feeling of letting go.

    Watch out below! Here I come with my fists!

    Okay, I’m not talking about jumping out of a plane letting go.

    I’m talking about the more subtle letting go that happens when you’re in a good mental space.

    Here’s how it works for me with fall and catch massage.

    The Zen of Fall and Catch Massage

    Once I got a few reps in of falling, I got good at controlling the fall (and landing).

    In other words, I became competent with (1) transferring my weight on my feet, (2) being in the right stance to deliver the desired pressure, and (3) knowing how to direct my body weight into the table and/or client.

    The result was that massage suddenly became easier to do. I went from eyeballs-popping-out-of-their-sockets strain to effortless work.

    And when massage is that effortless to do, it’s almost impossible NOT to completely relax.

    Definitely a “wax on, wax off, grasshopper” moment.

    Pardon the mixed analogy, but fall and catch massage gets me stoked. Cuz it’s a little slice of zen while you’re on the clock.

    For a deeper dive into falling (leaning), check out Table Height is Everything. 

    And don’t forget, if you need to make more money, build a business or get out of pain, join my email group. I’ll send you all my latest stuff. It’s free and you can unsubscribe anytime. Sign up below:-)

  • How Do You Hold a Massage Tool?

    How Do You Hold a Massage Tool?

    How do you hold a massage tool?

    If you want to do massage more than 5 years then you need to hold a massage tool in a way that’s not going to hurt your hand.

    Start by setting your table low. 

    Why low?

    So that you can lean your body weight into the massage table, pinning the tool between your hand and the tissue you’re working on.

    Once the tool is pinned you can relax your hand.

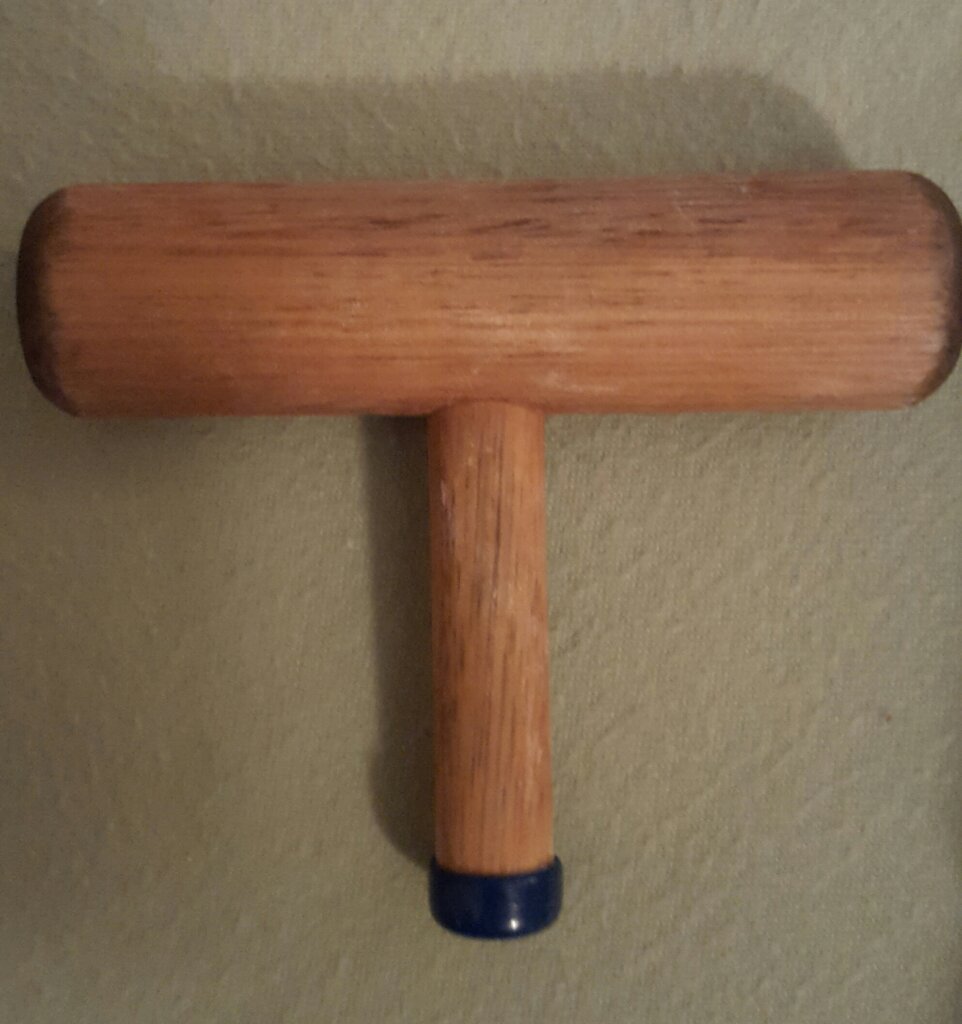
    I’m going to help you understand what this looks like in a second, but first I want to introduce you to one of my favorite massage tools: The t-bar.

    My neuromuscular massage instructors told me that the t-bar would save my thumbs when doing precise work.

    They were right. It did save my thumbs.

    But, unfortunately, it made my fingers cry.

    Crying fingers meant I used the t-bar sparingly, and I never got confident with it.

    It’s Not the Massage Tool

    For a long time I thought the massage tool was the problem.

    But it turns out that this wasn’t true. I was the problem–specifically, how I held the massage tool.

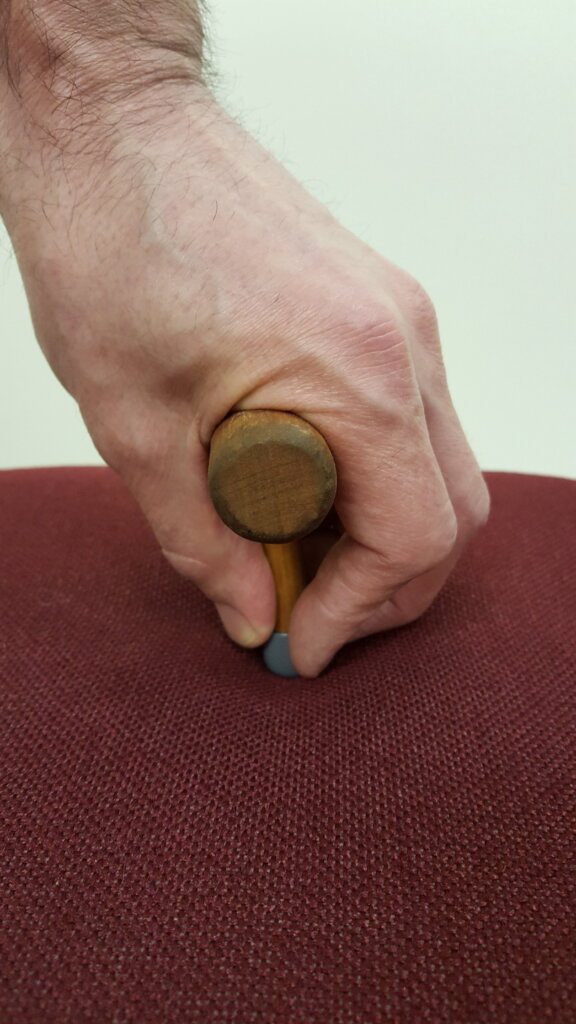
    Here’s how we were taught to hold the t-bar in neuromuscular massage training.

    You can see that my fingers are doing a lot of work at the end of the tool and, subsequently, they were in a lot of pain after doing a massage.

    Hmm…was there a way to hold the t-bar that wouldn’t stress my fingers?

    1. Lean

    My options increased once I lowered my table. When I lowered my table I could lean and use my whole body to generate pressure.

    When I did that it was easy to…

    2. Pin the massage tool.

    I’d pin the massage tool between my hand and the muscle I was working on.

    Once the massage tool was pinned, I could …

    3. Relax the hand holding the massage tool.

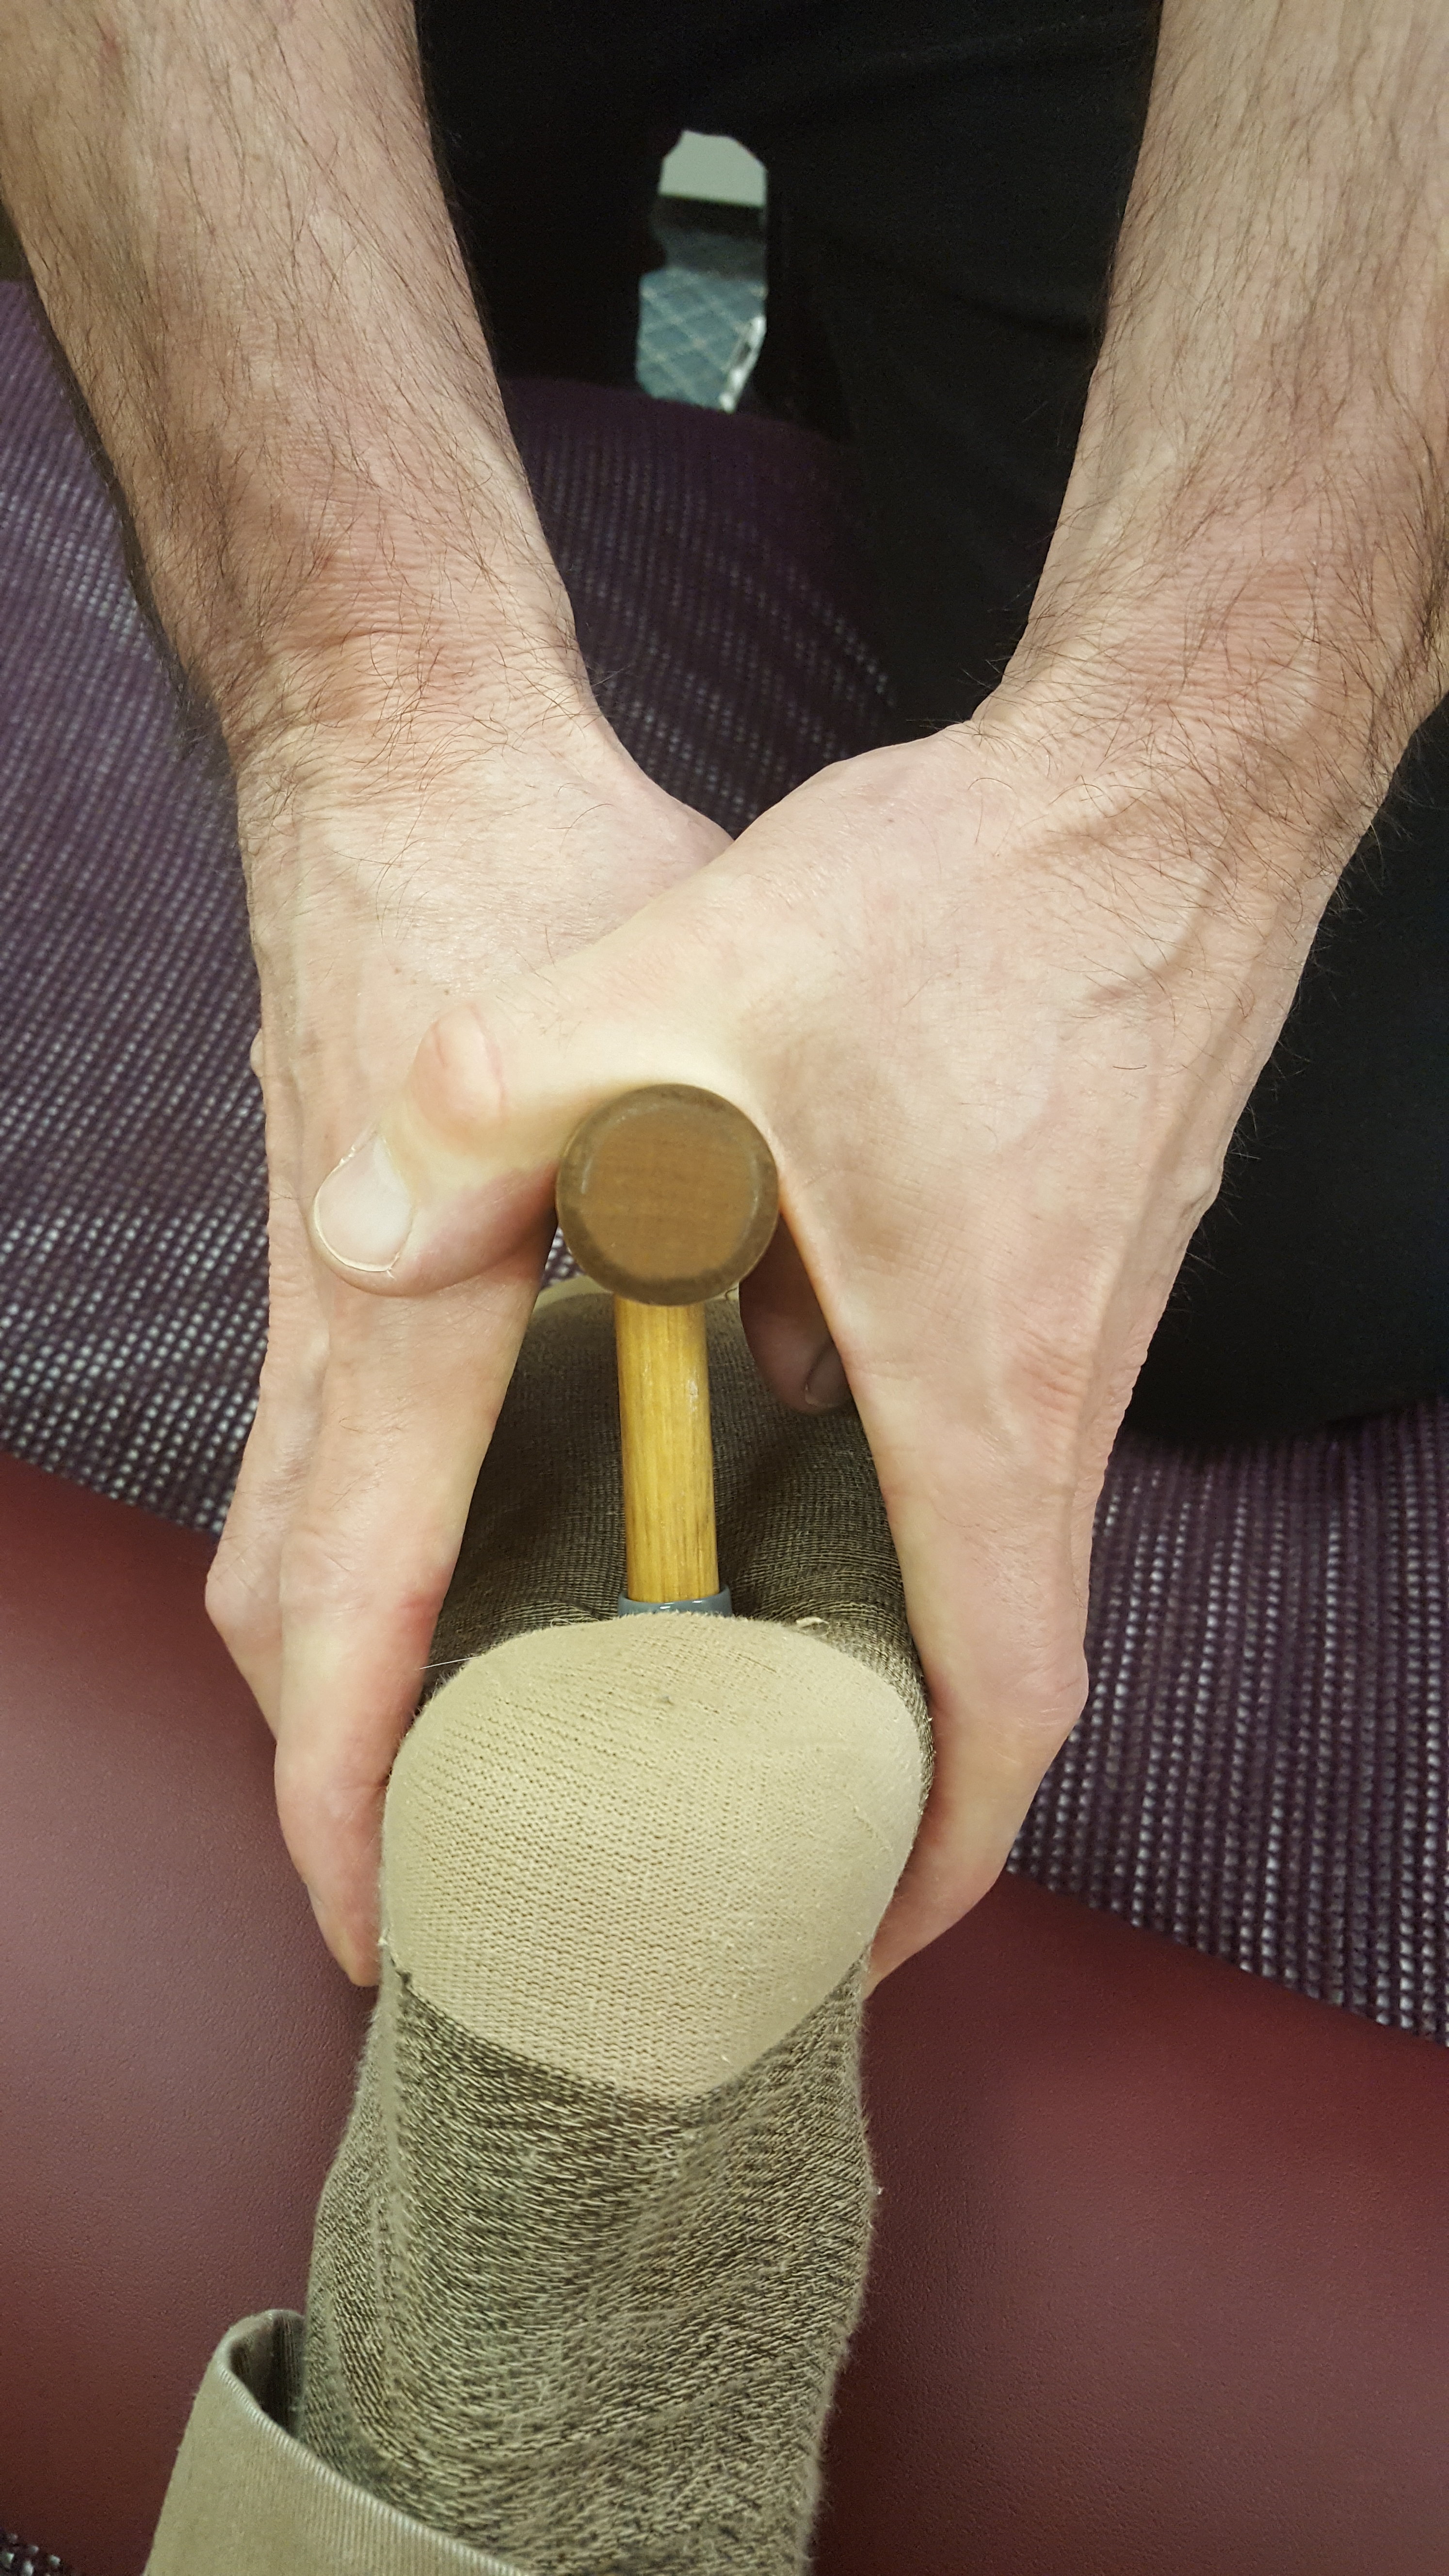
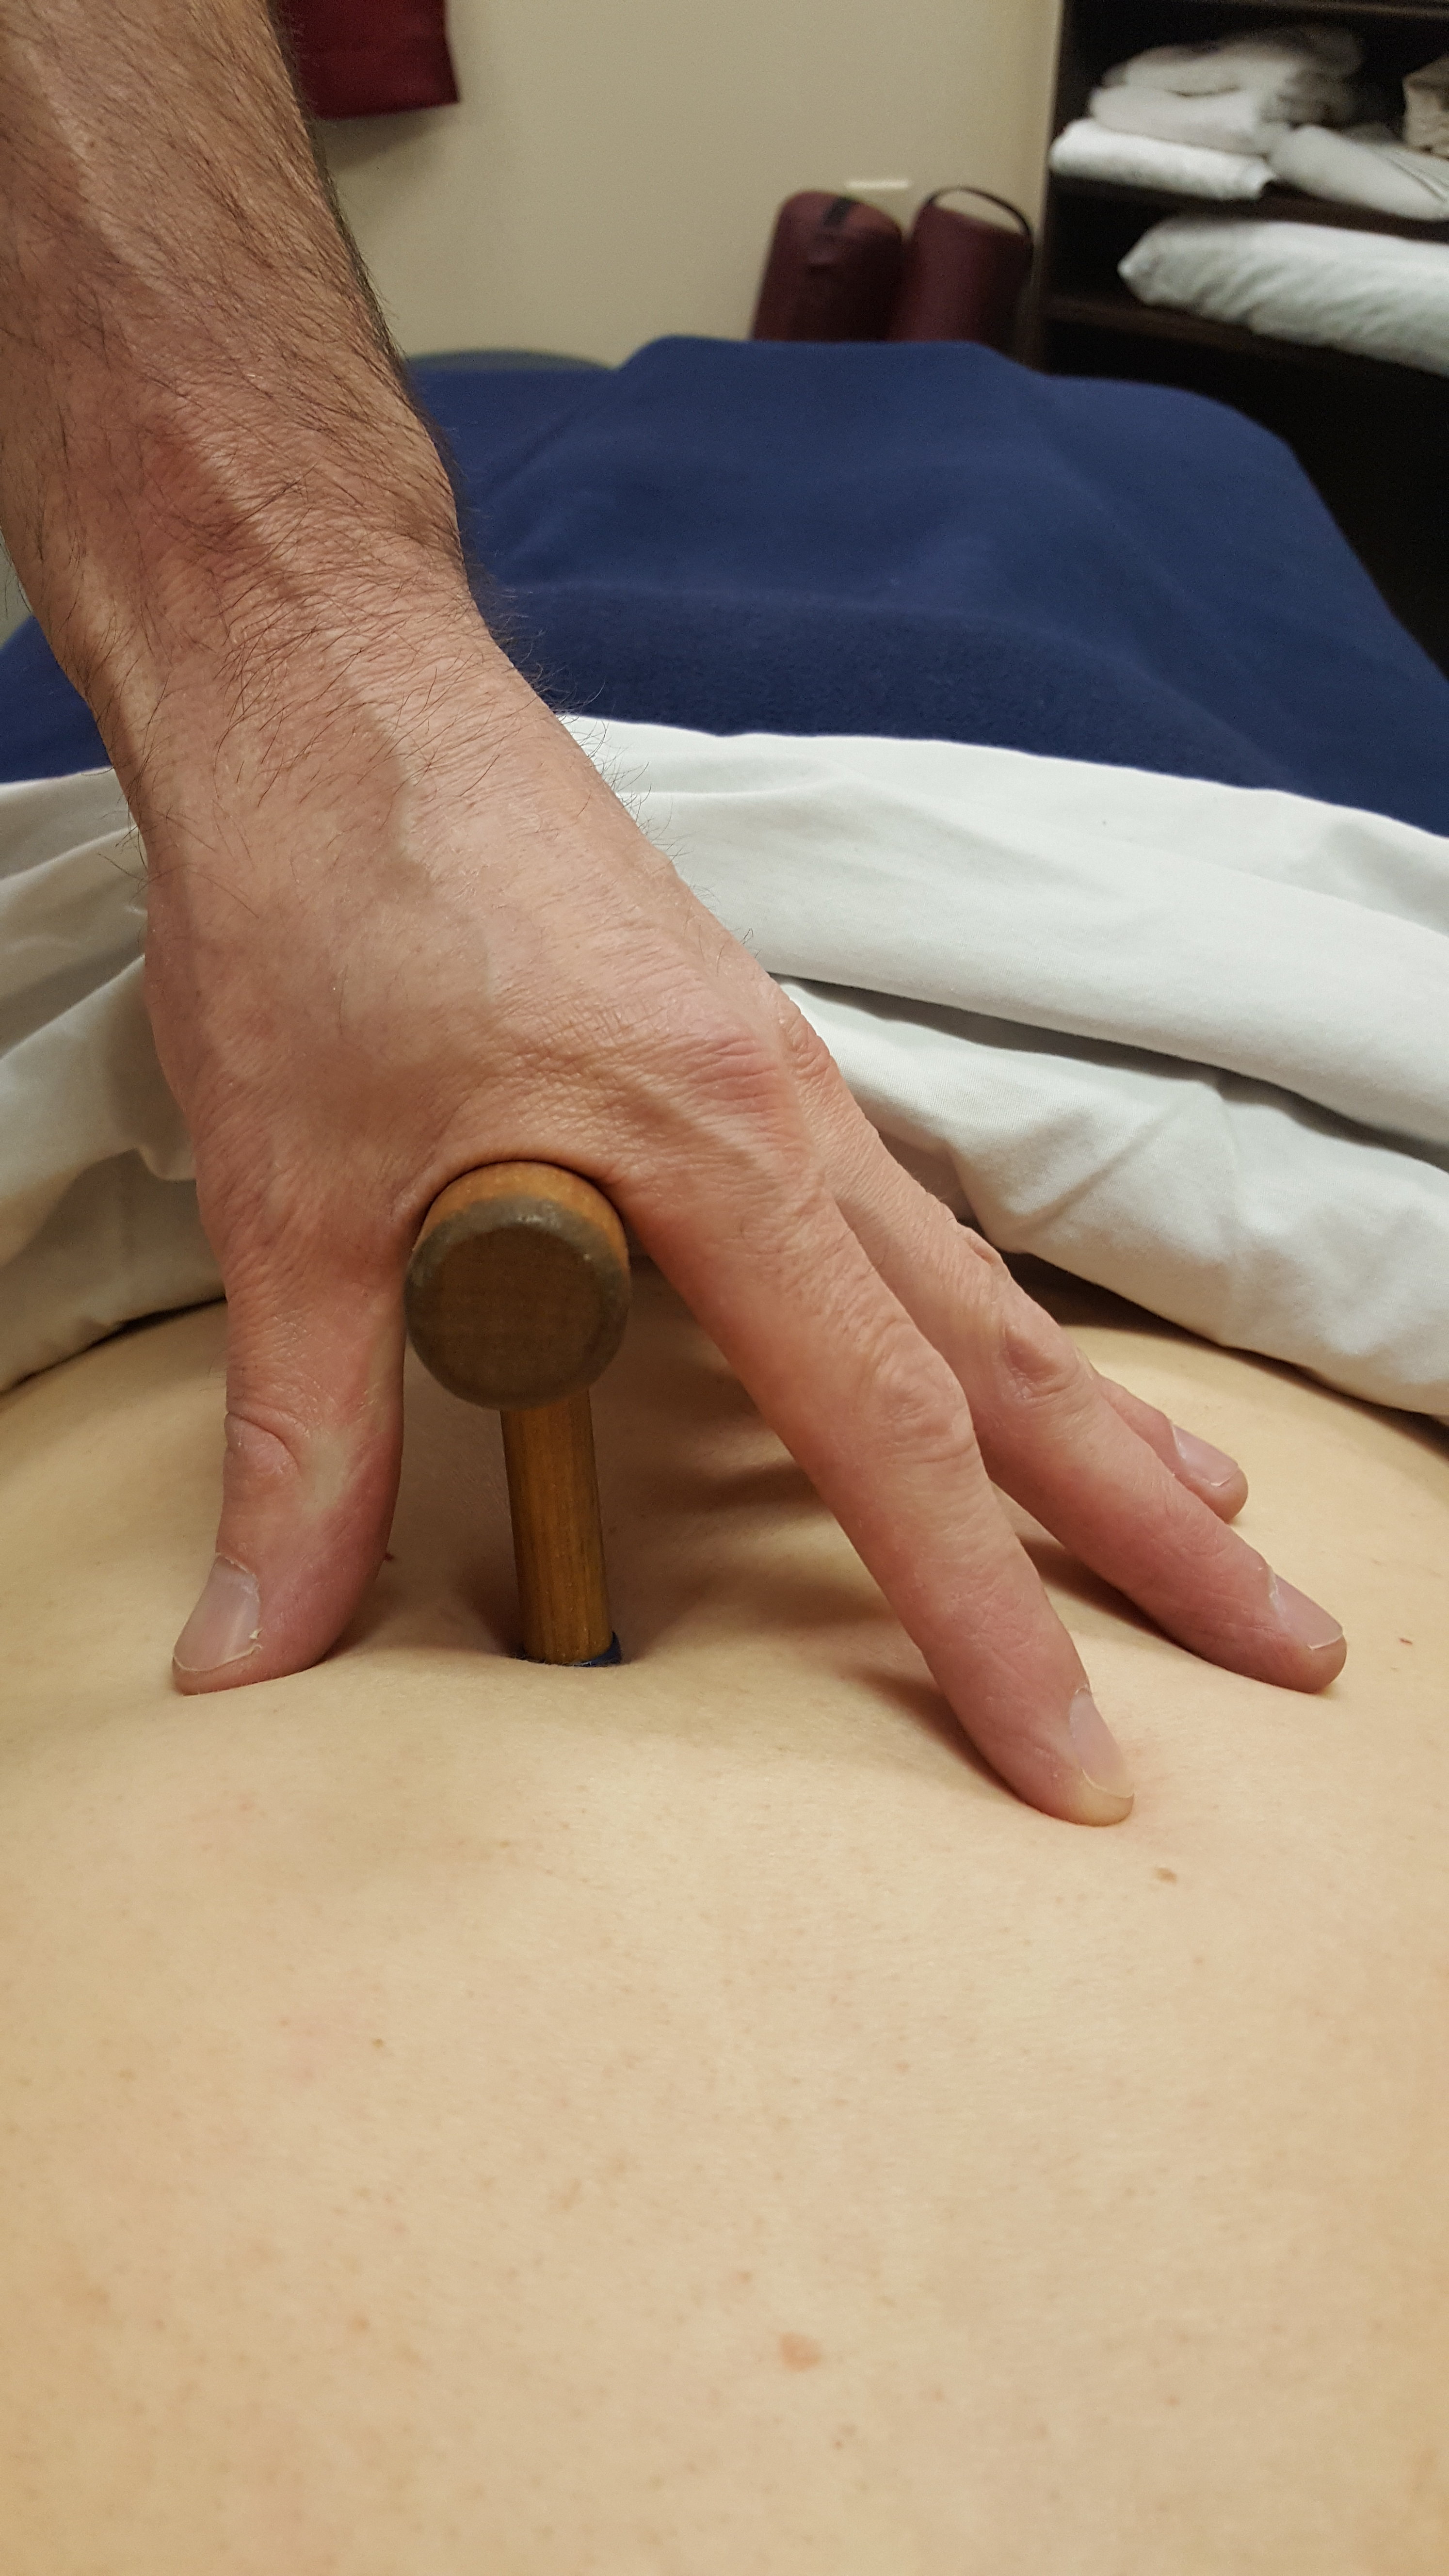
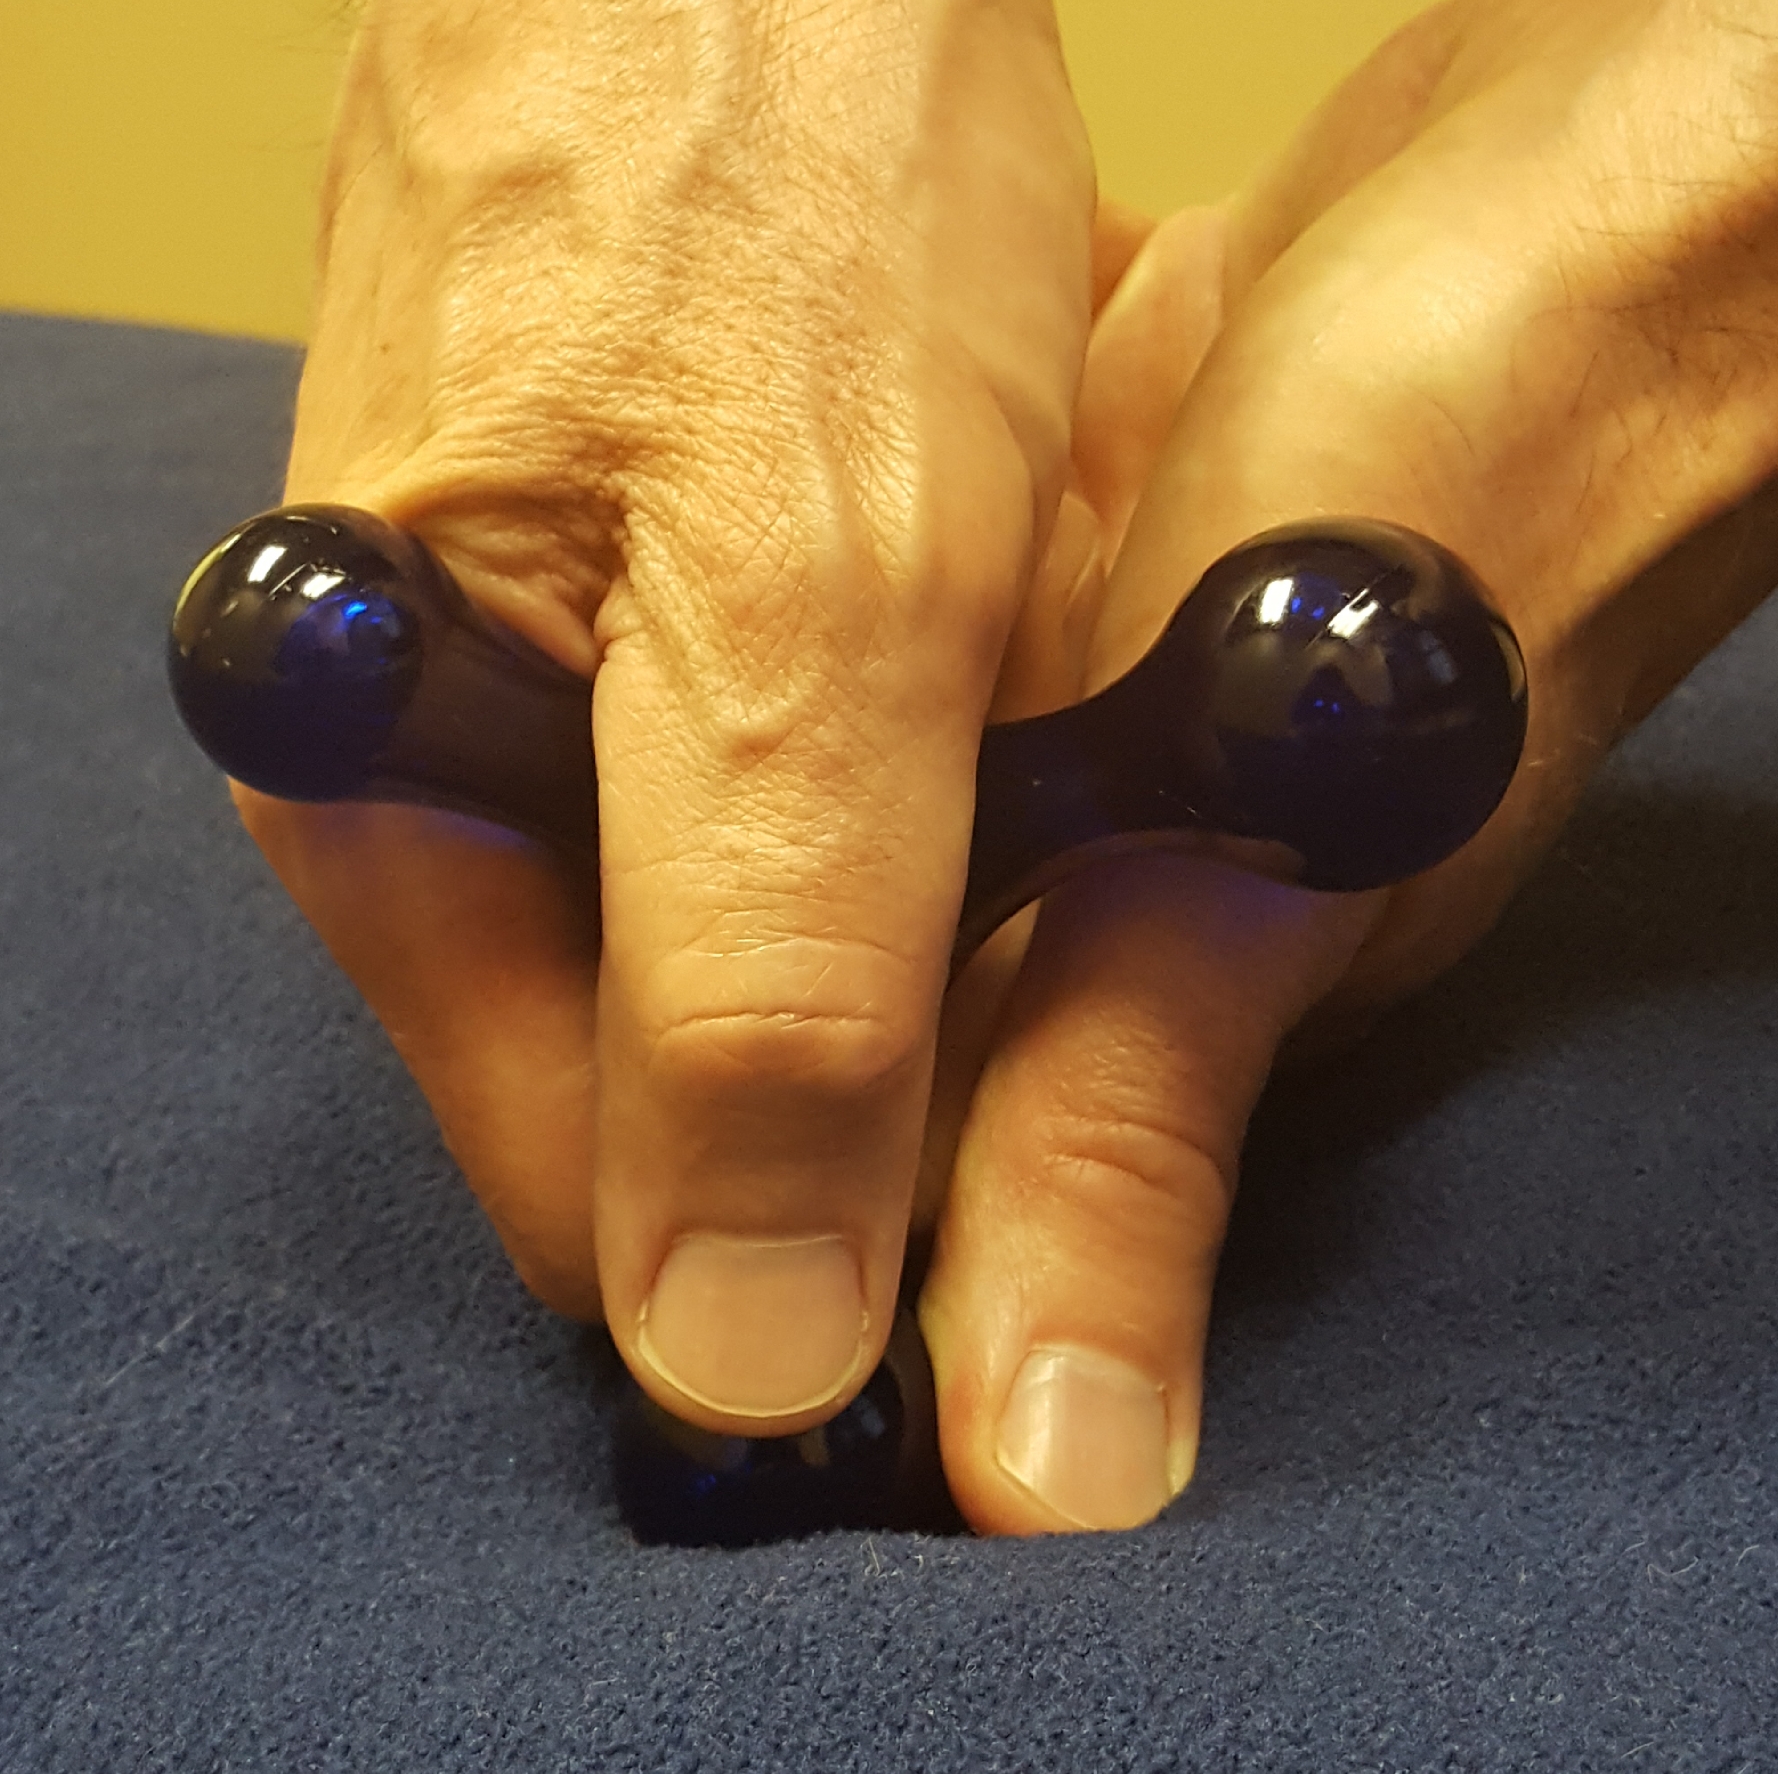
    Here’s my go-to hold now:

    My hand looks pretty relaxed, right?

    It is…but what happens if I needed to crank up the pressure?

    Exactly, I’d wrap my hand around the massage tool and grip hard so that the tool wouldn’t fall out of my hand.

    Fortunately, there’s an answer for over-gripping when doing deep pressure. 

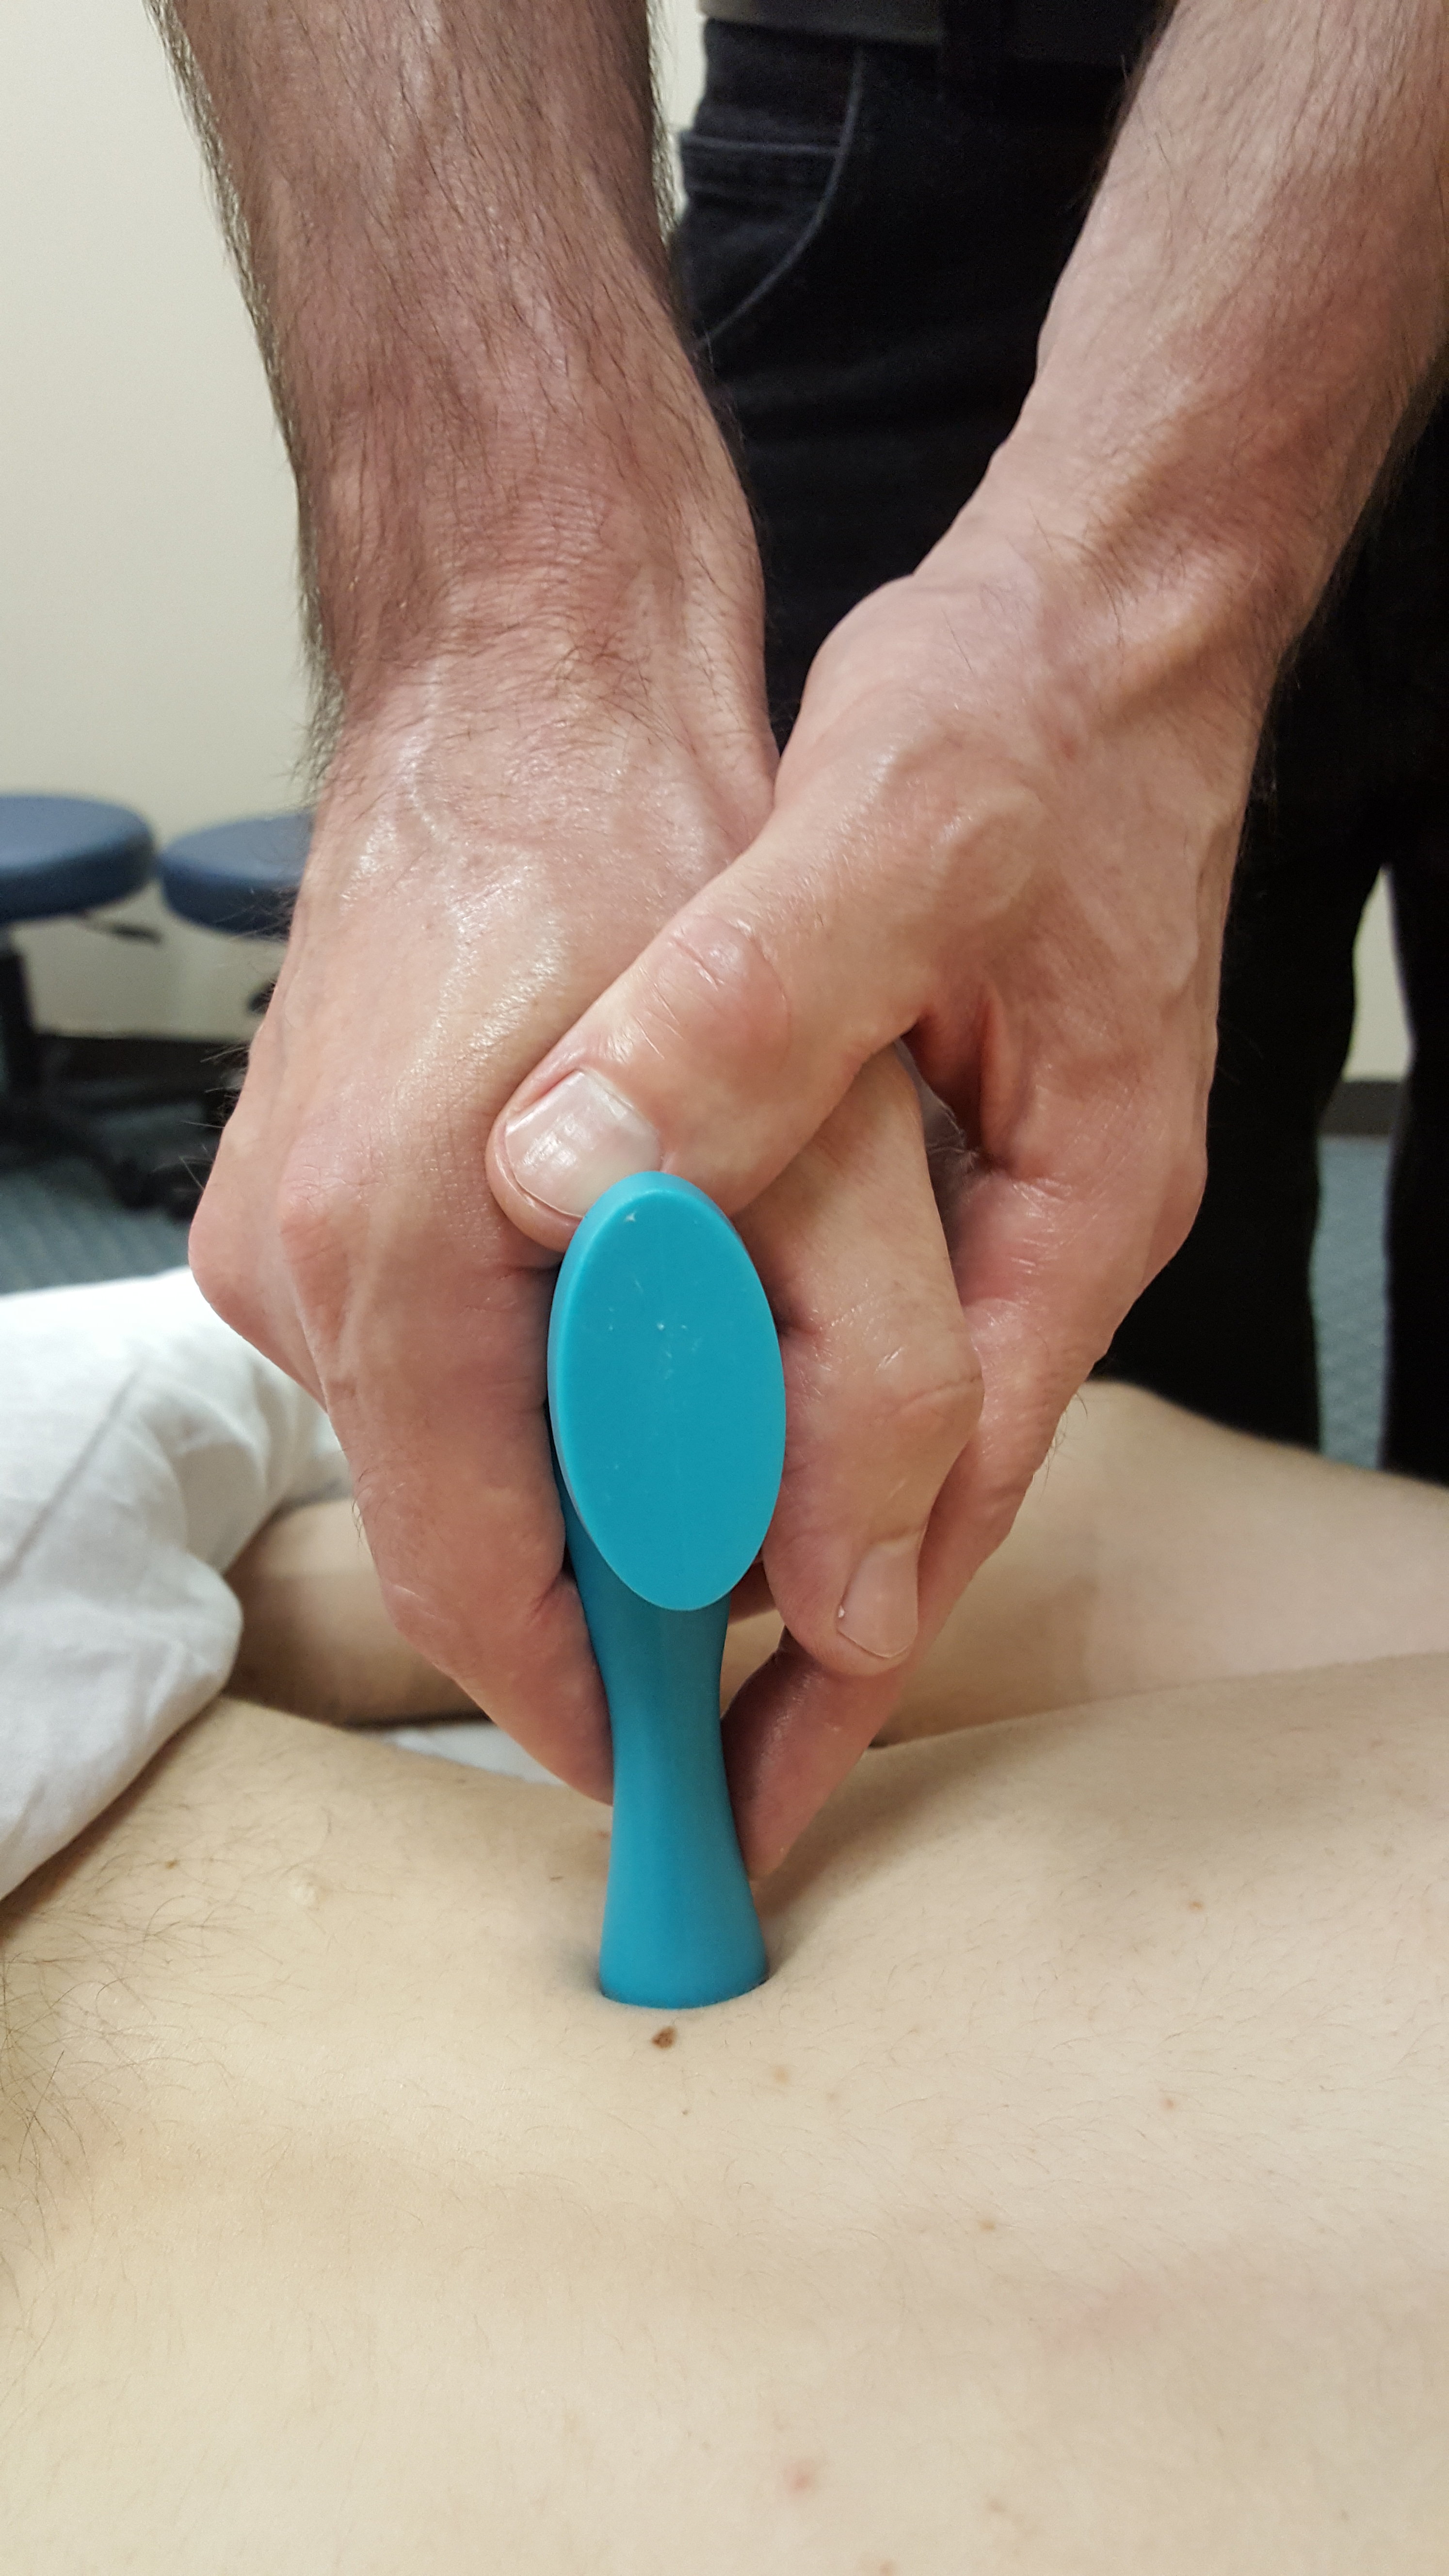
    It is to use a guide finger/hand or a second hand. 

    4. Guide Finger/2nd Hand

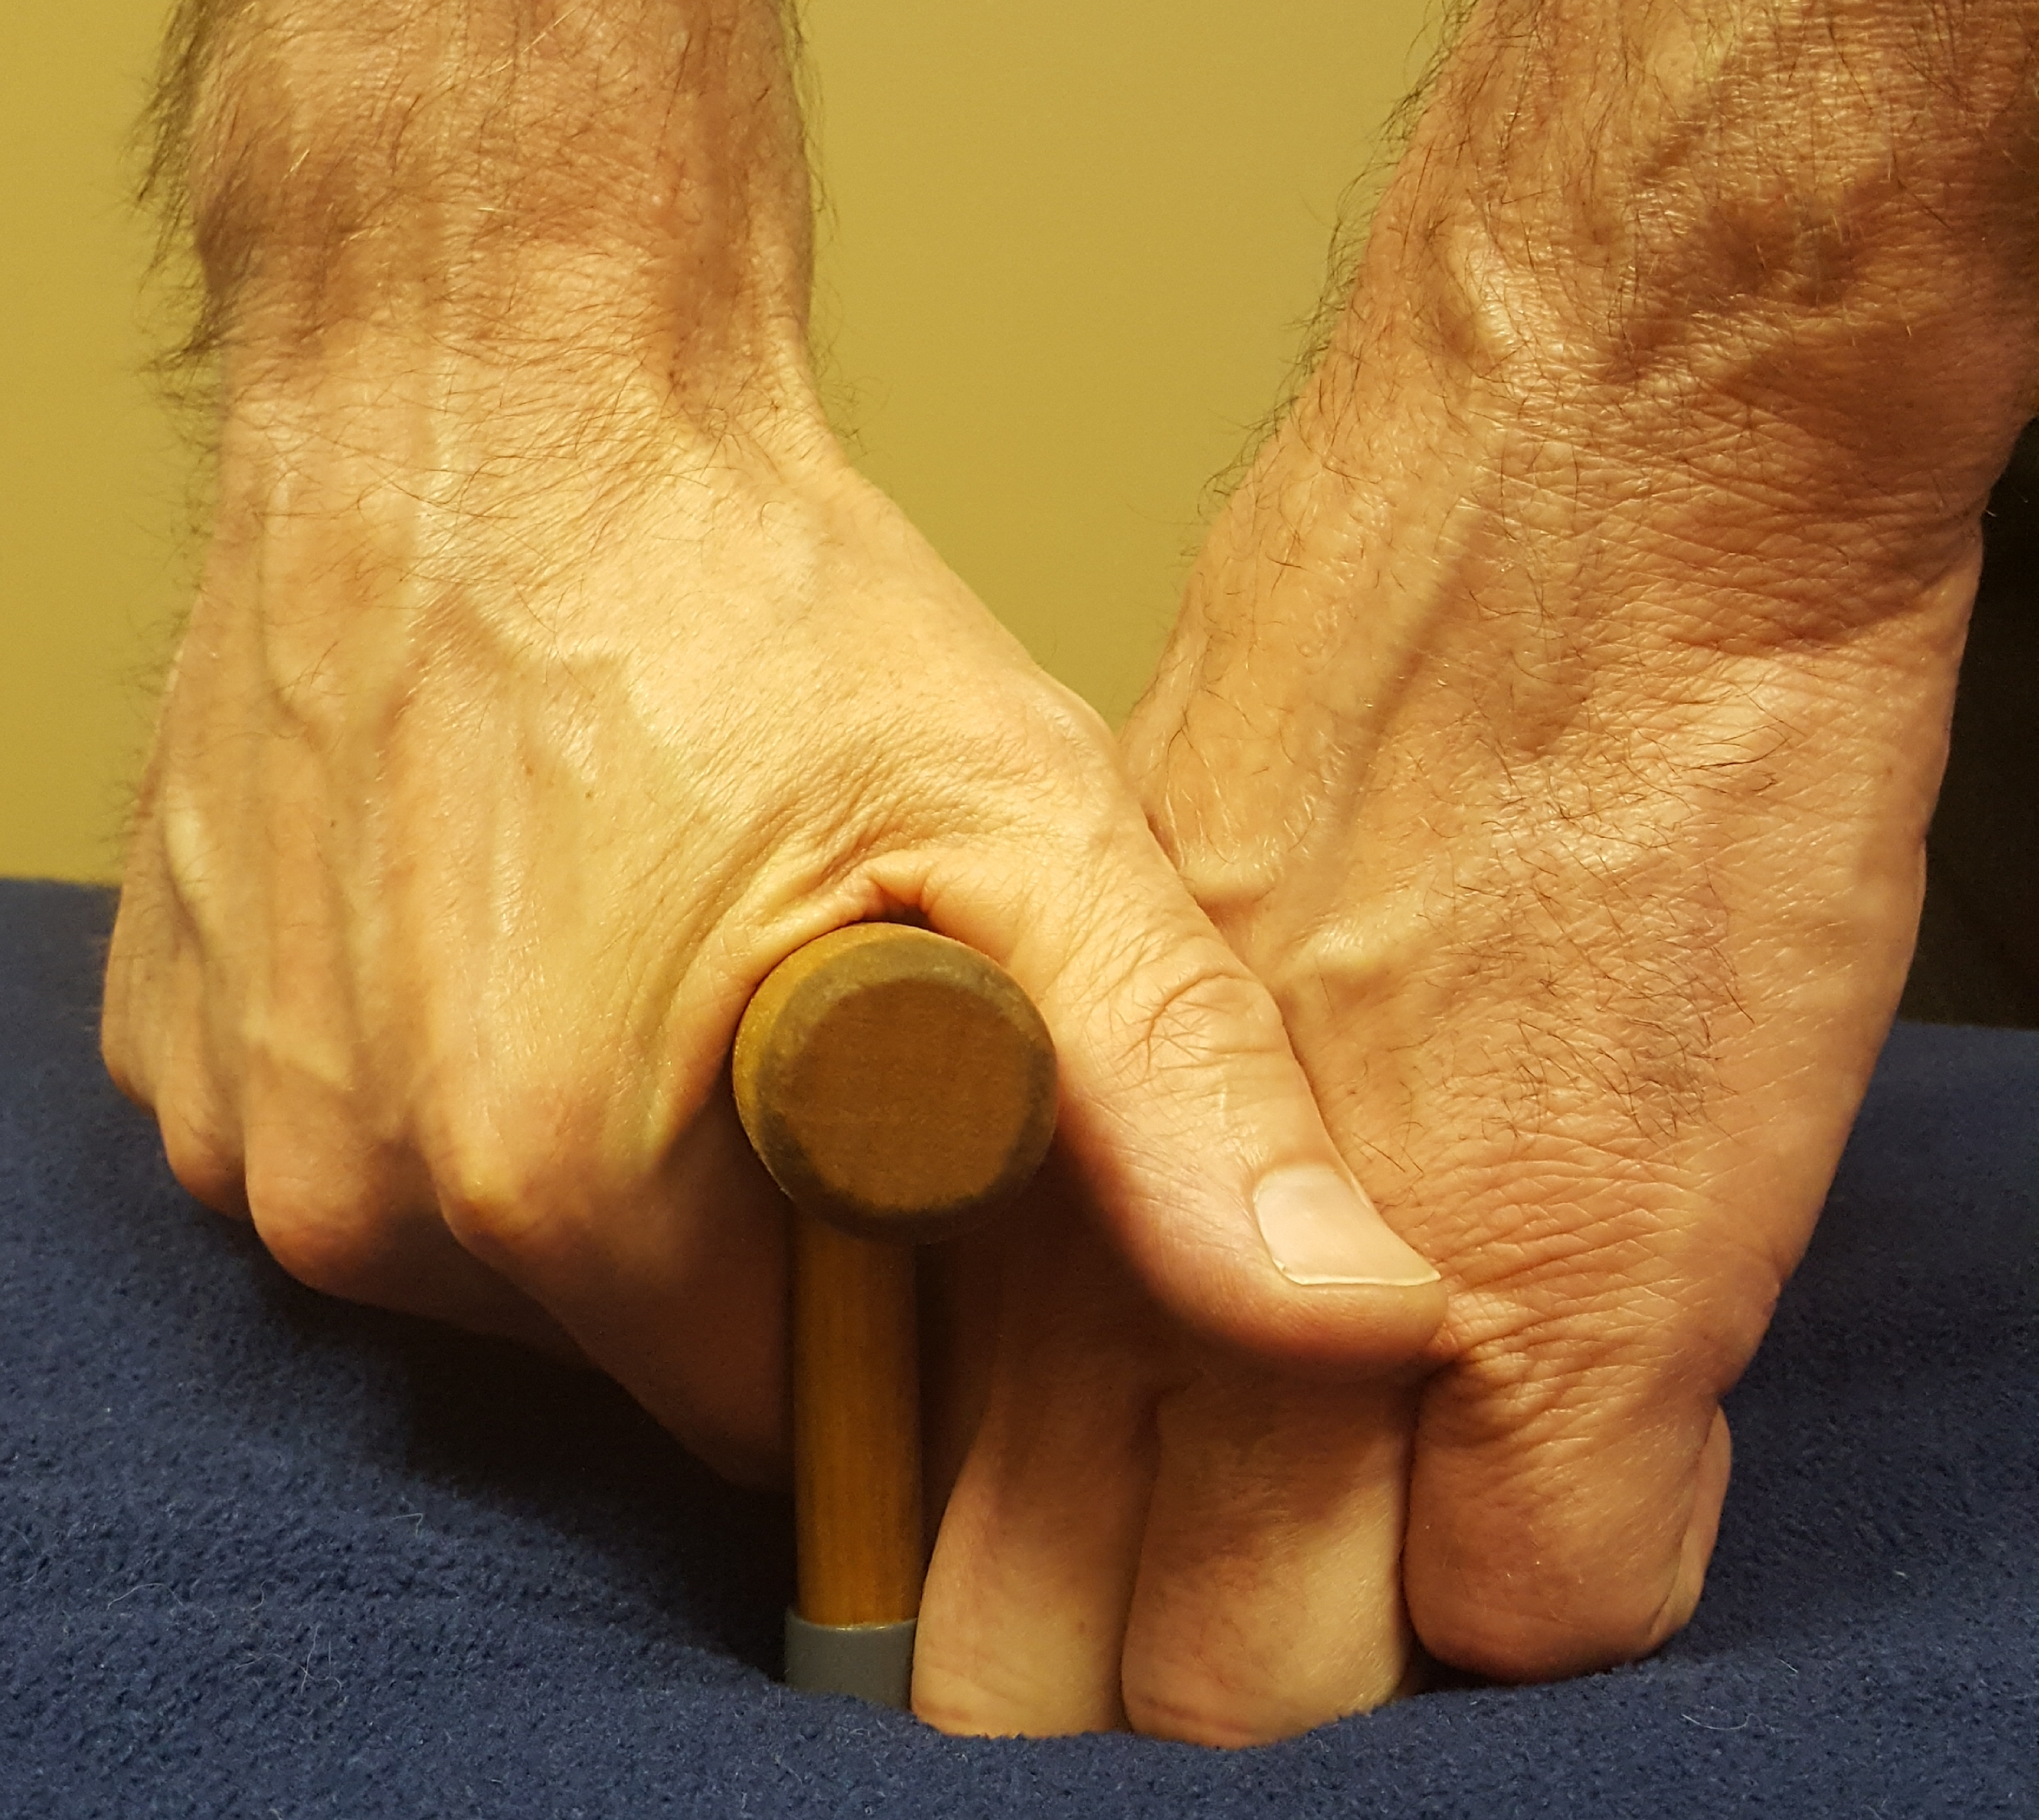
    A guide finger by the massage tool helped me stabilize the tool in my hand so that I didn’t have to tighten my hold when applying more pressure.

    In this picture I’m not directing a lot of the pressure (my body weight) into the guide finger because I’m basically using the guide finger to stabilize the tool.

    A guide finger also helped me with delivering pressure.

    Applying Pressure with a Massage Tool

    Say you want to use your T-bar to press into a trigger point with medium pressure.

    This is where a lot of MTs usually abandon ship and I get it.

    You’re taking a hunk of wood or plastic and trying to press with a certain amount of pressure.

    How the hell is that going to go well?

    Well, the trusty guide finger will help you out.

    First, with your guide finger palpate where you want to apply specific pressure.

    In the picture below my thumb next to the tip of the massage tool is my guide finger.

    Once you find the area press with your guide finger at the specific pressure you desire.

    Next slip in the massage tool tip where your guide finger was and mimic that pressure.

    It’s really not hard to do.

    And once you start getting some reps in you’ll be able to start “sensing” pressure through the massage tool.

    So, the guide finger helps stabilize the massage tool, find trigger points/tight spots and is the mechanism for determining pressure with a massage tool.

    It will also save you from making someone scream Ouch!

    How Not to Make Someone Scream when Using a Massage Tool

    Let’s just say it, massage tools look intimidating.

    One time a client looked up from the massage table and saw all my massage tools spread out on my stool.

    She said, It looks like I’m about to get a dental treatment.

    Come on, I said, I’m not licensed to administer Novocaine. 

    The fact that massage tools can look threatening doesn’t mean they need to cause pain. 

    And you can pretty much eliminate times when you press too hard or press into something you shouldn’t, like a bone or a lipoma, by doing this one thing: Do an exploratory massage stroke without the massage tool.

    Without your massage tool do a glide stroke and note the areas where you may want to apply more or less pressure.

    I’m going to call those notable areas speed bumps because you should be slowing your stroke down as you approach them.

    Once you have a road map of your speed bumps you can glide with your massage tool.

    As you approach a speed bump lighten your pressure with the massage tool. And once you’re on the speed bump you can then determine how much pressure you want to apply with your massage tool in a safe and slow way.

    This is what an example looks like:

    Speed Bump Map for the Back

    Destiny wants her back worked.

    So, before you pick up your massage tool you do some exploratory massage strokes to get a feel for her back. 

    Here are the speed bumps you find: Right side between scaps tight; T8 spinous process not aligned; L2 areas tightness; L5 lypoma.

    Here’s what your massage tool stroke might look like:

    You start your stroke above the scapula and before you get to your first speed bump between the scapula and the spine, you slightly lighten your pressure with your massage tool.

    Once you understand the tightness and location of the speed bump with you massage tool, you start to apply the pressure you think is appropriate with the massage tool.

    You settle for medium pressure and you ask Destiny how that feels.

    She says, Perfect.

    You then glide to the next speed bump, the misaligned T8 spinous process.  You lighten your pressure before you hit the speed bump.

    The area next to the misaligned T8 doesn’t feel tight and the client is reactive to your pressure. You decide that your massage tool is not needed here.

    You continue on to speed bump number 3, tightness around L2. 

    You lighten your pressure, get on the speed bump and then hear Destiny sigh. You lean into your massage tool a little more to exert more pressure and you sense that Destiny is relaxing even more.

    This speed bump likes the focused and deeper pressure.

    You spend a little more time there and then continue on to the last speed bump, what you think is a lipoma around L5.

    As you approach this speed bump you opt to use your guide finger to palpate this area.

    Yep, you’re fairly certain it’s a lipoma.

    No tool work needed here.

    No screams.

    No pressing on things you shouldn’t be pressing on.

    Boom.

    It was a clean and effective massage-tool, glide stroke and your client loved it.

    So I’d diverged a little here because I thought it was important to show you that a massage tool is not a lethal weapon and, in fact, could be a very effective relaxation tool.

    Now I need to tell you one more thing about holding a massage tool: Vary your holds to help avoid overuse injuries.

    Vary Your Holds

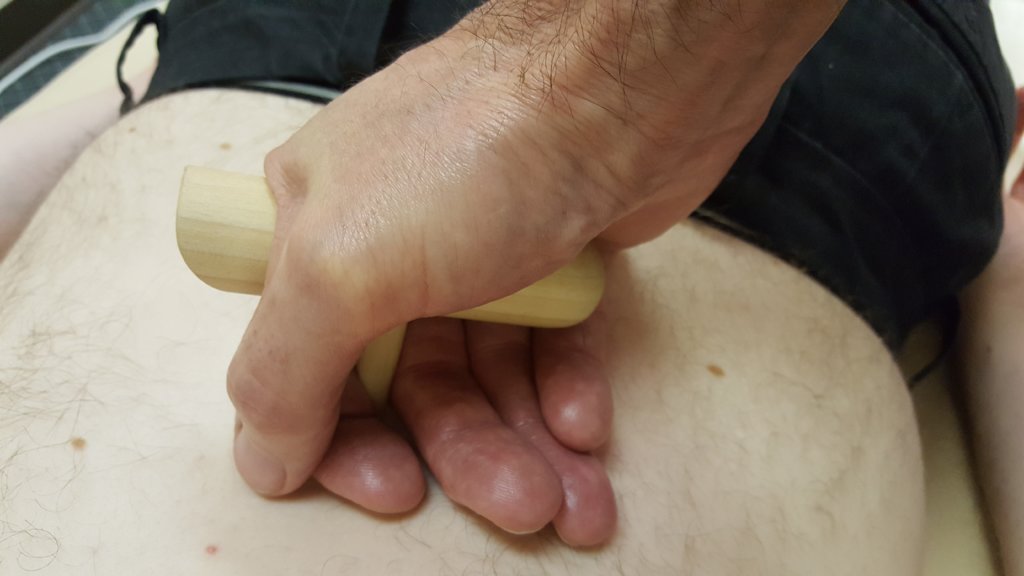
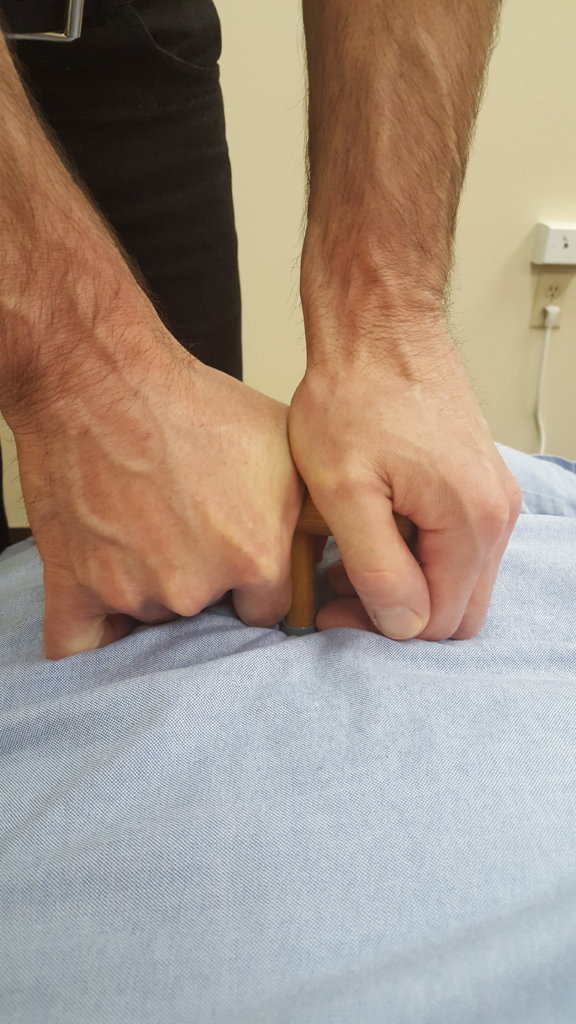
    Here are some variations on my go-to hold. This is a fist-as-a-guide-hand hold.

    This is a two-handed hold (both hands on the handle).

    This is a two-handed hold on a TheraPress.

    Once you have 3 or 4 holds down pat your massage world will change.

    Your hands won’t burn out. You’ll be able to increase your massage max. And you won’t fear deep work.

    Let’s do a quick recap.

    How Do You Hold A Massage Tool Recap

    So, how do you hold a massage tool so that it doesn’t hurt your hand?

    1. Lean.

    2. Pin the massage tool.

    3. Relax the hand holding the massage tool.

    4. Add a guide finger or use two hands to stabilize the massage tool.

    You can sense pressure and palpate with the guide finger.

    Sprinkle in different holds and voila your hands are going to love you.

    In this video I demonstrate how I use two hands to hold a massage tool:

    [embedyt] https://www.youtube.com/watch?v=V9rNmUwU_J0[/embedyt]

    Want to know more about how I use massage tools for focus work, relaxation massage and deep pressure massage?

    Check out my online, home study class: How to Use a Massage Tool


  • Will a Low Massage Table Hurt Your Back?

    Will a Low Massage Table Hurt Your Back?

    Will working on a low massage table hurt your back?

    Not if you adopt these strategies:

    (1) use the table for support,

    (2) take wider stances when doing lighter pressure,

    (3) incorporate seated work and

    (4) avoid static posture positions.

    When you do those four things you’ll be able to deliver all ranges of pressure efficiently and with minimal strain on your body.

    I know, I sound pretty confident with that answer.

    Here’s why: For about 20 or so years my massage table height was normal.

    Hold on there, Mark, what’s normal?

    Good question.

    Normal to me was setting my table height so that the first knuckle of my middle finger would touch the top of the table.

    Edward Mohr recommends figuring out your table height by first trying your table at half your height.

    Bottom line, there is no consensus on what normal should be, but we can say this about normal: It has recognizable boundaries.

    In other words, we all recognize when a massage table height is out of the normal range.

    All least my clients do: “Hey, Mark, is your table too low? Isn’t that gonna hurt your back?”

    So, for about 20 years I set my massage table height within the normal range and clients weren’t worried about my back.

    Then about 5 years ago all hell break loose. I was diagnosed with cervical radiculopathy, cubital tunnel syndrome and shoulder instability.

    The way I was doing massage was killing my body, and I needed to find another way to get the job done.

    Here’s the short version of what happened next. Because my neck and shoulder hurt when I did deep work with my forearm, I needed to find an alternative to my forearm.

    Enter fists.

    Massaging with Fists

    But there was a problem with fists at the normal table height. I couldn’t transfer my body weight onto the client. So, I’d have to use a whole lot of pressing action with my upper-body to generate deeper pressure which meant more stress in my neck and shoulder.

    So, I lowered the table so that I could lean (transfer) my body weight through my fists onto the client.

    Bingo!

    Deep pressure was easy do when I did that.

    But no one is just going to use fists throughout an entire massage, right? And when fingers and palms and forearms start to come out, the table is going to be too low. One case of back strain coming up!

    That’s 100% true UNTIL you learn how to adapt to a low massage table.

    My adaptation process was accelerated last year when I decided to do a Can My Massage Table Be Too Low? experiment. For 7 days, I set my table on the lowest setting possible for each client I saw, no matter if they were big or small, thick or thin.

    Guess what happened to my body?

    Nothing.

    Now I’ve taken it even a step further and two months ago I set my massage table at the lowest setting possible for each and every massage.

    I don’t plan on ever changing that.

    Why Stay Low?

    I’m sticking with low for two reasons. One, I can generate pressure effortlessly by simply transferring my body weight onto the client.

    And, two, I know how to adapt to a low table so that my back is fine.

    Here’s a quick primer on how to lean when using a low massage table.

    [embedyt] https://www.youtube.com/watch?v=NhBh2cdGz6A[/embedyt]

    And here’s how you adapt to a low massage table.

    Low Massage Table Hurt Your Back NOT – Adaptations

    A low table looks scary, like it’s going to hurt your back–but it won’t.

    The Can My Massage Table Be Too Low? experiment put a spotlight on 4 things that had to be done in order to successfully adapt (no strain in your back) to a lower table.

    Let’s tackle these four things right now.

    1. Bend your legs.

    Here I’m delivering deep pressure with my knuckles and fists. The table is low so that I can lean into client.

    But when I want to lighten the pressure it gets more complicated. I can either bend at the back and cripple myself OR bend my legs like I’m the Karate Kid.

    It will feel a little weird at first when you start doing Karate Kid stances, but you’ll love the results. No back pain.

    During the experiment I took bending my legs to whole new level. But I didn’t fatigue because of thing number #2.

    2. Use the table for support.

    Think of the table as a wall to lean against. Use it to support your weight.

    Look at my back leg in this pic. A lot of my weight is being directed into the table through my leg.

    Here I’m leaning into the table in a Karate Kid stance. (Notice how I can really get into the lamina groove on this person….haha…)

    Once you get that “the table can help hold you up”, you start looking for ways to rest against the table. And you begin to…

    3. Approach massage as dynamic work, not static work.

    By dynamic I mean moving and flowing with a purpose in mind–to effortlessly do a good massage.

    Here’s a movement sequence that happens naturally when you bend your legs and use the table as support.

    Deep pressure first.

    Relax your back.

    Then I bend my legs for light pressure on the neck.

    In this light pressure situation I switch to one hand and get vertical. Notice my leg against the table. I’m still using the table as support.

    And at the end I throw in a stretch.

    It may look like a lot of work, but if you’re at one with your massage table (using the table to support some of your weight), massage becomes effortless.

    4. Sit when you can.

    I have to come clean. The reason I perfected seated massage was because my toe hurt at the end of long work days and I was tired of adjusting the massage table for each client.

    So, one day I kept my table height on the lowest setting for everyone. And when a light pressure client came in guess what I did?

    You got it. I sat down for a lot of the massage.

    It worked great. (And later with other clients I discovered how to generate deeper pressure when sitting, especially in areas like the traps.)

    Want to know more about sitting on your butt to do massage? Check out How to Use a Massage Stool.

    A Low Massage Table Won’t Hurt Your Back in a Nutshell

    After you use the strategies that I’ve talked about for working on a low table the question actually changes to: Can your massage table be too high?

    And my answer is yes.

    If your massage table is too high for you to lean to generate pressure then you’re going to have to press really hard with your upper-body.

    You may be able to get the job done, but at what cost?

    Your hands, arms, shoulders and neck will let you know.

    Whereas, if you have a low massage table, medium and deep pressure is a slam dunk.

    And during times when a low table is not optimal for your back (like thin people and light pressure), you can easily adapt to a low table by bending your legs, using the massage table for support, breaking up static posture positions and sitting to do massage when you can.

    This video brings it all together:

    Read my articles and watched my videos, but deep pressure still kicks your butt?

    I can help.

    From 1,000 miles away?

    Actually, yes. Click here.

  • How to Start a Massage Blog

    How to Start a Massage Blog

    A massage blog or a side hustle blog is not for everybody.

    Weren’t expecting that opening, huh?

    But it’s true. You may like the idea of a massage blog, but if you don’t like to write it’s probably not a good idea to start a massage blog then.

    (There’s a way around that one. It’s called a Vlog. I’ll cover that in another piece.)

    Or a blog may be the next shiny object to divert you from the most strategic thing you should be doing right now to grow your massage client list.

    This punk loves shiny objects.

    Truth-be-told…

    …I love this punk.

    His name is Rocky, and I have to admit that I’m a lot like Rocky.

    I could write a 30,000 word article on how I chased shiny objects instead of doing the next important step for my business, but I’ll save that for another time.

    When a Blog Makes Sense

    So, those are some reasons for not doing a massage blog. However, there are times when starting a massage blog or any type of blog makes complete sense, like if you’re compelled to write and what you write about is connected to your business.

    But if you only have fire in the belly, this is probably what’s going to happen.

    Only Fire in the Belly

    You crank out your first 2 blog posts no problem. You’re friends and family are supporting you and you’re flying high.

    Then the third gets a little harder. The fourth one takes you a month to get out and by the time you get to number five you’re asking yourself: for who, for what?

    (Reference: Ricky Watters’ quote. In a game against the New York Giants, Philadelphia Eagles’ running back Ricky Watters didn’t go up for a pass in traffic where he would’ve more than likely been crushed by a defender. After the game, sports reporters asked him why he didn’t go up for the pass. His infamous response: For who, for what?)

    Good question, Ricky.

    If you’re losing your drive and passion to write your blog, why go on?

    What’s the pay-off?

    This is where the business part helps.

    The Little Equation
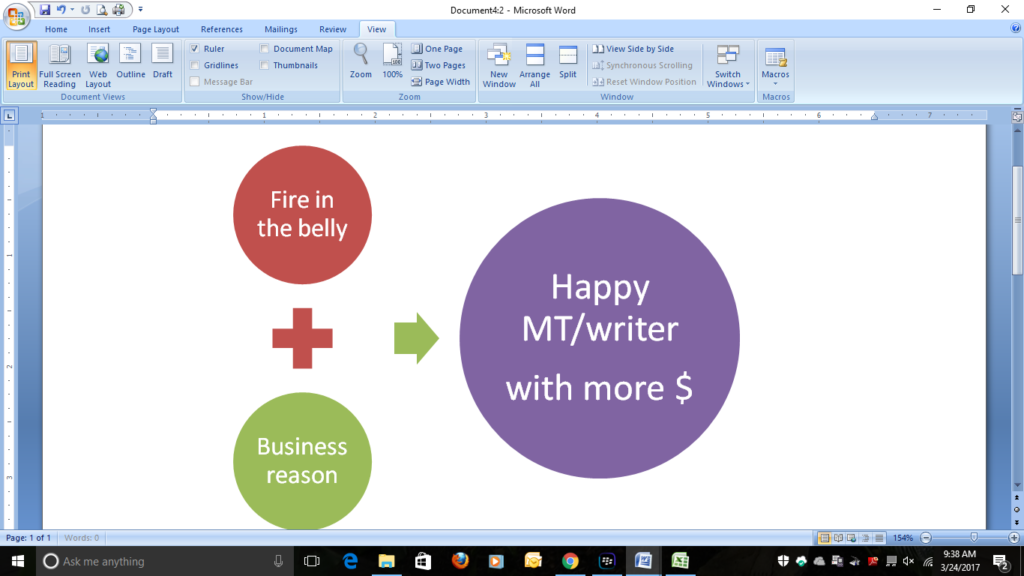
    This little equation took me a long time to get mainly because I thought writing should be driven by the sole desire to express something, and business (money) should be a byproduct.

    How noble I felt early on in my writing career…and hungry because I didn’t have any money…and depressed because no one wanted to read what I wrote.

    But I’m a happy writer when my massage blog produces more customers viewing our website, more customers calling our phone and more referral sources contacting us.

    Here’s what a blog could do for you and your business:

    The Benefits of a Massage Blog

    1. Add more credibility to your website.
    2. Build a stronger relationship with you and potential customers.
    3. Help convert more website visitors into customers.
    4. Improve search rankings for website/blog.
    5. Expand potential referral bases (other health professionals and businesses who see/read your blog).
    6. Re-engerize you about your massage practice.

    Plain and simple, when you write about massage, you learn more about massage. And when you do, you get excited about massage all over again.

    More Benefits

    1. Allow you to work on marketable writing skills.
    2. Set the stage for blog to article or blog to book.

    Think of all the material that you could be covering in your massage blog. I’m sure you can find an article or two or three or four to sell in there. I do this frequently.

    When you turn a blog post into an article you get to know a topic inside out, which is good for you and your client, and you have more money in your pocket after you sell the article.

    1. Be a primer for another blog you want to do.
    2. Keep you focused on your business path.

    If you work for yourself doing massage, you understand that it’s easy to get complacent on the business end of things.

    Have you ever had this happen? A regular client goes away for the summer…another one moves…a third one losses her job…and so on…  Next thing you know you’re down 5 clients per week because you were sleeping at the wheel. Now it’s going to take you a few months to recoup the losses.

    When you’re on schedule with your massage blog, you’re more than likely to be on schedule with your business needs which brings me to benefit # 11.

    Benefit #11–My Favorite

    1. Help you never have to work for someone else again.

    When I ask myself if I could work for someone else, my answer isn’t no.

    It’s HELL NO!

    I’ve tried. And it 100% not for me. Basically it comes down to this, I’m a God-awful, horrible employee because more than anything, I want to work for myself.

    A blog is another tool that helps keep me independent.

    Now that we got through the “why” to blog, what about the “what” to blog about?

    What to Blog About

    Take a deep breath because I’m going to ask you do some thinking and planning. This is important because you’re sure to fail if you have a couple of ideas that seem really cool but you don’t actually have a plan.

    First, pick one or two overarching topics to cover in your massage blog and that’s it.

    Why?

    Because one goal of your blog is to attract, inform and hold the attention of the viewers so that they call you for a massage.

    To me, generic information—the latest study said that massage might be better than chiropractic for pain relief but only on Tuesdays after the full moon…–is not giving my client anything that she can say wow, Mark is really giving me some valuable information or Mark really knows what he’s doing.

    In fact, I may be in danger of boring her to death.

    Go Deep

    Instead drill down on topics that are core to your massage practice. If you do relaxation massage focus in on relaxation massage and relaxation related topics. That will help attract the customers who want relaxation massage

    In addition, going deep into a topic will give you enough information to turn blog posts into articles that you can then sell.

    Let’s use a blog focused on relaxation massage as an example.

    Here are some relaxation massage and related topics:

    1. Where the heck did relaxation massage start?
    2. What makes relaxation massage relaxing?
    3. Is Swedish massage relaxation massage?
    4. Can Shiatsu and acupressure (static pressure) be relaxing?
    5. Why not drink a beer instead of getting a relaxation massage?
    6. Don’t be nervous; here’s what to expect when you get a relaxation massage.
    7. My first relaxation massage experience. (From your—the MT’s— history.)

    Include Topic-Related Material

    1. Is rejuvenation the same thing as relaxation?
    2. Meditation, yoga and massage have this in common.
    3. Which way of breathing helps you relax the best, yoga or Pilates?
    4. Instant mindfulness: an interview with a local Qigong teacher.
    5. How a novice can use imagery to relax.
    6. The easiest meditation method according to…

    The list goes on…

    What if Your Blog is Not About Massage?

    Same strategy applies.

    1. Know your audience.

    If you want to start a fitness blog for personal training side hustle, ask yourself: What do I bring to the table?

    Maybe you’re really good with stretches. So, a chunk of your blog content could be on stretching.

    Like: What are the safest stretches for the piriformis?

    2. Go deep instead of broad.

    Continuing with the example of stretching in a fitness blog, going deep could be writing a blog post like: Is passive piriformis stretching better than active stretching?

    The more you write, the more ideas you’ll have.

    And about a year in, you’ll never feel like your running out of ideas.

    Turn a Blog Post into an Article

    Now you can take one of these posts and expand it into an article or combine multiple posts to create an article.

    This is called re-purposing your work. It’s a great way to maximize the payoff for your writing effort.

    This is my most recent blog to article:
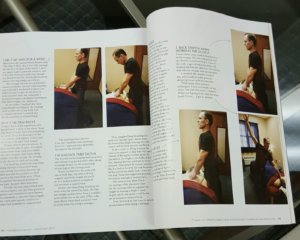
    Back to the relaxation massage example, here’s an idea for a massage magazine: Three ways for a stressed out client to do relaxation breathing while on the table with a sidebar on how to practice breathing and mindful meditation while driving.

    You can also re-purpose material on social media.

    Re-purposing Content on Social Media

    For our massage blog, I focus on runners because we bring in a lot of runners from the local running store.
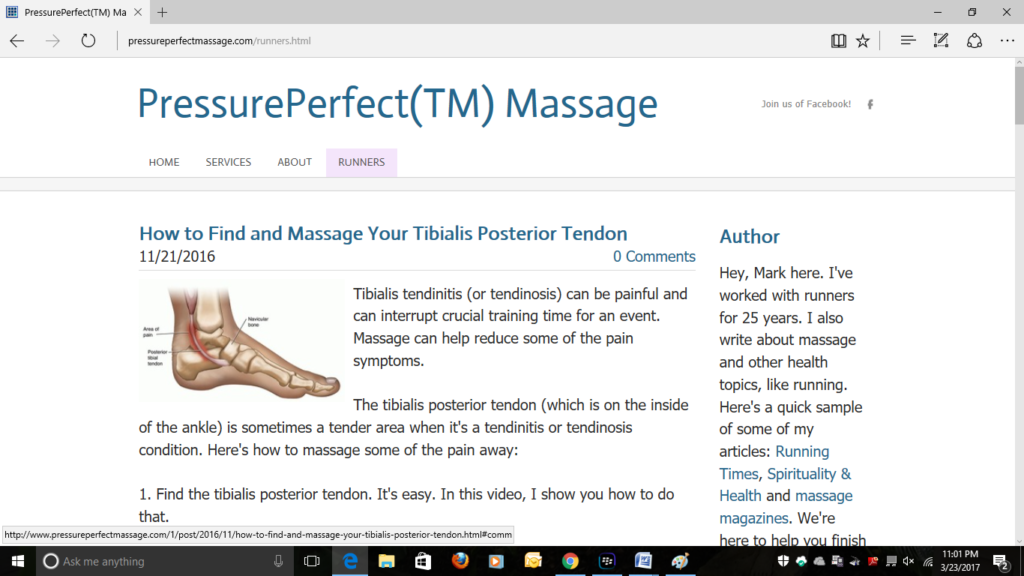
    I re-purpose some of the blog videos by posting them on our Facebook page or my YouTube channel. Sometimes I’ll send a link to a video in an email blast to our customers.

    You can check out my massage blog here.

    When Should You Post?

    Okay, that’s “why” and “what”, now let’s do “when”. When should I do my first post?

    Now.

    What?!

    I know, that’s a lot of pressure, but this tip is going to make it easier: For your first couple of posts, don’t pick hard things to write about. Draw mainly from your experience, like “My First Relaxation Massage” or “How to Do a Relaxing Self-Massage”.

    And keep it short 500 to 750—ish words.

    As you’re writing, keep telling yourself that you’ll be able to get a post out faster in 3 to 6 months. Which leads us to how often should you post?

    Personally, if it were just for my business, I’d start with posting once a month as a goal.

    But if the massage blog was related to establishing a writing side gig, I’d shoot for every other week.

    If you’re having trouble envisioning all this, try making a editorial calendar. That means pick a topic and due date and mark it on a calendar. A good editorial calendar is planned out months in advance. Talk about holding you accountable… Here’s what one looks like:
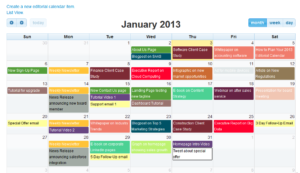
    Here’s what mine looks like now:

    Remember the shiny object syndrome…yeah…that’s sort of what happens to my writing schedule…

    If an editorial calendar reduces your stress, do it. If it adds to it, let it go for now.

    Enough “what”, let’s do the “how”.

    How do I Create a Blog?

    I’m going to show you two ways to do the “how”. One way is to do a Weebly blog and the other way is to do a WordPress blog.

    From here on out, whenever I say Weebly blog or WordPress blog, think website and blog rolled together. This will make sense when you watch the videos.

    Here’s how to pick when deciding between Weebly or WordPress.

    If you want super easy and you’re only planning on doing a blog for your business, go with Weebly.

    If you’re more serious about blogging and writing, go with WordPress.

    And if you still can’t decide, jump ahead to the videos at the end of this article and have a peek.

    Next, if you have a website up and running already, check to see if there’s a blog option in your website builder. If so, you’re good to go. Just look for blog tutorials using your website builder on YouTube.

    If you don’t have a website or your website doesn’t have a blog option or you just want to start new, I’m going to show you how to set up a Weebly blog and a WordPress blog.

    It takes two steps.

    Step #1: Pick a Website Host and Domain Name

    A host is a company that provide web space for you on a server.

    There are a ton of hosts out there. Here’s a list of some popular Web-Hosting-Services.docx (5 downloads) .

    I use Bluehost for a few reasons.

    1. It’s one-stop-shopping. You get your domain name when you sign up with them.
    2. It’s really easy to get started.
    3.  And they provide really good support.

    About needing support…I’m like Lucy in the chocolate factory when it comes to technology. Once I erased my entire WordPress blog. Oops.

    When I called them (about 1 AM on a Sunday), they restored my WordPress blog within a few minutes.

    Since then, I seriously abuse their phone service. I call them about everything, no matter how small the detail.

    They don’t seem to mind–either that or they’re playing it safe because the conversation is being recorded.

    This is my BlueHost link. If you do buy their hosting service through my link, I will get a commission, but you don’t pay more for using the link and BlueHost has a money back guarantee.

    If you choose to go through my link and follow my step-by-step, first I want to say thank you! I really appreciate you supporting my work.

    I also want to let you know that I got your back.

    In other words, I won’t leave you high and dry if you sign up through my BlueHost link.

    Why?

    Because when I first started blogging I was lost, and then I spent a lot of money trying to get un-lost.

    I want you to skip the lost part.

    So, whenever I have a new article or tutorial about blogging, I’ll make sure that you get it.

    And if you get stuck with blogging using BlueHost as your hosting service, just email me or ask your question in the comment section below.

    I promise to make your blogging experience as smooth and painless as possible.

    Think of it as DIY with some extra help from me:-)

    Also, if you haven’t checked out my DIY Website Guide, you may want to if you’re blog is going to be part of your website. BUT for now, if you want get cranking on your blog just continue on. We can add in the website later no problem.

    Okay, if you want to sign up through my Bluehost link and hate dealing with installation of any kind like my friend Bless…
    …just email me, and I’ll set up your blog so that you can make your first post. If you want to do it yourself (it’s not hard to do), read on.

    Quick Set-Up

    Let’s blow through this set-up. If you go to Bluehost, this is the first screen you’ll see:

    Click on the “Get Started” and this will be your next screen:
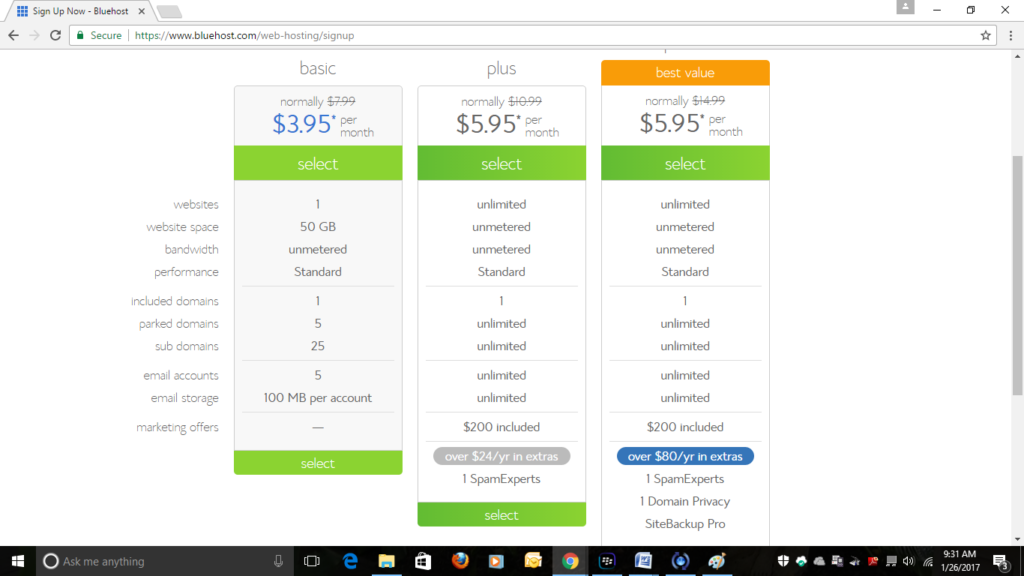
    For now, just select the Basic (the cheapest plan) for $3.95/month. You’re not locked in to this package. We will drill down and figure out which package is best for you after the next step.  Once you select a package, you’ll be taken to this page:
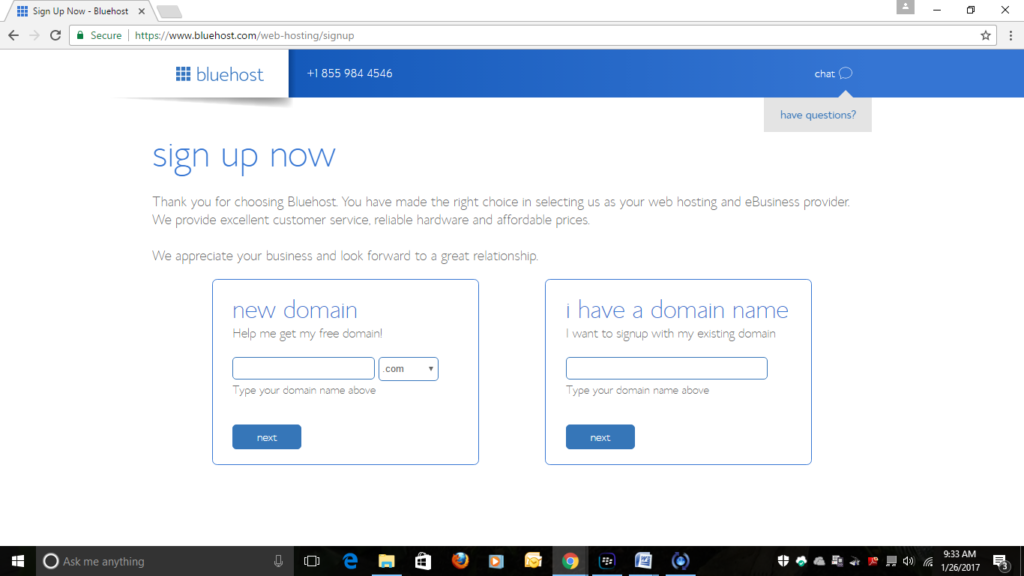
    If you have a domain name enter it into the box to the right. If you don’t, decide on one and use the box on the left.

    Suggestion: if your domain name is taken, try adding words, like “massage” or “massage therapy”. For us, “pressureperfect” was taken, but “pressureperfectmassage” was not.

    If you can’t decide on a domain name just hang out on the page (about 10 seconds or so) and a pop-up will appear which will allow you to continue on without choosing a domain name.

    After you select your domain name, you’ll be taken to the Create Your Account page.

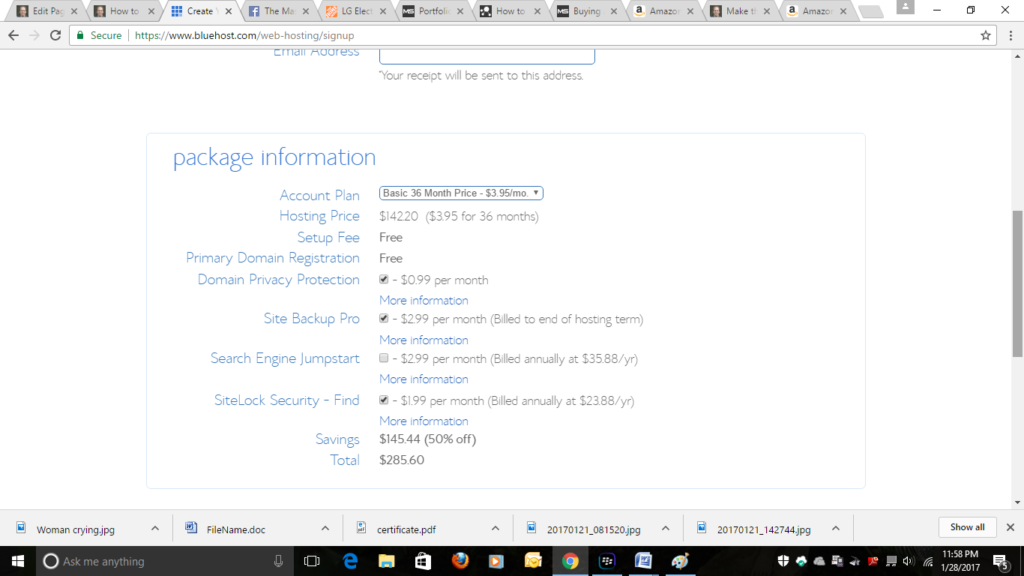
    Once you fill in the account information, you’ll scroll down to the payment section. It looks like this:
    Paying the Least $ as Possible

    Okay, so you want to pay attention here. Look at where it says Account Plan. You’ll see that BlueHost has you connected to the cheapest plan at $2.95 per month; however, it’s for 36 months.

    With Bluehost you pay for everything upfront. So, over the long run you’ll save money with the 36 months plan, but it’s going to be a bigger initial expenditure than the 12 month plan.

    That said, for getting your website up and running for the least amount of money possible, I’d choose the 12 month plan.

    Okay, once you choose the length of your plan look below Account Plan.

    See all those boxes checked? Un-check them and save yourself more money.

    If you’re following my suggestion of 12 month plan with boxes unchecked, your total should be $71.40 and here’s what your screen should look like:

    Once you enter your credit card information, you’ll be asked to create a username and password.

    Then you’ll be offered more things to buy. Pass on that.

    Hit the confirm button.

    Done!

    You’ll soon have a blog (with a domain name that you own) that will cost you less than $72 for the first year.


    BlueHost offers two options for blogs: Weebly and WordPress.

    BlueHost automatically installs WordPress to the first domain name you have with them.

    Which one should you use?

    If you are going to be a serious blogger, I would recommend using WordPress to build your blog.

    If you are going to be an occasional blogger and need super easy, use Weebly.


    Build a Blog

    So, which one are you going with Weebly or WordPress?

    Weebly Blog

    Okay, if you’re going with Weebly your next step is to uninstall WordPress that was automatically installed to your Domain name.

    Omg, Mark, you sucker punched me! I can’t uninstall anything!

    Hold on. This is how we are going to make it easy.

    Call BLUE HOST support: 888-401-4678

    Say to the agent: “I want to use the Weebly sitebuilder for my website, so would you please uninstall WordPress for me?”

    The agent will uninstall WordPress. (It should only take minutes.)

    When that’s done ask the agent: “Can you please show me how to navigate to my Weebly site builder?”

    That’s not hard.

    Choose the free version of Weebly to use. Once you’re on your Weebly start building!

    You can use two approaches to starting your Weebly massage blog.

    One approach is to build your website first, then add the blog. The other approach is to just start the blog and let that serve as your website for now. You can always build the website later.

    Pretty freakin’ cool, huh?

    Oh, and nothing is set in stone. If you do a Weebly blog now and decide that blogging is really working for you, you can always switch over to WordPress (the better blogging platform) later. No problem. I’ll show you how to do that in upcoming videos.

    Here are the Weebly Blog tutorials;

    How to do Your First Weebly Blog Post (Blog is the Website)

    [embedyt] https://www.youtube.com/watch?v=yYnvVGDdAi8[/embedyt]

    How to do Your First Weebly Blog P0st (Blog as Part of the Website)

    [embedyt] https://www.youtube.com/watch?v=PmP2awGKyC8[/embedyt]

    WordPress Blog

    Now for WordPress. Just a heads-up, it won’t be like painting with Bob Ross.

    Actually, you’re going to get in there and look at the guts of the blog and say “Oh, crap”. BUT I’m going to make it really, really easy for you because I’ve done all the “Oh, crap”-ing already and have figured things out.

    Another heads-up, once you start getting the WordPress system down, you might just get addicted. It’s like decorating a house.

    But for now, let’s keep it simple and use the generic WordPress theme (appearance) that was installed automatically to your domain name when signed up with BlueHost.

    You can change themes (appearances) later. Some themes cost a small amount of money, but a lot are free.

    *In this video you will see that I’m first installing WordPress: DON’T DO THAT. Remember WordPress (and it’s generic theme) we’re automatically installed when you signed up.

    [embedyt] https://www.youtube.com/watch?v=X3sD8tcuIYs[/embedyt]

    Not bad, huh?

    But there’s one more thing you’ll need to know, when you’re ready to publish your first post, your gonna be peeing yourself.

    Who’s going to read it? Are they going to hate it? Do I hate it? Did I do a good job proofreading?

    Here’s the thing, you’re always going to be second guessing yourself.

    Publish it.

    You can always go back and make edits at anytime.

    Here’s what happens to you when you publish it:

    Oh, yeah! You’re gonna feel good!

    When you get a chance, send me a link. I’d love to see what you’ve done!

    The Short Version

    Here’s a recap of the whole shebang without the “talking you through all the parts”.

    1. Pick a Web Host.

    I recommend Bluehost.

    1. Pick a Domain Name.

    With Bluehost, you do this during the same step when you sign up with them.

    Suggestion: if possible your domain name should be the name or close to the name of your business.

    If your domain name is taken, try adding “therapy”. For example, MonicaMassage.com is taken. Try MonicaMassageTherapy.com.

    Or stick with MonicaMassage but add a different suffix: MonicaMassage.net or MonicaMassage.biz.

    1. Set up your massage blog on Weebly or WordPress and write your first post.

    Here are the tutorials to get help you get your first blog post out there. Remember that it doesn’t have to be perfect. In fact, it won’t be–but it will work!

    Weebly #1: How to do Your First Weebly Blog Post (Blog is the Website)

    Weebly #2: How to do Your First Weebly Blog Post (Blog as Part of the Website)

    WordPress: How to do Your First WordPress Post

    One more time!

    P.S. If you’re struggling with something, jump on my email list. Once I know what you need help with, I can send the right videos, tutorials and articles. The email group is free and you can unsubscribe anytime.

    [contact-form][contact-field label=’Name’ type=’name’ required=’1’/][contact-field label=’Email’ type=’email’ required=’1’/][/contact-form]

    .